If you're new to Windows 10 or have recently switched from Mac, you may be wondering how to trim videos on Windows 10 without using third-party software. Fortunately, Windows 10 comes with built-in tools that make video trimming quick and easy. In this article, we'll introduce the Photos app and Movies & TV, two hidden video editors, along with a lossless video trimmer for more advanced editing needs.

- Part 1. Trim Videos on Windows 10 with Photos App
- Part 2. Trim Videos on Windows 10 with Movies & TV
- Part 3. Trim Videos on Windows 10 with Joyoshare VidiKit [Lossless Output]
- Part 4. FAQs about Trimming Videos on Windows 10
Part 1. How to Trim a Video on Windows 10 - Photos
Windows 10 comes with a default app called Photos that has a hidden editor to help basically trim videos. If you don't want to install any extra software, then it can be the best option. Now we'll walk you through the steps to quickly trim and create home-made videos. According to your actual needs, get to know whether to trim a part or multiple parts on Windows 10 using this app.
- 😄Pros
- Free and pre-installed on Windows 10
- Easy-to-use and intuitive interface
- No software download requirement
- ☹Cons
- Lack of advanced editing features
- Limited supported video formats: MP4, MOV, AVI
1.1 How to Trim a Part from a Video
Learn how to trim a video on Windows 10 here if you only want to remove unnecessary video segments at the beginning or the end. This can help you to leave only the middle part.
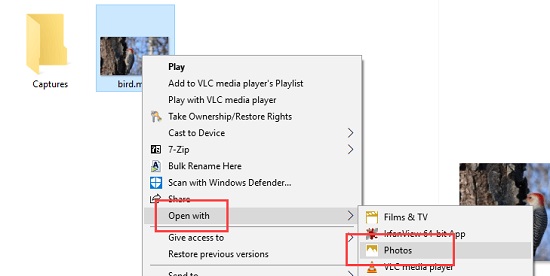
Step 1: Open Photos App. Firstly find the video file you want to trim on your computer drive and then right-click Open with → Photos.

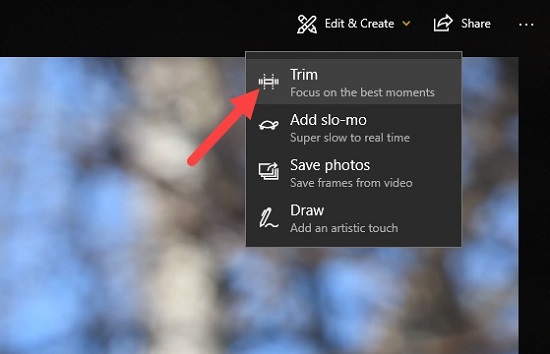
Step 2: Adjust Settings. Once it's launched, click on the video and you'll see a menu bar come across the video. Click Edit & Create → Trim.
Step 3: Set Trimming Section. Now simply move the start and end sliders to select the video segment you want to keep. By clicking on the "Play" icon, you can preview how the video looks after trimming.
Step 4: Start to Trim Video. When the trimming part of the video is set ready, click on the "Save a Copy" or "Save as" button at the top. Depending on the file size, quality, and resolution, it can take some time to create a copy of the trimmed video for you.
Step 5: Edit the Name of the Trimmed Video. Once done, go back to the same folder where you've saved the original video file, and you will find the newly cut video with "Trim" at the end of the file name. You can then rename the trimmed version as you like so that you can easily recognize it later.


1.2 How to Trim Multiple Parts of a Video and Combine Together
Supposing there are different fragments that you'd like to trim out from the same video source and combine them further, here we will demonstrate how to trim multiple parts using Photos app on Windows 10.
Step 1: Open Video Editor. Go to the search button in the lower left corner of Windows 10 to type "Photos" or "Video Editor".
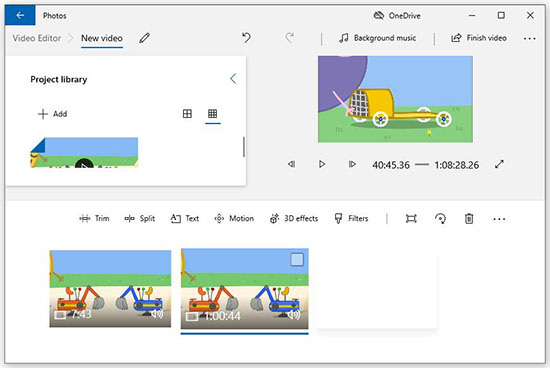
Step 2: Create New Project and Add Video. Click "New Video" → "New Video Project" and name your video. Then you can hit the "+ Add" button to import your video file from the PC, collection or the web.
Step 3: Trim Video on Windows 10 Photos App. Drag the video file from the "Project library" to the "Storyboard". You can drag the same source many times. Then select one in the storyboard → click "Trim" option" → move the blue sliders to choose desired section → click "Done". Repeat the operation to trim multiple clips.
Step 4: Save Multiple Videos into One. Now you can click on the "Finish Video" button in the upper right corner → customize video quality and click "Export" to save all sections into a whole one.

Part 2. How to Trim Videos on Windows 10 - Movies & TV
You may not realize that there is another default video cutter for Windows 10 - Movies & TV, that functions well to trim videos without effort. When you're playing and watching a video file in this tool, trim straightly on your Windows computer by following these simple steps below.
- 😄Pros
- Free and pre-installed on Windows 10
- Simple to trim videos
- No need for software installation
- ☹Cons
- Limited video editing features
- Only support a few video formats
- Step 1: Confirm the target video and open it with "Movies & TV" on Windows 10.
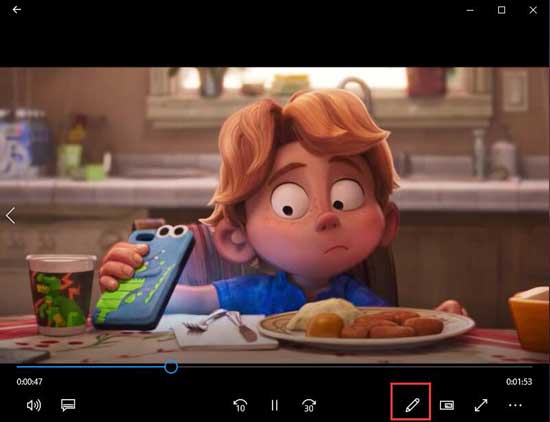
- Step 2: Find the pencil-shaped Edit icon in the bottom right corner of the playback window.
- Step 3: Click Edit option and select "Trim" tool in the popup menu.
- Step 4: Your video will load up in the Photos app and stay in the trimming window.
- Step 5: Drag the video over the timeline in playback windows to complete the trimming process and finally save it on Windows 10.
Part 3. How to Trim Videos on Windows 10 without Losing Quality
Joyoshare VidiKit is a professional video editing toolbox with a sought-after video trimmer to cut videos in 1:1 output quality on Windows 10. It enables real-time video playback for instant previews during trimming and enhances precision by expanding the timeline view for frame-level adjustments. With the advanced technology, you can even enjoy 60X faster speed to efficiently finish video editing operations.

- Trim videos on Windows 10 with high accuracy
- Trim videos without losing quality at 60X cutting speed
- Split videos anywhere, like beginning, middle, and end
- Support a wide range of streaming video formats
- Merge all small fragments into a single file
- Built-in editor to repair, compress, convert, watermark, etc.
Step 1 Add video file(s) to the program
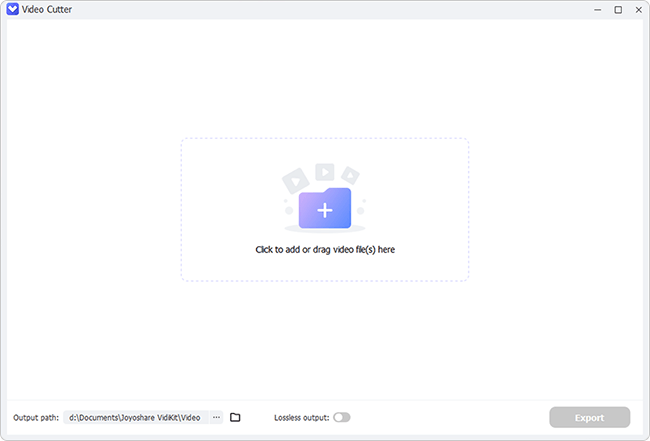
Launch Joyoshare VidiKit on Windows 10 and choose "Video Cutter" under Video functionality section. Simply drag and drop a video file that you'd like to cut into the center area of the program. Or click the "+" button to select the target file from the local folder.
Step 2 Trim a video on Windows 10
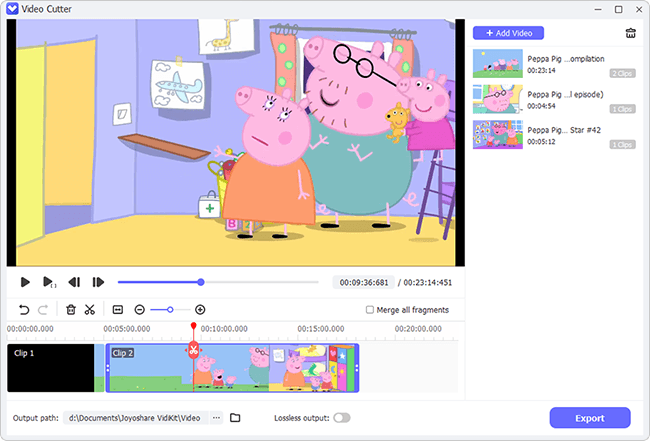
All selected video files will be displayed in the right-hand column. To proceed with file selection, locate the desired video from this list. You can then play the video and pause it at any point as needed. Simplys use the Split tool to divide the video into smaller clips. Furtherly, you can identify and delete any unwanted segments by right-clicking the "Remove" option.
Note: Joyoshare VidiKit is equipped with an advanced built-in media player that enables real-time playback of video files. To ensure precise trimming, you can utilize the "Zoom To Fit" feature or set specific start times accurate to the millisecond.
Step 3 Decide how to output video(s)
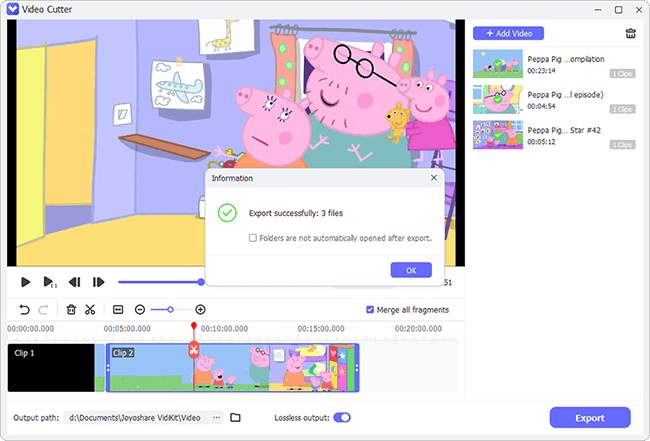
If you have split the same video source into multiple clips, you may wish to check the "Merge all fragments" option to combine them into a single file. Besides, you can enable "Lossloss output" option to keep original video quality without any degradation.
Step 4 Save trimmed video(s) on Windows 10
Now click the "Export" button in the bottom right corner to save the trimmed video file to your local folder in Windows 10. Simply play any video and see if it meets your needs.

Part 4. FAQs about Trimming Videos on Windows 10
Q1: Can I trim videos in Windows 10 without installing software?
A: Yes. Windows 10 comes with built-in video trimming tool in both Photos and Movies & TV apps. You can use any one directly without downloading and installing third-party software.
Q2: Can I trim a video in Windows Media Player?
A: No. Windows Media Player is a video and audio player that does not have a built-in video trimming feature. To cut out selected fragment, you need to install SolveigMM WMP Trimmer Plugin.
Q3: How do I trim a video without re-encoding in Windows 10?
A: To ensure zero quality lossless, you can use Joyoshare VidiKit to trim videos on Windows 10 without re-encoding.
Conclusion:
All the cutting worries can go away as long as you carefully check what we offer in this article. The default Photos app on Windows 10 can help trim not only a part of your video but also multiple clips, which can be a best solution to take into consideration. Also, you can use free Movies & TV on your PC to easily get this job done. For better trimming experience and 100% original quality output, Joyoshare VidiKit can be used as well. No matter which solution you ask to trim video on Windows 10, don't hesitate to try!
