Trimming MP3 files is essential for refining audio recordings, creating personalized ringtones, or removing unnecessary sections from lengthy tracks. Whether you are a video creator, podcaster, or music lover, using a good solution to trim MP3 files can greatly enhance your audio listening experience. If you're using Windows 10, there are multiple tools available, both built-in and third-party, that can shorten MP3 files effectively. Have no idea? Now this post will guide you how to trim MP3 files on Windows 10 without sparing too much effort.
- Method 1. Trim MP3 on Windows 10 Using Joyoshare VidiKit [All-in-one Toolkit]
- Method 2. Trim MP3 on Windows 10 with Windows Movie Maker
- Method 3. Trim MP3 on Windows 10 via Windows Media Player
- Method 4. Trim MP3 on Windows 10 with VLC Media Player
- Method 5. Trim MP3 on Windows 10 Using Audacity
Part 1. Trim MP3 on Windows 10 Using Joyoshare VidiKit [Lossless]
Joyoshare VidiKit can be a decent MP3 Trimmer for Windows 10. It has the ability to trim MP3 files with precision while maintaining original audio quality. By means of it, you can cut large MP3 files into smaller segments, remove unnecessary parts, make ringtones for smartphones, and merge multiple tracks into a single one. Remarkably, Joyoshare VidiKit can support nearly all audio formats like MP3, FLAC, AIFF, M4R, AU, MKA, WAV, WMA, APE, OGG, AAC, AC3, M4A, etc. Whether you're an amateur or professional, this software provides a high-efficiency, reliable, and smooth trimming experience.

- Trim MP3 files without re-encoding
- Merge and convert audio files for free
- Record MP3 from system and microphone
- Extract MP3 from video files in lossless quality
- Add soundtrack to video, adjust volume, denoise, and more
Valid until May 31, 2025
Copy the coupon and paste it at checkout.
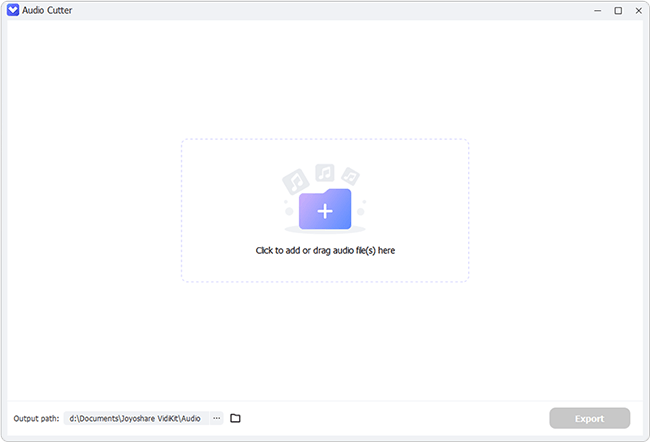
The following is the simple step-by-step tutorial to show you how to trim MP3 files on Windows 10 with the help of Joyoshare Audio Cutter. Before getting started, please make sure you have downloaded and installed this software - Joyoshare VidiKit, on your PC.
Step 1 Import target MP3 file to VidiKit
After completed program downloading and installation, launch Joyoshare VidiKit on Windows 10. Simply open Audio Cutter under Audio section and add MP3 file(s) by clicking the "+" button. Or directly drag and drop the file to the program.

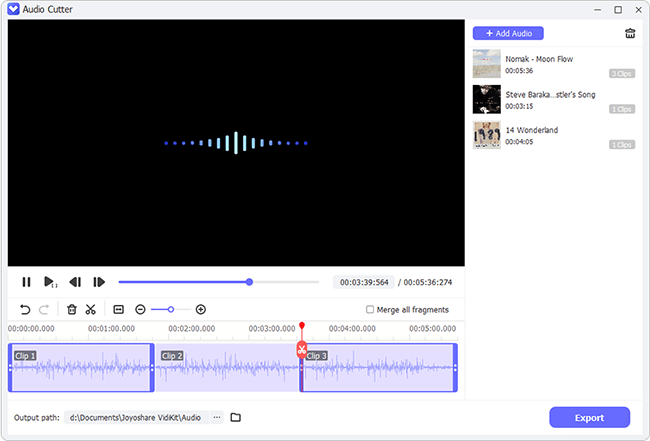
Step 2 Select and trim MP3 in Windows 10
You can simply move the blue sliders to select both start and ending points. Or play the audio first and then enter the specific start time in millisecond precision. Once you locate where you want, use the Split tool to trim the large file into smaller portions. You can choose unwanted fragments and right-click to Remove them.
Note: If you want to merge the remaining fragments after removal, you can check "Merge all fragments" option.
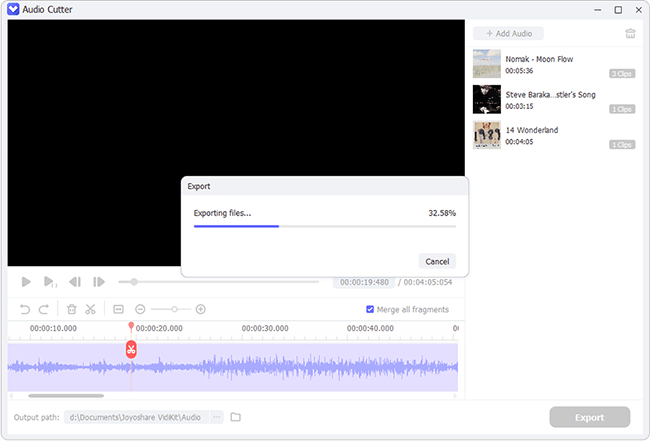
Step 3 Save and export MP3 file on Windows 10
Now click the "Export" button to save trimmed MP3 file(s) on Windows 10. Wait a while until the conversion is completed. Then you can find shortened MP3 file(s) by browsing through the local folder.
Part 2. How to Trim MP3 on Windows 10 via Windows Movie Maker
If you're a Windows user, you probably have Windows Movie Maker pre-installed on the computer. This tool provides a straightforward way to cut unwanted sections from an MP3 file while also offering basic audio enhancement features. You can adjust the start and end points of the track, apply fade effects, and export the final trimmed audio with ease.
- 😄Pros
- Free and pre-installed on Windows
- Simple to trim audios
- Support adding audio effects
- ☹Cons
- No longer officially supported
- Limited to basic trimming
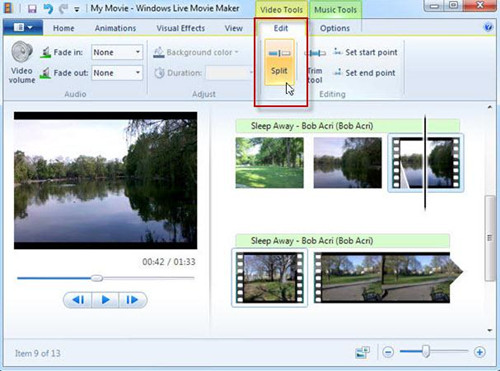
Step 1 Add MP3 music file
Launch Windows Movie Maker program first and then click "Add music" option to import an MP3 file that you'd like to trim.
Step 2 Trim MP3 file
Right click on the audio file and choose "add to Timeline", or just drag the file to the Timeline. Set the start and end trim point by dragging the cursor.
Step 3 Save trimmed MP3 audio
Once you get the desired segment, head to File → Save movie → Audio only to save the trimmed file in MP3 format.
Part 3. How to Trim an MP3 File in Windows Media Player
Windows Media Player provides no way to trim MP3 files directly. To do it, you have to rely on third-party plugins like SolveigMM WMP Trimmer. This allows you to cut unnecessary sections, extract certain audio parts, and refine MP3 files directly within the familiar Windows Media Player interface.
- 😄Pros
- Built into Windows 10 without installation
- Work with plugins for added functionality
- ☹Cons
- Rely on third-party plugins for trimming
- Only provide basic editing features

Step 1 Install SolveigMM WMP Trimmer Plugin
You should firstly download and install the plug-ins, SolveigMM WMP Trimmer Plugin, on your Windows 10. Simply run Windows Media Player to enable it in Tools → Plug-ins → SolveigMM WMP Trimmer Plugin.
Step 2 Add an MP3 file
Open your MP3 file via Windows Media Player and click on "Edit File" option to view it (Or head to "Open Media File" in the plugin).
Step 3 Select a target part to trim
Separately slide to choose start and end positions by clicking on the "Add marker" option. Then use the Trim button to trim MP3 file in Windows Media Player.
Step 4 Save and output trimmed MP3
Now export the trimmed MP3 file by clicking File → Save as... in Windows Media Player.
Part 4. How to Cut MP3 Files on Windows 10 Using VLC
VLC Media Player is a free, open-source, cross-platform media player that offers basic MP3 trimming through its recording feature. If you don't mind audio quality loss, this solution can fit for your audio trimming need.
- 😄Pros
- Free and open source
- Support a wide range of file formats
- ☹Cons
- Record audio manually to trim MP3
- Lack of precise trimming
- The audio quality can be lossy

Step 1 Launch VLC
Open VLC media player on the PC and go to View → Advanced Controls.
Step 2 Import an MP3 file
Click on the Media → Open File to import your target MP3 file or just drag-and-drop the file to VLC.
Step 3 Record to trim out an MP3 section
Now play the MP3 file and drag the slider to designated position that you want to trim. Simply click Shift + R to record the segment.
Step 4 Export recorded MP3 segment
After recording the wanted part, click the "Record" button to stop the recording, and the trimmed MP3 file will be saved in "My Music" folder on your computer.
Part 5. How to Trim MP3 Files on Windows 10 Using Audacity
Audacity must be a familiar tool to most users. It functions well on Windows, Mac and Linux as not only an audio capture but also a professional editor to help edit multiple tracks. Aside from the basic cutting option, it can do more than you know, such as adjusting sound quality, removing noise, applying effects, etc. Now, you can check how to trim MP3 with Audacity.
- 😄Pros
- Free and cross-platform tool
- Feature-rich audio editor
- Support accurate audio trimming
- ☹Cons
- Hard for beginners to get started
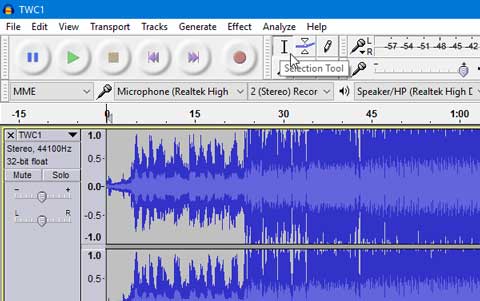
How to Cut Audio in Audacity
Here you can learn how to separately cut the beginning and the end, or directly extract to get desired audio track.
Read More >>Step 1 Add MP3 file to Audacity
Run Audacity on your Windows 10 and go for File → Open... to import your local MP3 audio.
Step 2 Select the beginning or end of MP3
Click the "Selection Tool" to spotlight a section in the beginning or end of your imported MP3 file by pressing and dragging with your mouse's left cursor.
Step 3 Remove and save MP3
Head to "Edit" in the top menu and click Remove Special → Split Delete to get rid of your chosen part. Next, save your MP3 with File → Export → Export Audio or Export as MP3.
Conclusion
It's simple to trim MP3 on Windows 10, whether you need a quick cut or precise editing. VLC and Windows Media Player offer basic trimming, while Audacity and Joyoshare VidiKit provide more advanced features for professional-grade editing. With these tools, you can remove unwanted sections, create ringtones, and enhance audio quality effortlessly. Choose the best option based on your needs and start trimming your MP3 files with ease.
