Windows Media Player is exclusively developed for media files playing on Windows devices. No editing functions are accompanied by it. But many times, quite a few Windows users wonder how to cut video in Windows Media Player. How could this be possible without editing ability? Don't be in a hurry to give up when told that Windows Media Player comes with no built-in editor. With the help of an additional trimmer plugin, it could grant your wishes. Check out the following content to achieve trimming a video in Windows Media Player.

- Part 1. Cut a Video in Windows Media Player
- Part 2. Trim a Video in Windows Media Player Alternative
Part 1. How to Cut Video in Windows Media Player
Windows Media Player itself is a multimedia player program, which actually comes with the inability to cut and edit video files. However, it can be equipped with a plugin by the name of SolveigMM WMP Trimmer Plugin, thereby functioning as a free video trimmer to cut videos without hassle. Below are details on how Windows Media Player works to trim video clips by aid of the third-party plugin. Let's see and learn together.
Step 1 Install SolveigMM WMP Trimmer Plugin

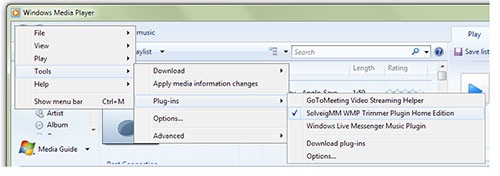
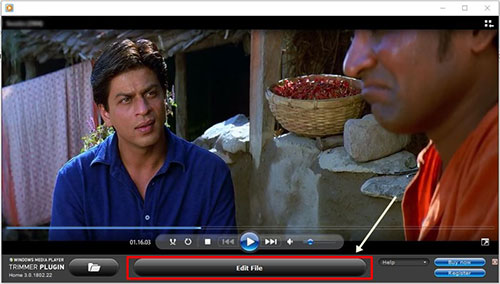
The first thing you have to do is installing SolveigMM WMP Trimmer Plugin. It officially develops Home Edition and Business Edition. According to your needs, choose one to download and install. After the installation, there will appear the "Edit File" option when you open your video in Windows Media Player. Suppose the editing option is not presented, manually enable the trimmer plugin by "Tools" > "Plug-ins" > "SolveigMM WMP Trimmer Plugin".
Step 2 Start to cut video file

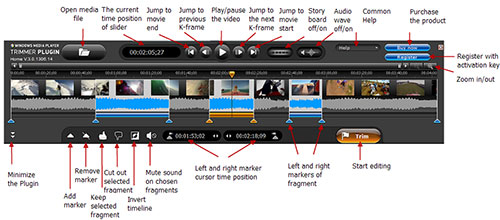
Now, tap on "Edit File" button to expand the trimmer plugin panel as shown below. Play your video and identify the video segment that you don't want. Move the orange timeline and choose "Add Marker" icon to confirm the unwanted part, then touch "Cut out selected fragment" button shaped by a thumb down icon.

Alternatively, drag the orange time slider and use "Add Marker" to specify the video segment that you want to keep, and then click the "Keep selected fragment" button with the shape of a thumb up icon, to cut video.
Step 3 Export and save video to Windows
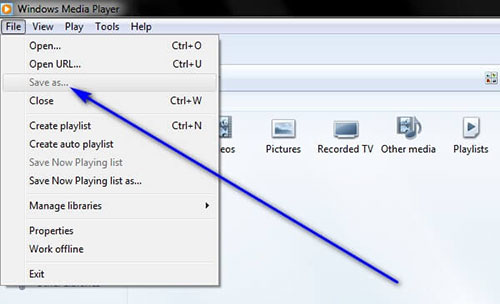
In the final step, just press the "Trim" button to start the cutting process. After that, go to "File" and followed by "Save as" to set the output file and then the trimmed video will be saved to your local system.

Note: There will inevitably be some limitations in cutting video using Windows Media Player - SolveigMM WMP Trimmer Plugin. For instance, the trial version of trimmer plugin places 10-minute output restriction, Windows Media Player sometimes fails to open with the plugin installed, or Windows Media Player crashes while cutting video file. In order to shun these awkward circumstance, the following shares a foolproof alternative. Keep reading to find out the details.
Part 2. How to Cut a Video in Windows Media Player Alternative
Served as professional video editing software with strong compatibility and usability, Joyoshare Video Cutter is introduced here as the alternative to Windows Media Player for video cutting. This all-round video cutter is supplemented with consummate cutting technology. Both simple and precise video cutting task can be perfectly completed by it. Also, it comes with 2 cutting modes. Whether you need to trim your video without re-encoding or plan to cut and edit video file in a customizable manner, it can live up to your expectations. An awful lot of video formats are accepted. You get permission to cut almost any video without losing quality using it.
- Cut and trim any video without re-encoding on Windows and Mac
- Output video to other formats and formats accepted by portable devices
- Cutting technology with 60X speed and millisecond precision to cut audio/video
- Other editing options like crop, rotate, adjust, control, watermark, subtitle, merge, etc
- Used for the purpose of customizing codec, frame rate, resolution, bit rate, etc
-
Step 1 Upload video to Joyoshare Video Cutter
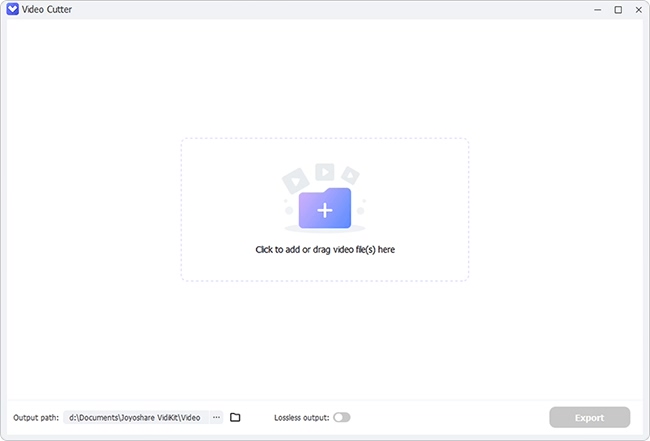
Please click the above button of "Try It Free" to download and install Joyoshare Video Cutter beforehand. Run it on your computer. Then, click on "Open" button to import the video file that you prepare to cut. More simply, drag and drop the video to the program for cutting.
-
Step 2 Cut off any part from video
The uploaded video will play automatically. Preview it and pause on the time point from where you want to start cutting. Next, use the "Set Segment Start Time" or directly slide the left time handle to mark the start point. Likewise, determine the end point by the "Set Segment End Time" icon or moving the right time handle. Any part beyond the yellow timeline is going to be cut off from your video. To cut video more precisely, it is suggested that you choose the Key Frame" option to specify the cutting segment and manually enter specific start time and end time to perform cutting task.

-
Step 3 Select the output format
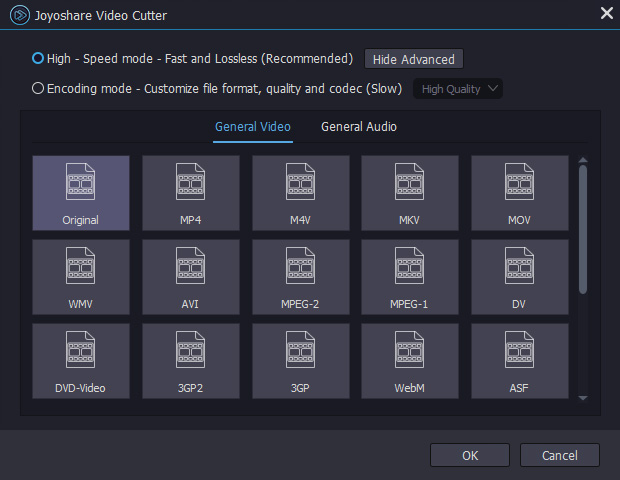
After that, hit "Format" button to choose an output format for the trimmed video. You are allowed to do it in either high-speed mode or encoding mode. Without the requirements of video editing and file format customizing, it is advisable that you opt for the export format from the high-speed mode, which makes the cutting process fast and lossless.
-
Step 4 Save the trimmed video to local
On the last go, leave for the main interface and press "Start" button to export the trimmed video to system. Upon completion, quickly preview the new video by clicking the "Open The Output Folder" icon.
