You may wonder how to extract audio from video without damaging original quality. Explicitly, there might be times you have to extract audio from MP4, cut video to MP3 or something similar. Being easier than you think, you can carry out any extracting task online or offline at your own will. To keep you from putting in too much time and effort to hunt for a reliable audio extractor, we attach a quick guide for these 6 tools for your kindly reference as below.
- Part 1. Joyoshare Media Cutter
- Part 2. VLC Media Player
- Part 3. iMovie
- Part 4. Format Factory
- Part 5. Freemake Audio Converter
- Part 6. Online Audio Converter
- Comparison
- FAQ
Why to Extract Audio from Video?
With the vigorous development of media software, audio extraction from video is not a big deal. You might need to rip audio from video for multiple purposes. Probably, you just gather background audio like birds chirping, dog barking, joyful laughter, etc. for your own video from movies. Or, chances are that you want to create individual audiobook by detaching audio files from inspiring TED talk videos. If you are a music enthusiast who are fond of making a collection of interlude songs of classic movies, an audio extractor is perfectly a helping hand for you to draw such music tracks from movie videos when they are not shared on music service. Of course, ripping music from a video as a ringtone is absolutely a great idea for most people.
Part 1. How to Extract Audio from Video in Joyoshare Media Cutter
As a desktop audio extractor, Joyoshare Media Cutter can be your top priority to rip audio from video securely. No matter what kind of media file you import to this program, it is capable of helping you cut off needless fragments to make size smaller.
Essentially, it can do well in combining distinct portions into a new one after your trimming. Aside from automatically keeping high quality, Joyoshare audio extractor also has ability to customize format, quality, codec, bitrate, channel, etc. as you please. Alternatively, it provides access to output audio track to any popular format, for instance, MP3, M4A, AAC, OGG, WAV, WMA, M4B, MKA, FLAC, AIFF, etc.
Taking the aid of it, you are empowered to setup cutting area accurately. Undoubtedly, you will be shocked at its fast speed, which can up to 60X.
Key Features of Joyoshare Media Cutter
Separate audio from video in high quality
Support saving audio file in any format or device
Split and merge audio/video file in precise way
Carry out extracting assignment at up to 60X faster speed
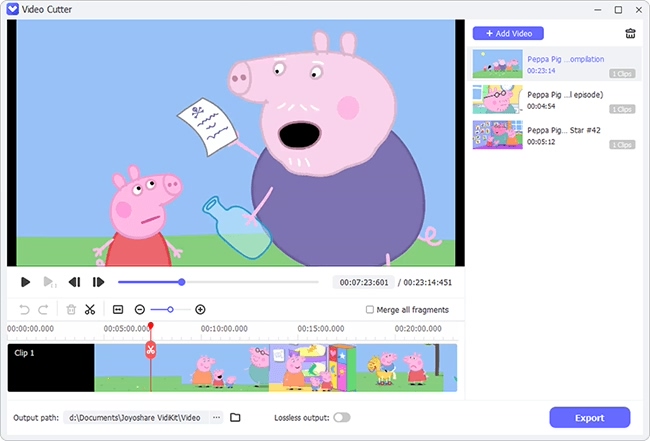
Step 1 Import any video file into Joyoshare Media Cutter
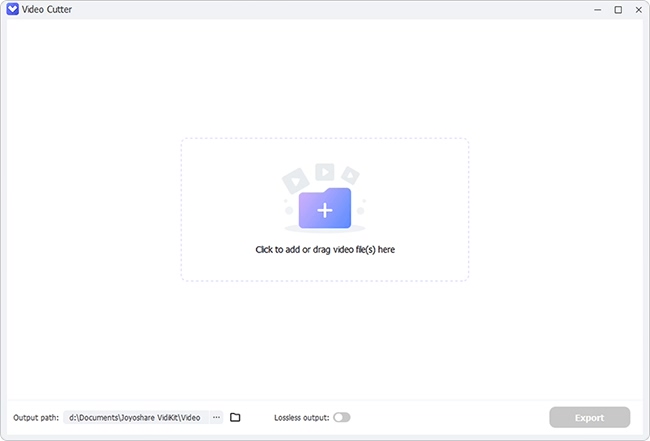
Make sure that you have already installed Joyoshare Media Cutter on your computer ahead of time. Directly launch it to make it work for you. You can hit the "Open" button to select video file from local hard drive. Of course, it's also feasible to drag and drop the required video.

Step 2 Removing unwanted segments from original video
To only get favorite parts left, you can firstly get rid of unnecessary pieces. Move the slider key to decide both beginning and end points. Additionally, you can manually enter the exact time to the well-designed temporal intervals. To enhance accuracy, you can refer to either timeline or controller.

In case you'd like to merge multiple segments into one, Joyoshare Media Cutter offers capability to realize it as long as you hit "+" icon and tick "Merge segments" option. If you want to cut large video into multiple segments once, you can click the "+" icon to create a new cutting task in the progress.
Step 3 Choose output format and personalize related parameters
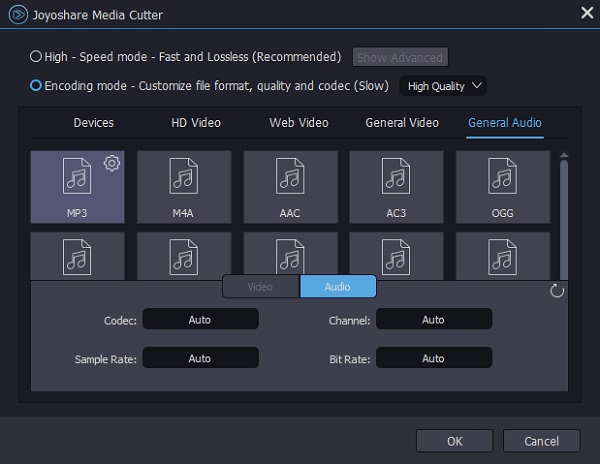
The critical step is to set audio format. Otherwise, you cannot get audio from video successfully. Clearly, go forward to press "Format" panel and access to "General Audio". You can choose whichever you appreciate, for example, MP3, AAC, WAV, WMA, M4B, M4R, MKA, FLAC, OGG, AIFF, etc. If you want to customize codec, channel, sample rate, bit rate, etc., you have to select the output format from the encodign mdoe and click the gear icon located at top right corner of the chosen format to get it done.

Note: To extract sound from video in original quality, the high-speed mode is your choice. In such a mode, format customization is not allowed and the output audio format you specify must be compatible with your source video.
Step 4 Start extracting audio from video on your PC
Once everything gets ready, you can straightly press the "Start" button to manipulate this smart program. After waiting for a short time, you can get what you want for later listening.
Part 2. How to Extract Audio from Video in VLC Media Player
Applicable to Windows, Mac, and Linux operating systems, VLC, the free and open-source media player and editor, is definitely a decent alternative when you need to separate audio from a video. It comes with quite a lot features. Besides the ability to play any content, it also supports drawing audio from video, cutting and trimming media files, adding audio track to video, and more. How does VLC extract sound from videos? Do as described below.
Step 1 Add video file to VLC
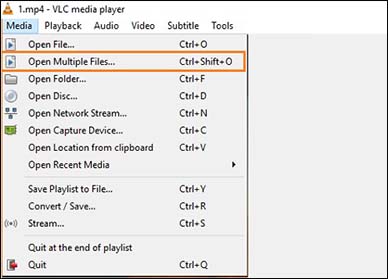
Run VLC on your computer. After that, go to "Media" - "Open Multiple Files..." - "Add" to open your local folder and import the video from which you want to rip audio to VLC.

Step 2 Set up output audio format
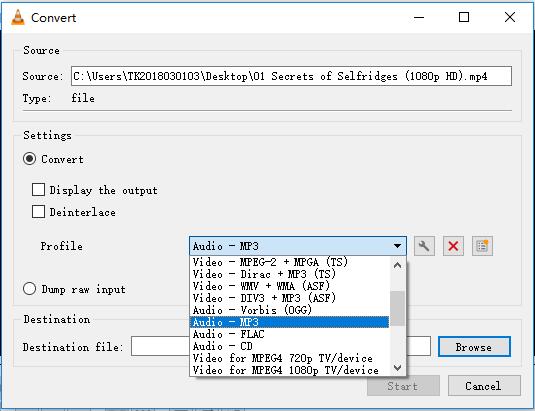
Head to "Play" button at the bottom right and then to "Convert". In the next window, select an output format the audio file from "Profile" section. If needed, you can click the icon resembling forceps to modify the audio codec, bitrate, channels, and sample rate.

Step 3 Rip audio track from video
Now, touch "Browse" to define a destination file. Once done, press on "Start" to enable VLC to commence the extracting process. After the end of it, find the separate audio track in your specified destination folder.
Part 3. How to Extract Audio from Video in iMovie
To separate audio from video, Mac users might as well have a shot at iMovie. Such a free editing tool is built in every new Mac and is perfect for each Mac user to detach audio from videos, attach the audio to other videos, reduce background noise, and even mute video on iMovie, etc. How to operate it to extract audio is explained below step by step.
Step 1 Upload video to iMovie
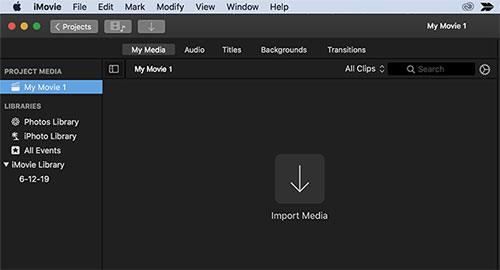
Launch iMovie on your Mac and upload the target video file by "Import Media". Alternatively, drag and drop the video to the timeline directly. By the way, if this is your first use, you are required to create a new project by way of "Create New" and "Projects".

Step 2 Detach audio from video in iMovie
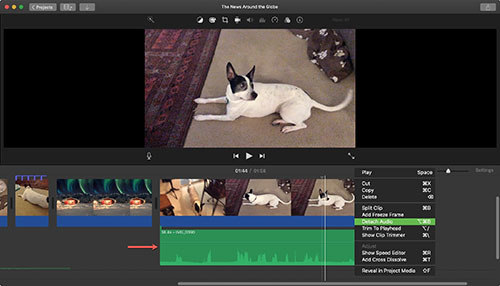
After the video segment is placed to the timeline, select it and right-click. From the pop-up menu, choose the "Detach Audio". Or, proceed to the "Modify" located at the top bar and followed by "Detach Audio". Like this, the audio will appear as an audio-only clip attached below the video in the timeline.

Step 3 Output the audio track
When the audio has been separated from your video, please highlight the audio track and then access the "File" tab - tap on "Share" - "File..." to save the extracted audio file in the system.
Part 4. How to Extract Audio from Video in Format Factory
Format Factory is a free Windows toolkit consisting of a wide array of video and audio processing tools, like media converter, splitter, cropper, merger, and compressor, etc. With it, you can realize the safe conversion between the video, audio and images of different encoding formats. It is loaded with a simple interface. Even though you are a novice, it is not hard to handle it to separate audio from video.
Step 1 Drag video files to program
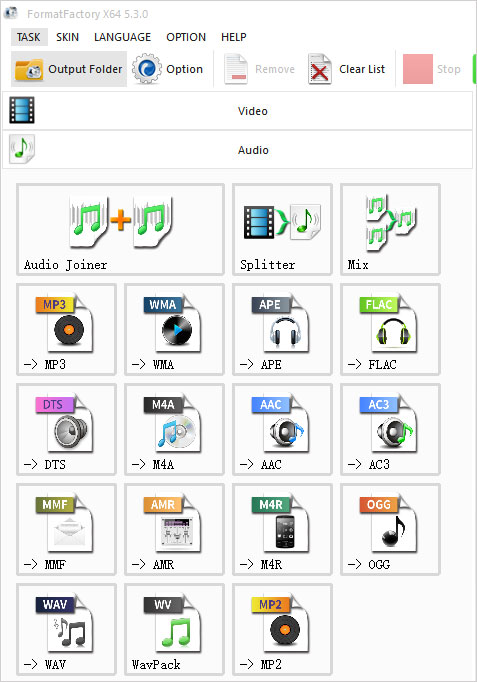
Download, install and run Format Factory on your Windows computer. To rip audio from video in it, you should choose the "Audio" option down the left and select an audio format as the output format. Then, click "Add Files" to add your video.

Step 2 Adjust output settings
Get into the "Output Setting" option at the top right to custom the audio quality based on your needs. At the lower left corner, there is a "File" icon. Click it to choose a destination folder for the extracted audio file. Subsequently, touch "OK".

Step 3 Save the audio
Now, you return to the first interface. To complete the conversion from video to audio, the last click is "Start". When the progress bar goes to 100%, visit your local file to check and play the audio.
Part 5. How to Extract Audio from Video in Freemake Audio Converter
Freemake Audio Converter is a popular and all-purpose converting program focusing on the rocket-fast conversion of audio and video files as well as the lossless audio extraction from any video on the Windows system. It supports 50+ non-protected audio formats and 500+ video formats, such as MP4, MP3, WMV, MOV, AAC, WMA, OGG, FLAC, DTS, and more. As a modern audio converter, it allows users to specify audio codec, bitrate, sample rate, file size, and channels to achieve the optimal results. This converting tool is totally and extremely easy to use. Below is a quick guide.
Step 1 Open the software and add video
Install and open Freemake Audio Converter on a Windows computer. Next, add your video to it. There are 3 ways: hit on "File" - "Add Audio..."; use "Audio" button; simple drag. These adding audio buttons hold true for adding videos.

Step 2 Opt for the audio format
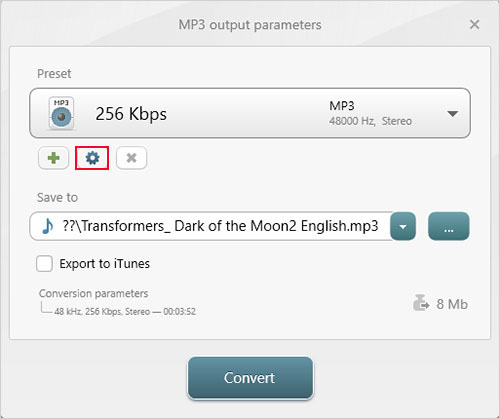
Whereafter, go for the "Convert" button and select an output audio format from the its drop-down menu. You will be guided into a new window, in which you can customize the output parameters and edit preset by clicking a setting icon.

Step 3 Export and save the audio track
After all is set up, touch "..." under "Save to" to decide where the audio track is exported to. Next, hit on "Convert" to finish the whole process.
Part 6. How to Extract Audio from Video Online in Audio Converter
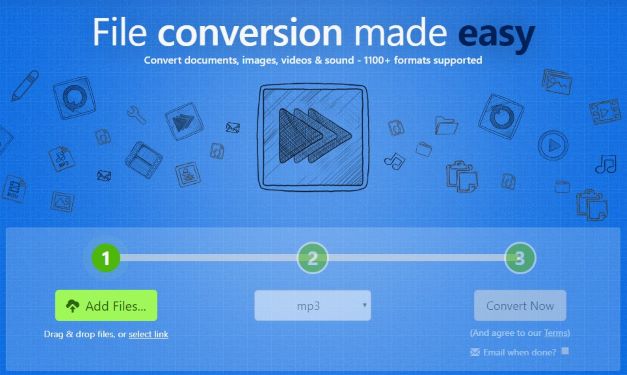
Online Audio Converter is a web-based tool specially made for audio extracting. It supports over 300 different file formats without installing any other program. More amazingly, this handy audio converter enables you to make batch conversion, edit tag info, extract sound from video, etc. easily. Here's how to utilize it.
Note: Working with this compact online tool, you will find it is simple to get any audio track from your original video. However, if you want to cut the track, you should ask other online software for help.
Step 1 Upload files
Flexible as Online Audio Converter is, it allows you to upload file(s) from your local folder, Google Drive, Dropbox or even via URL. Be clear about that the maximum size of a file you can upload is 2048 MB.

Step 2 Choose destination audio format
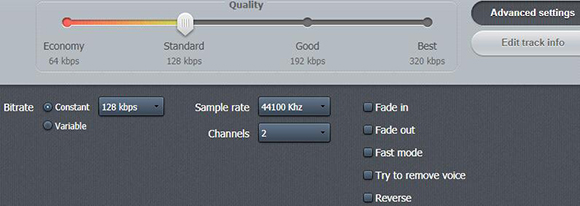
To extract audio from the required video source, you are supposed to choose a desirable format, such as MP3, WAV, iPhone ringtone format, M4A, FLAC, OGG and more (MP2 and AMR). For each format, it is accessible to set up quality by yourself. The quality level includes "Economy", "Standard", "Good" as well as "Best".

Step 3 Go for advanced settings and edit track info
If you want to make your converted audio file more manageable, you can enter "Advanced settings" option to customize bitrate, sample rate and channels. You can also add fade-in/fade-out effect, select fast mode, try to remove voice and reverse audio file as you like.

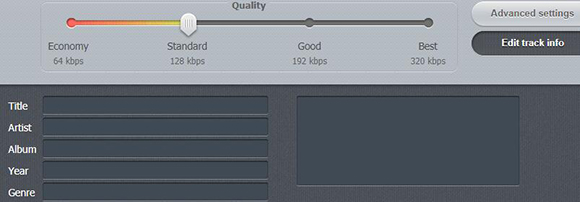
Simply press the "Edit track info" button. In this section, you are enabled to add necessary info for your audio track, like title, artist, album, year, genre, or relevant introduction.

Step 4 Rip audio from video with one click
Now, you can click the "Convert" button. This easy-to-use online program will extract audio from original video file without hassle. Once the whole conversion process is done, you can hit the "Download" icon to save it on your computer for offline enjoyment.
Comparison:
Having known how each of these audio extractors does separate audio from video, take a second here and look at the following table that is conducted to make an in-depth comparison of these tools from multiple perspectives.
| Audio Extractor | Joyoshare Media Cutter | VLC | iMovie | Format Factory | Freemake Audio Converter | Online Audio Converter |
| Supported OS | Windows, Mac | Windows, Mac, Linux | Mac | Windows | Windows | Online |
| Audio Quality Loss | No | A little bit | No | Minimal loss of quality | No | No |
| Extracting Speed | 60X faster speed | Lie on GPU | Decide by the CPU | Base on file size and computer | Rocket-fast speed | Depend on broadband speed |
| Built-in Editor | Yes | Yes | Yes | Yes | No | No |
| Customize Quality | Yes | Yes | Yes | No | Yes | Yes |
| Require Downloads | Yes | Yes | Yes | Yes | Yes | No |
| Operability | Extremely simple | A bit complicated | Not hard | Relatively simple | Easy | Easy |
| Price | 5-time free use $29.95/Lifetime | Free | Free | Free | Free | Free |
Frequently Asked Questions:
#1 How to avoid quality loss during audio extraction?
For the fulfillment of lossless audio extraction from videos, there are two requirements to be met. First, professional audio extracting software is a must. Many audio rippers allow the ability to detach audio from video but can't promise the original audio quality. Second, the chosen output audio format is bound to be compatible with the original video file. Therefore, it is better that the audio extractor you use can work with all kinds of media formats. According to the above table, Joyoshare Media Cutter, Freemake Audio Converter, and Online Audio Converter conform to the condition of no quality loss. Though, when taking both into consideration, Joyoshare audio extractor is perfect for you.
#2 Is it possible to extract audio from YouTube video?
For such a question, "Yes by all means" is the answer. The way of extracting sound from YouTube video and that of separating audio from any video are on the whole the same. The only thing of importance to note is that software to perform the task of audio extraction from YouTube video must accept web video formats.
#3 Can I extract sound from video using Audacity?
As we all know, Audacity is a multi-track audio editor, which simply can't open video files without the optional FFmpeg library. Often, this method is not suggested for beginners. Supposing that you insist on doing so with it, follow the quick guide.

1. Open Audacity and then download FFmpeg to let Audacity open video files;
2. Import your video file by touching "File" > "Open...";
3. Now, navigate to the "Edit" item at the top bar > "Preferences" > choose "Libraries" option and enable "Allow background on-demanding loading";
4. Again head to "File" tab and followed by "Export". Select an audio file format and click on "Save". In the next pop-up window, you can edit metadata tags. Afterward, tap on "OK". The converting process starts automatically.
