Q:"I have a large audio file, which I want to share with my friends. However, it cannot be transferred in a quick manner due to its big size. As a matter of fact, I know Audacity is a prevalent program to do this job. How can I cut audio in Audacity with ease? Please give me detailed steps." - From Quora
Have you cut audio in Audacity? Are you familiar with using this tool? In fact, there are many users, especially novices, who don't know how to use it correctly to cut audio files. To offer help, we will introduce the complete guide in this article and at the same time share one Audacity alternative, named Joyoshare VidiKit, to give more possibility.
Part 1. How Does Audacity Cut Audio
Audacity is always a fairly good choice for different users. Its prominent advantage is that it's well developed as a free, open-source and cross-platform tool for editing as well as recording. That's the reason why lots of users, especially inexperienced starters, like it so much. If you are one member among them, see the following instructions to know how to use Audacity to cut audio files.
Note: Audacity is limited in some capabilities and sometimes it will become unstable. If you cannot get accustomed to utilizing it, you can have a look at the other alternative solution as well.
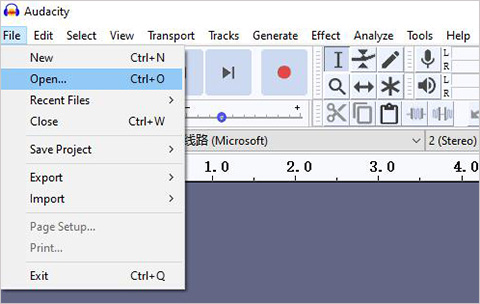
Step 1 Run Audacity to open an audio file
Download Audacity to your Windows, Mac or Linux. Finish the installation and launch it simply. To import an audio file, you can click "File" > "Open" in the upper left corner of its top menu bar. Or press keys Ctrl + O to add one from your designated local folder.

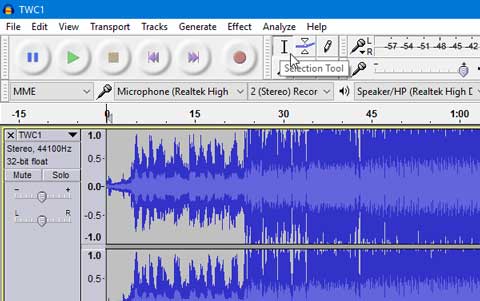
Step 2 Cut audio in Audacity
Cut the beginning and the end separately: Find the "Selection Tool"(or press F1) in the top icon bar to make it active. If you want to see the audio waves more clearly and cut them accurately later, you can tap on "View" > "Zoom" > "Zoom In" to enlarge the whole audio file. Then highlight the beginning or the end (any unwanted section) using the Selection Tool by pressing the left cursor on your mouse and drag to choose certain audio length. Afterwards, go to Edit > Remove Special > Split Delete to remove it.
Cut the beginning and the end synchronously: Likewise, apply Selection Tool to highlight the audio section that you'd like to keep (that's the desired audio part). It's better to play and confirm precisely. Then press the "Edit" > "Remove Special" > "Trim Audio". Your wanted audio will be left and both its beginning and end will be removed. Next, move it to the beginning using "Time Shift Tool" by pressing the left mouse to drag forward until a yellow line is shown (standing for the most beginning).
Step 3 Save trimmed audio in Audacity
To make you audio more natural, you can use Selection Tool to choose the beginning and the end of it, and click "Effect" > "Fade In"/"Fade Out". When everything is ready, click "File" >"Export" > "Export Audio" or "Export as MP3", etc. to save it on your specific location.
Part 2. How to Cut Audio in Audacity Alternative Losslessly - Joyoshare VidiKit
The solution described above to cut audio in Audacity may not be what you appreciate or like. We here specially offer one more workaround, called Joyoshare VidiKit (formerly Joyoshare Media Cutter). It is quite sufficient for your specific requirements. By means of this alternative to Audacity, you are allowed to shorten your audio size by cutting it into small sections and remove needless parts. Notably, the quality will not be damaged.
Additionally, this one-stop audio cutter is well designed with an innovative acceleration processor, which serve for you at 60X faster speed. You can as well cut audio and save it in any format, like M4A, AAC, AC3, FLAC, AIFF, WMA, AU, MP3, etc. Aside from that, you can get an access to customize parameters, such as quality, codec, channel, bit rate, sample rate, etc. To provide more possibility, you can merge different audio tracks from the same source into a complete one. The built-in audio editor also allows you to adjust volume, apply sound effects and add background music.

- Trim MP3 on Windows 10 and Mac at 60X speed
- Remove unwanted noise from original audio
- Extract audio from video, like MP4, MOV, etc.
- Combine multiple audio pieces together
- Support varieties of audio and video formats
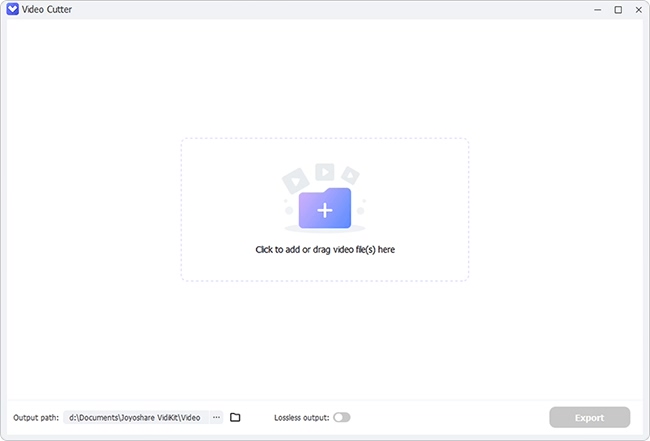
Step 1 Import audio file into Joyoshare VidiKit
Launch Joyoshare VidiKit and open "Video Cutter" to let it do further work for you. You can get two available ways to add the required audio file. One is to click the "Open" button and browser file in local folder. The other is to drag file to the main interface. Owing to Joyoshare cannot support batch cutting, you should note that only one audio file can be processed at a time.
Step 2 Decide an accurate cutting area
Once imported, Joyoshare will automatically play the audio file for you. To elect the cutting area, you have two different choices. Move the sliders in progress bar and locate exact points. Or you can manually set both start time and end time into the temporal intervals. By the way, you can also hit the "+" button to generate more than one audio segments.
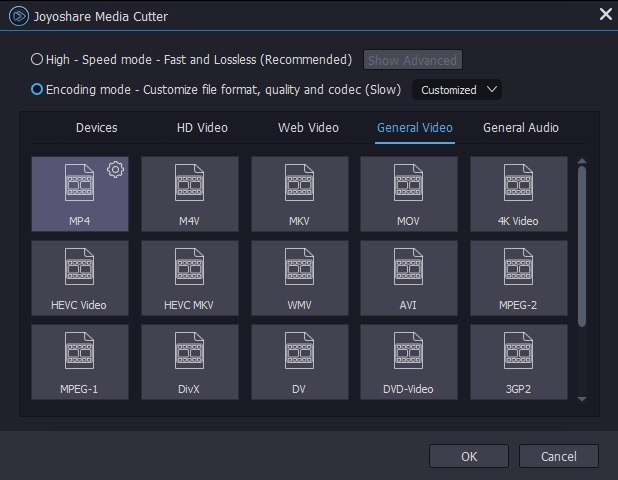
Step 3 Choose the desired output mode
Now press the "Format" panel to see all hidden settings. There are "High-Speed" mode and "Encoding" mode in your sight. Different output modes provide you with different options. If you want to stylize related parameters for your audio, like codec, quality, channel, sample rate, etc., you can select the latter one.
Step 4 Start to cut audio file
When everything gets done, click "OK" and go back to the main interface. Press the "Start" button to initiate a cutting task. Just a moment later, you can find the new file in the history folder, which can be shared to your friends and families.

Comparison:
Below we have a table to visually illustrate the difference between the two methods, so you can take a look at them to get your preferred guide first.
| Program | Audacity | Audacity Alternative |
| Operating system | Windows, macOS, Linux | Windows, macOS |
| Cut all audios | Yes | Yes |
| Lossless cutting process | No | Yes |
| Cut videos or live photos | No | Yes |
| Operability | A bit difficult | Easy |
| Price | Free | 5 Free Chances |
