Q:"How to remove an Apple ID from my iPhone?" - From Apple Community
Before you sell or give away an iPhone, you must remove your Apple ID from your device, which will prevent your information from being leaked. If you know the password, this can be done effortlessly. However, if you have bought a used iPhone and the previous owner didn't sign out of his Apple ID, then finding a solution can be more intractable. Continue reading this article and you'll know how to remove Apple ID from iPhone with or without a password.
- Part 1. How to Remove Apple ID from iPhone without Password
- Method 1. Remove Apple ID from Media & Purchases on iPhone
- Method 2. Sign Out of Apple ID on iPhone Settings
- Method 3. Restore iPhone in Recovery Mode with iTunes
- Method 4. Remove Apple ID with Professional Apple ID Remover
- Part 2. How to Remove Apple ID from iPhone with Password
- Method 1. Sign Out of Apple ID on iPhone
- Method 2. Remove Apple Account on Browser
- Method 3. Remove iPhone from Apple ID via iCloud
- Method 4. Erase All Data on iPhone
- Part 3. How to Delete Apple ID Account [Bonus]
Part 1. Remove Apple ID from iPhone without Password
What can you do if you cannot get touch with the previous owner of the second-hand iPhone or you don't keep the credential information in your mind? No worries. Learn how to remove an Apple ID from an iPhone without a password by using the following solutions.
Method 1. Remove Apple ID from Media & Purchases on iPhone
Fortunately, it's pretty simple to sign an Apple ID out of Apple services on your iPhone such as Apple Store, Apple Music, Apple TV, Books, Podcasts, and more. Importantly, this solution doesn't require a password, which works well if you have gotten a used iPhone with the previous owner's Apple ID signed in.
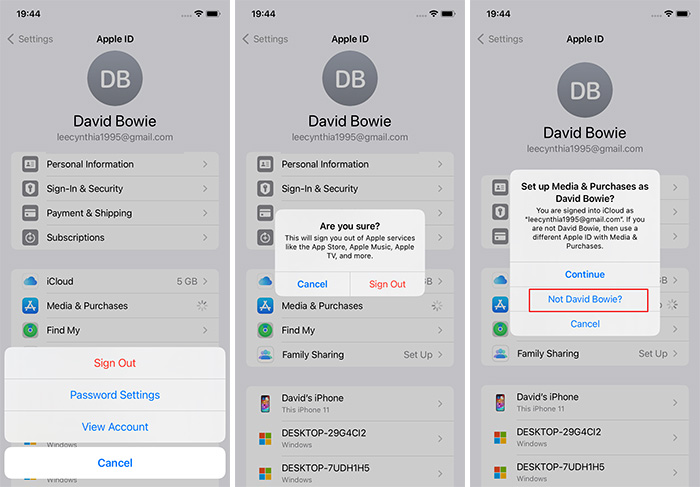
- Step 1: Open your iPhone, go to Settings, and tap on [Your Name] at the top of the screen.
- Step 2: Select Media & Purchases among all options.
- Step 3: From the window that pops up at the bottom, tap on Sign Out option and make confirmation.
- Step 4: Then head to Media & Purchases tab again.
- Step 5: This time, you can tap on Not XX (previous owner's name) in the pop-up window, so you can sign in with your own Apple ID.
Method 2. Sign Out of Apple ID on iPhone Settings
As long as the Find My iPhone feature is disabled, it will be easier to remove the Apple ID from the iPhone. No password is required and you can quickly sign out of your Apple ID on your device.
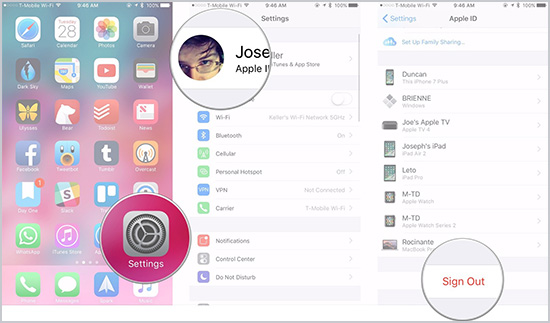
- Step 1: Open Settings on iPhone.
- Step 2: Scroll down to the bottom and tap on "Sign Out" button to directly sign your current Apple ID from iPhone.
Method 3. Restore iPhone in Recovery Mode with iTunes
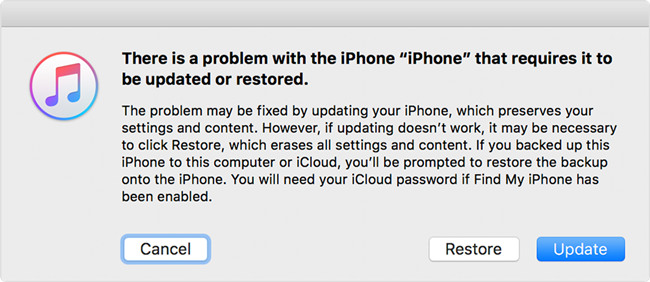
A simple and brutal way to remove someone else's Apple ID from your iPhone is to restore your iPhone. In this case, your data, including Apple ID, is going to be erased thoroughly. But one thing should be noticed is that you need to put your iPhone into recovery mode if your computer hasn't been trusted before.
- Step 1: Connect iPhone to your computer and run iTunes.
- Step 2: Put iPhone into recovery mode by the following guide.
- iPhone 8 and later: press and undo the Volume Up button, press and undo the Volume Down button, long press the Side button and release it when you successfully enter the recovery mode.
- iPhone 7 and 7 Plus: press and hold the Side button and the Volume Down button, then undo them until the alert occurs.
- iPhone 6 and earlier: press and hold the Power button and the Home button at the same time, and once a computer image appears, release both buttons.
- Step 3: A prompt will emerge on the screen asking you to restore or update your iPhone. Click the Restore button to start removing Apple ID.
Method 4. Remove Apple ID with Professional Apple ID Remover
Without knowing the password, Joyoshare iPasscode Unlocker is capable to help you remove Apple account from your iPhone with no data loss. Actually, more than iPhone, iPad and iPod touch are also compatible with this program. So, it brings a convenient channel to unlock Apple ID without email, security questions, and even phone number. You have no need to worry about security as Joyoshare iPasscode Unlocker doesn't require your private information. Further, it assures you a high rate of success along with tech-free steps. Apart from that, it could be used to unlock all kinds of screen locks, including Face ID and Touch ID. Your Screen Time and MDM restrictions can be bypassed without data losing as well.
- Remove the previous owner's Apple ID without losing data
- Unlock screen lock, Screen Time and MDM
- Compatible with iPhone 16 series and iOS 18
- User-friendly steps and high-security factor
Step 1 Plug iPhone into Computer
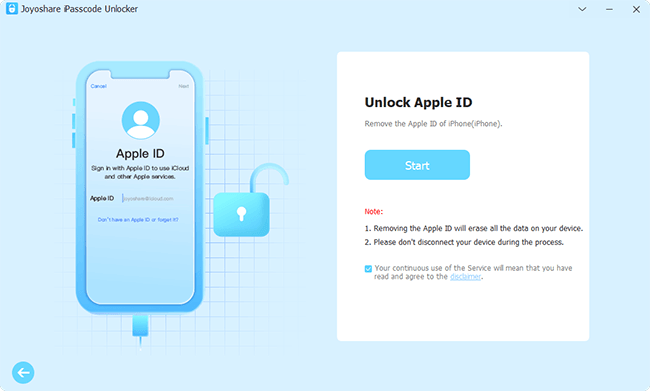
Install and run Joyoshare iPasscode Unlocker, plug your iPhone into computer and choose Unlock Apple ID. Then, click the Start button.

Step 2 Check iOS Version
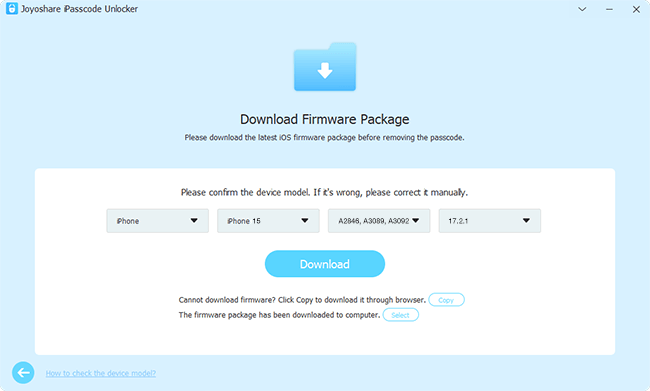
To successfully remove an Apple ID from a connected iPhone, you should make sure Find My iPhone is turned off. Then check the iOS version further. For devices running versions prior to iOS 14, Joyoshare iPasscode Unlocker can start the Apple ID removal process without losing data. For devices running iOS 14 or later, you should download a matchable firmware package by clicking the Download button.

Step 3 Start Removing Apple ID from iPhone
Click on the "Unlock" button in Joyoshare iPasscode Unlocker to begin removing an Apple ID from your iPhone. Keep the device connected all the time and wait for Apple ID removal process to accomplish. You can then sign in your account with another Apple ID without a problem.

Part 2. Remove Apple ID from iPhone with Password
All the above methods require your Apple ID and password, but what if you have no way to get them? Watch this video to immediately get the 5 solutions on how to remove Apple ID without password.
Method 1. Sign Out of Apple ID on iPhone
A known Apple ID password can simplify Apple ID removal process on your iPhone. There are no other requirements and you can make it in Settings app easily.

- Step 1: Head to Settings and tap your Apple ID.
- Step 2: Scroll down to the bottom and hit the Sign Out option.
- Step 3: Enter your Apple ID password, tap the Turn Off button to confirm turning off the Find My feature.
- Step 4: Tap Sign Out again to successfully remove Apple ID from this iPhone.
Tips: Change Apple ID Password to Further Remove Apple ID

For the situation where you simply forgot the password of your Apple ID, you can change it in Settings using your device passcode. After creating a new Apple ID password, you can use it to sign out of your account from iPhone again. Here's how.
Go to Settings → [Your Name] → Password & Security → Change Password. Follow the onscreen prompts to enter your iPhone screen passcode and create a new Apple ID password. Then you can sign out of Apple ID on your device.
Method 2. Remove Apple Account on Browser
When you don't have your iPhone at hand, you could take advantage of a browser to unlink Apple ID from iPhone remotely. Once your Apple account is disassociated from the device, you are successfully done.
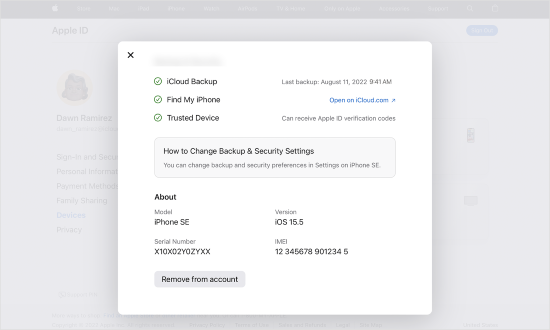
- Step 1: Visit appleid.apple.com on any browser and sign in with your account.
- Step 2: Tap Allow option on your iPhone and check the verification code shown on your iPhone.
- Step 3: Go back to the browser, locate the Devices section on the left-sidebar, and select your iPhone.
- Step 4: Hit the "Remove from account" button and click Remove again.
Method 3. Remove iPhone from Apple ID via iCloud
With the enabled Find My feature, you are able to remove your iPhone from your Apple ID on the iCloud website or Find My app, which is equal to remove Apple account from iPhone.

- Step 1: Open the iCloud app on any other Apple devices signed with the same account, or get into iCloud webpage on the browser and log into your Apple ID.
- Step 2: On the website, choose your name and click on the Find Devices link. Alternatively, tap Find My on the app.
- Step 3: Choose All Devices and select your iPhone.
- Step 4: Hit the Remove from Account option at the bottom and enter the Apple ID password.
Method 4. Erase All Data on iPhone
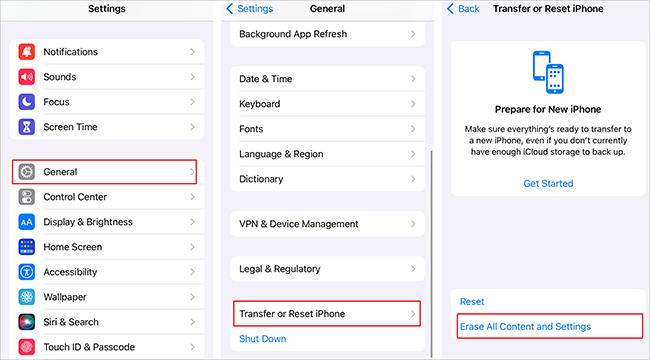
If the Sign Out option in Settings turns out grey and as a consequence, you can't remove your Apple ID, it is advisable to directly put your iPhone into factory settings. By wiping all data from your device, your Apple ID will be removed and required to sign in again when setting it up after restarting. Just navigate to Settings → General → Transfer or Reset iPhone → Erase All Content and Settings → Continue → Back up your data/Skip Backup → Erase iPhone. And wait for your iPhone turning on again.
Part 3. How to Delete Apple ID Account [Bonus]
After learning about so many methods for removing Apple account from your iPhone, you might also want to know how to permanently delete old Apple ID, here are some preconditions you need to satisfy. First, backup your important data; second, check the subscriptions; third, sign out of Apple ID on all devices. Then, follow the steps to complete the deletion.
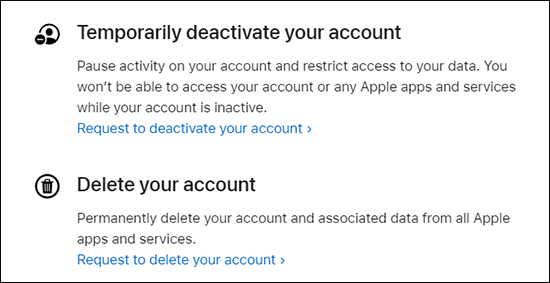
- Step 1: Go to privacy.apple.com and log into your Apple account.
- Step 2: Scroll to "Delete your account", select "Request to delete your account" and choose a reason why you want to delete account.
- Step 3: Read the warnings of deleting your Apple ID and select a reason for your request.
- Step 4: Choose a way to track the process of deleting your Apple ID, and you will be sent a unique access code, which need to be kept in mind.
- Step 5: Contact Apple support within a short period of time if you want to stop the progress. And you could resume using your Apple account after providing the access code.
- Step 6: If you are sure that you want to delete your Apple ID, type in the access code and click Delete Account and the Sign Out option. Then, wait for a few days, your Apple ID could be permanently deleted.
Conclusion
In this article, you could find some feasible ways to remove Apple ID from iPhone knowing the password. At the same time, methods to remove Apple account without password are provided in detail. If you don't know how to do it, try Joyoshare iPasscode Unlocker. You could remove Apple ID from iPhone with a few clicks. Further, if you want to delete Apple ID directly, this article lists the operating steps in the end. Hope your problem is resolved after reading this article.

