After updating to iOS 16, users are able to unlock their iPhone Face ID not only in portrait orientation but also in landscape mode, which like using Face ID with a mask is more humanized than ever. However, there are users who reported their iPhone Face ID not working in landscape mode, even some of them who only set up Face ID are unavailable to enter their iPhones. If you are confronting the same problem, don't be anxious, this article is going to explain the reason why it fails and the solutions to bring your Face ID to normal.
- Part 1. FAQs about Face ID Not Working in Landscape Mode
- Part 2. Methods to Fix Landscape Face ID Not Working Issue
- 2.1 Troubleshoot Unlocking Conditions
- 2.2 Restart iPhone
- 2.3 Delete and Recreate Face ID
- 2.4 Set Up an Alternative Appearance
- 2.5 Turn off Require Attention for Face ID
- 2.6 Reset All Settings
- 2.7 Update iOS
- 2.8 Restore iPhone
- 2.9 Remove Face ID via iPhone Unlocker
- Part 3. Summary
Part 1. FAQs about iPhone Face ID Not Working in Landscape Mode
Q1: Why doesn't Face ID work in landscape mode?
A: A bad unlocking condition is the first possible reason. If you are using Face ID in a dimmer light, with a broken camera, wearing too many ornaments, etc. it is normal that you can't unlock your iPhone in landscape mode. The second cause might be the incompatibility with your iPhone model. And the last possibility could be iOS system glitches.
Q2: Does Face ID work in landscape mode on iPhone 12?
A: The landscape Face ID supported devices are iPhone 12 series and above. In fact, this feature is launched in iOS 16, which means that it works only in the latest iOS version. Although iOS 16 is also compatible with iPhone 8 and later models, you are only allowed to unlock with Face ID using iPhone 12 or later. So, the answer is yes, theoretically iPhone 12 running iOS 16 is able to use Face ID in landscape mode. However, unstable iOS 16 will lead to a non-working error.
Part 2. Methods to Fix Landscape Face ID Not Working Issue
2.1 Troubleshoot Unlocking Conditions
Improper conditions will restrict you to unlock iPhone with Face ID. Hence, the first and foremost thing you need to do is to troubleshoot your surroundings.
- Keep a proper distance so that your face will be well recognized.
- Take off all your jewelry and ornaments like glasses, colored contact lenses, and so on.
- Take off the iPhone case and screen protector.
- Clean up the cameras and sensors.
- Go to a place without too dark or too bright lighting.
2.2 Restart iPhone
As we all know, restarting is capable to solve most problems on iPhone. Thus, when you come into trouble, try to reboot. Head to Settings, enter the General screen, scroll down to the bottom, tap Shut Down and drag the Power-off slider to turn it off. Then press and hold the Power button to turn it on again to see if you can unlock using your Face ID.
2.3 Delete and Recreate Face ID
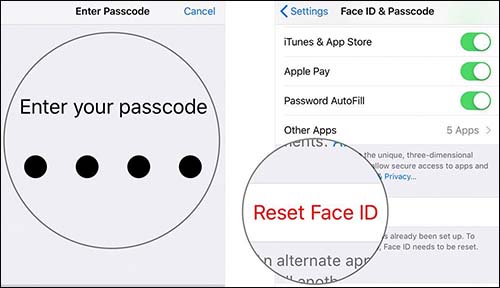
If you allow unlocking with a digit passcode, you could enter your iPhone and reset your Face ID when landscape Face ID is not working. Open Settings, find Face ID & Passcode, and tap Reset Face ID where you are required to enter your screen lock passcode or Apple ID password. Then, choose Set Up Face ID to recreate one.
2.4 Set Up an Alternative Appearance
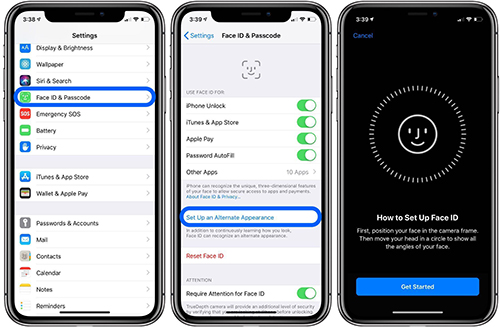
This mistake happens when the algorithm of unlocking with Face ID is sluggish, especially if you are wearing in a different way or getting makeup. To let iPhone recognize you better, you can set up more than one appearance, including different costumes. In the Face ID & Passcode interface on Settings, enter your passcode and tap Set Up an Alternative Appearance.
2.5 Turn off Require Attention for Face ID
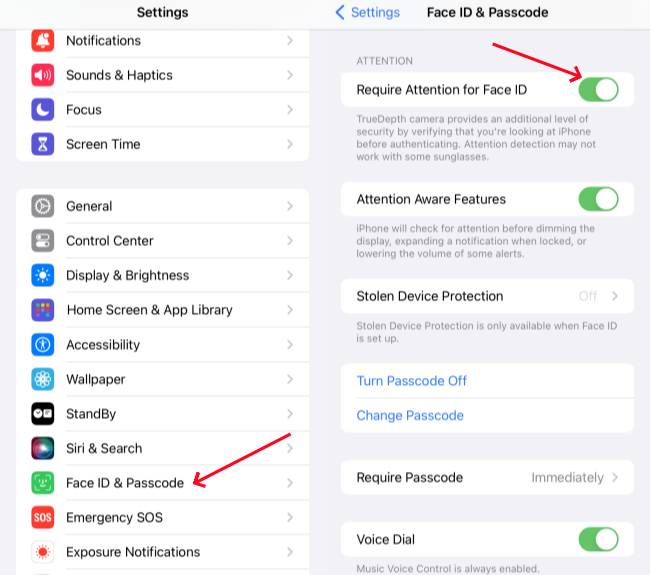
Actually, the Require Attention for Face ID feature is extra security protection with the help of the TrueDepth camera so that it will prevent other people from unlocking your iPhone when you are sleeping or closing your eyes. Therefore, it is not recommended you turning it off permanently. But in this case, you could give it a try and check whether your Face ID works in landscape mode. Identically, disable Require Attention for Face ID in the Face ID & Passcode screen.
2.6 Reset All Settings
If the foregoing solutions are ineffective in solving the iPhone Face ID not working problem, it is necessary to reset the settings on your iPhone. Head to Settings, select General, choose Transfer or Reset iPhone, hit Reset, tap Reset All Settings and enter your passcode to delete your previous settings including your Face ID as well. Then, you could set up a new Face ID.
2.7 Update iOS
In case you are running the software version earlier than iOS 16, certainly, you cannot use Face ID in landscape mode on your iPhone. The suitable solution is to update your iOS system. In the Settings app, tap General, choose Software Update and hit the Download and Install bar. Alternatively, you can upgrade the system software on your computer. Connect iPhone to Windows PC or Mac, open iTunes/Finder, find your device, select Summary, and click the Update button. When you finish updating, there is a great possibility that your iPhone could be unlocked.
2.8 Restore iPhone
Another method to fix the iPhone Face ID error you could make attempts is to restore your iPhone by erasing all data. Before you start this operation, make a backup of your important information in iCloud or iTunes. Navigate to Settings, tap General, scroll down to Transfer or Reset iPhone, and select Erase All Content and Settings this time. After confirming your action by entering your passcode, you should wait until your iPhone get restarted. When you set up your iPhone, choose Don't Transfer Apps & Data, which will not recover your previous Face ID.
2.9 Remove Face ID via Joyoshare iPasscode Unlocker
There are other situations when coming across iPhone Face ID not working in landscape mode, you merely permit to unlock your iPhone with Face ID and do not set up other types of passcodes, or you can't remember your digit passcode, as a result, you are locked out of your iPhone. An easy method is to remove your Face ID via third-party software. Joyoshare iPasscode Unlocker readily helps you unlock your Face ID with simple steps. No matter which iPhone model you are using, it will provide a high success rate and high safe factor to remove your invalid Face ID.
Apart from the screen passcode, Joyoshare iPasscode Unlocker can be used to remove the Screen Time passcode, Apple ID and MDM. And it assures you 100% safe and a high rate of success. With simple steps, you can enter your iPhone again without any hindrance.

- Unlock landscape Face ID on iPhone
- Remove all types of passcodes from iPhone/iPad/iPod touch
- Remove Apple ID, Screen Time passcode, MDM restrictions
- A high success rate, high compatibility and high safe factor
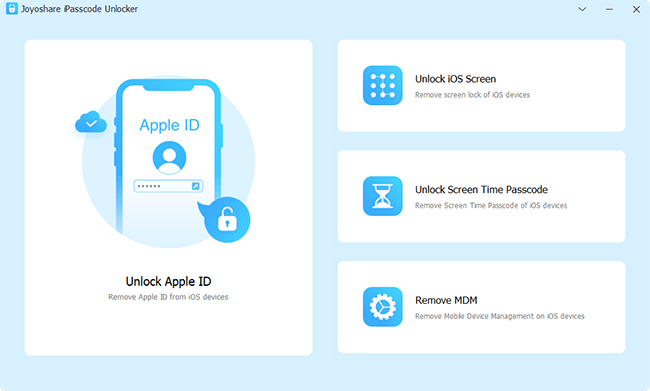
Step 1 Plug iPhone into Computer and Enter Unlock iOS Screen
Since the unlocking procedure will delete all your content and settings, you need to back up in advance. Then plug your iPhone into your computer, and run Joyoshare iPasscode Unlocker. Choose the Unlock iOS Screen section.

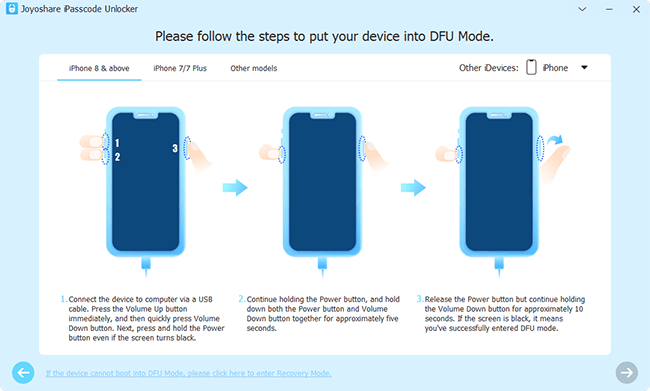
Step 2 Put iPhone into DFU/Recovery Mode
Follow the on-screen instructions matching your iPhone model to put your iPhone into DFU mode, and you can click the bottom link switch to the recovery mode guide.

Step 3 Start Firmware Package Downloading and Verifying
Once you successfully enter DFU/recovery mode, click the right arrow to check the detailed information. After your confirmation, you can click the Download button to get the firmware package and start the verification.

Step 4 Remove Face ID
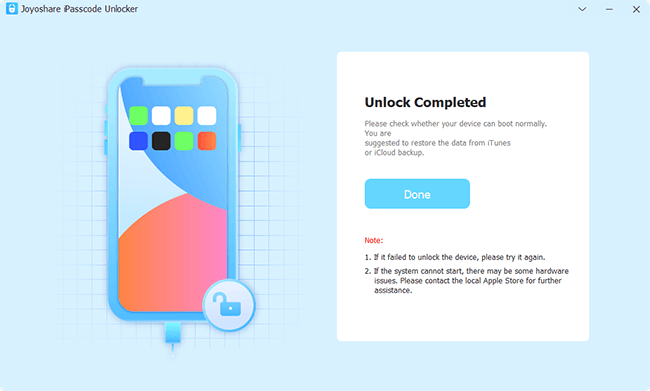
Click the Unlock button to remove the non-working Face ID in landscape mode. When the whole progress ends, you can inspect if the issue is fixed.

Part 3. Summary
Facing the iPhone Face ID not working in landscape mode glitch, you should know that the unstable iOS system and different unlocking environments may be the culprit. If you troubleshoot these two factors but the problem remains, it would be better to directly remove your Face ID. Restoring iPhone is an effective way, however, if it is Face-ID-only, you need to ask Joyoshare iPasscode Unlocker for help. It is hoped that this article is helpful to fix the annoying issue.
