Since the release of iOS 12 on Sept. 17, 2018, many iPhone users can't wait to install iOS 12 in order to enjoy those amazing features of Apple new iOS system. But most of them may forget one risk that your iPhone data may be lost if an error occurred during the upgrading. Thus, we suggest you to back up your iPhone before updating to the iOS 12. Actually, it is a good habit to back up iPhone data regularly since data loss happens every day. Then how to back up iPhone? In this article, we are going to show you 2 effective methods to back up your iPhone prior to installing iOS 12.
Part 1. How to Backup iPhone to iTunes
The first way to backup iPhone or other iOS device is to use iTunes. What we need is your iPhone, a computer, the latest version of iTunes app installed on it, and an original USB cable. Next let's move to the specific guide below.
Step 1 Connect iPhone to the computer
At first, connect your device to the computer with a USB cable that comes with the phone. Open iTunes and check if it has been updated to the newest version. If not, just upgrade it by going to iTunes > Help > Check for Updates. If you're asked to enter the passcode of your iPhone or Trust This Computer, follow the onscreen prompts.
Step 2 Navigate to the right option

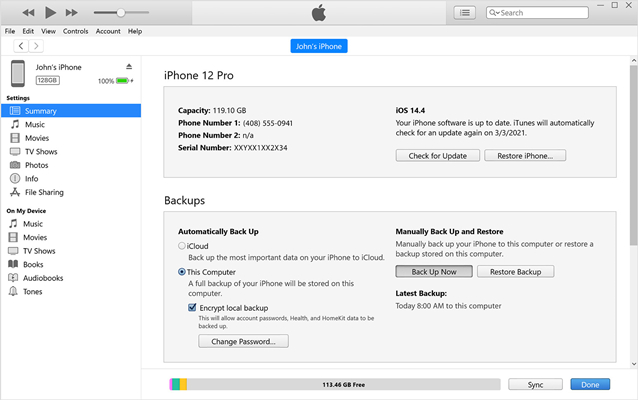
Select and click on the small icon of your iPhone next to the Music or Movies dropdown menu when it is successfully recognized by iTunes. Then go to the left sidebar and click on the Summary option.
Step 3 Back up your iPhone

Select This Computer under the Automatically Back Up and tick the Encrypt iPhone backup option to set a password for your iTunes backup. Afterwards, click the Back Up Now button and let iTunes work. Wait for a few minutes and then you will see an encrpted backup file stored on your computer.
Note: Please remember this passcode or write down and store it somewhere safe, because you cannot restore your iTunes backup files if you forget this password.
Part 2. How to Backup iPhone to iCloud
The other way to back up iPhone is to use Apple's iCloud service. Each iPhone user has 5GB of iCloud storage for free to back up data. Using this method is very simple, and you only need a Wi-Fi netowrk.
Step 1 Connect iPhone to a Wi-Fi network
Open your device and connect it to a Wi-Fi network. Take a handy charger in case you need to charge your iPhone to ensure the completion of backing up.
Step 2 Back up iPhone via iCloud

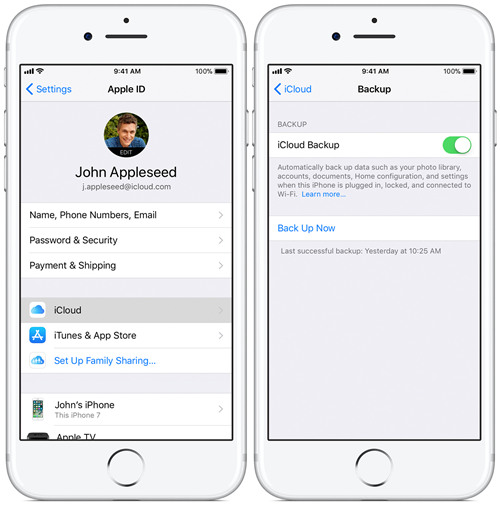
Go to the Settings > [Your name] > iCloud > iCloud Backup > Backup up now. Wait a while until the process completes. Then you'll see the data and time of your last successful backup.
Note: 1. Don't disconnect the Wi-Fi network during the backup process. 2. You only have a 5GB of free storage. Once it's full, the automatically iCloud back up will stop and you need to buy more.
More Tips: Restore iPhone Data after iOS 12 Update with Joyoshare
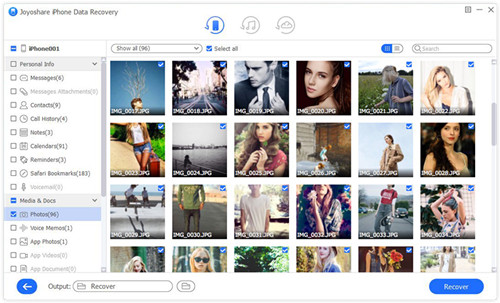
If you have lost iPhone data after updating to iOS 12 unfortunately, don't worry, you can easily get them back by restoring iTunes/iCloud backup files since you have synced the data. Alternatively, you can also use a third-party data recovery app to recover lost iPhone data. Here I highly recommend Joyoshare iPhone Data Recovery because it is 100% trustworthy.
Key Features of Joyoshare iPhone Data Recovery:
Recover up to 20+ types of lost data from iPhone/iPad/iPod
Restore lost data instantly with highest success rate
Support to recover from iDevice, iTunes and iCloud backup
Real-time preview and selective recovery provided.
See also: How to Recover Lost iPhone Data after iOS 12 Update


