Besides SMS and MMS, iMessage happens to be another communication form which enables you to send and receive photos, texts, videos, locations, as well as voice memos on iPhone, including the most recent models out there such as iPhone Xs (Max), iPhone Xr, etc. However, in case you'd like to make use of iMessage successfully once you purchase a brand-new iPhone device, it is imperative to set it up and also activate it properly. In the subsequent paragraphs, we will talk about how to enable iMessage on iPhone, effective solutions to fix activation error and how to recover lost iMessages from iPhone.
- Part 1: How to Activate iMessage on iPhone
- Part 2: How to Fix iMessage Activation Error on iOS 14
- Part 3: How to Recover Lost or Deleted iMessages from iPhone
Part 1. Quide Guide to Acitivate iMessages on iPhone (iOS 14 Supported)
Follow the subsequent steps in case you'd like to enable iMessage on your iPhone gadget, including iPhones running the latest iOS 12:
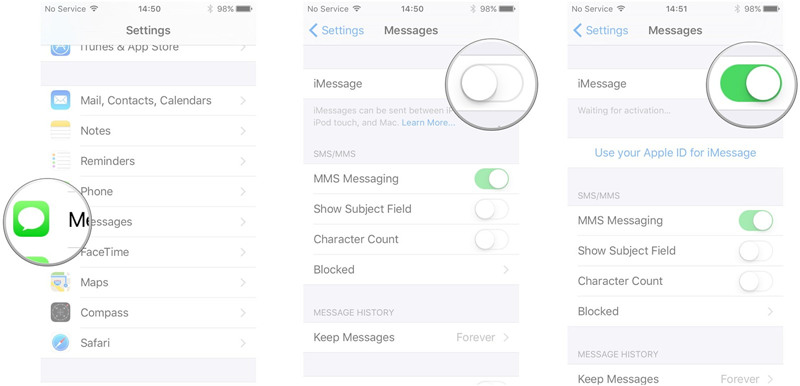
Step 1. Go to the Home screen and launch Settings application on your iPhone gadget.
Step 2. Click on Messages after scrolling down in the Settings menu.
Step 3. A slider will be visible to you, which you need to activate. This color will become green thus indicating that iMessages have been enabled. Now, you'll be able to send as well as receive messages without consuming your cellular data once you are connected to Wi-Fi.
Note: a. Here, in case you are prompted by the setup to log in utilizing your personal Apple login credentials, you simply need to login by providing your details. The app will be verifying your login details and your iMessage activation is going to become successful. In case you're not utilizing an Apple ID already, it is time to create one right now.
b. iMessage might take a maximum of 24 hours to activate as Apple will be verifying and matching your phone number along with your Apple ID. However, in most cases, it should not take in excess of 1 hour to complete the activation process.
Part 2. How to Fix iMessage Activation Error iOS 12
At present, many iOS 14 users have complained regarding iMessage activation errors after updating their devices. However, this issue can be solved effectively by several easy fixes regarding which we have mentioned below.
1. Verify your network connection when iMessage is waiting for activation:
First of all, please make sure that your internet connection works properly. Go to Settings > Wi-Fi/Cellular > turn off the trigger, turn on Wi-Fi/Cellular after rebooting your iPhone.
If this doesn't work, just try to reset the networking settings. Open Settings > General > Reset > Reset Network Settings. These actions should clear all of your network settings to default.
2. Set your Date and Time automatically:
In case, the previous step fails to deliver the desired results, follow these simple steps. Just go to Settings > General > Data and Time. Check "Set Automatically" and also check your time zone.
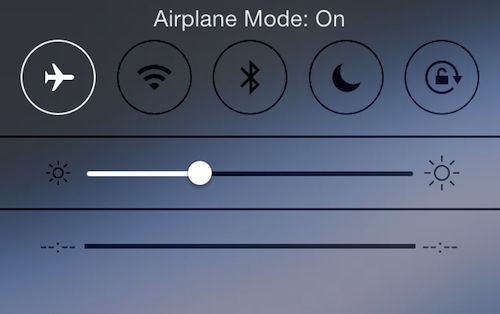
3. Enable and disable your Airplane Mode:

Turning the Airplane Mode on and off will help to fix the issues linked to your network connections. You need to simply open your control center and disable the Airplane Mode after turning it on for several minutes.
4. Update the Carrier Settings:
In case all the 3 above-mentioned processes do not deliver the goods, then you can try to update your carrier settings if it is at all available. In case you are making use of carrier data, and still receiving the "iMessage waiting for activation iOS 12" message, it will be prudent to update your carrier settings. Open "General" under "Settings", and click on "About". It will be possible to update your carrier settings right here.
5. Contacting your Apple or Carrier Support:
In case the selected Carrier in your country does not support iMessage, you must activate it by requesting at the Carrier desk. Otherwise, you might also request the Apple support Centre to get the job done for you.
6. Disable iMessage and reboot your iPhone once again:
Prior to switching off your iPhone device, make it a point to disable iMessage and reboot the device following this. Follow the subsequent steps so as to disable iMessage: Click on "Messages" after going to "Settings". Turn off "iMessage" right here.
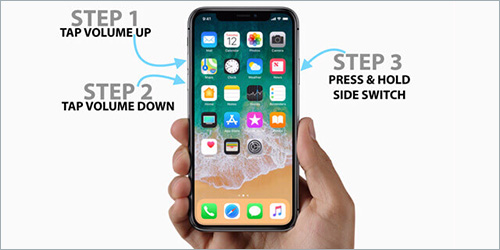
Follow the subsequent steps to reboot your iPhone device: Press and then release your Volume up key. Press and then release your Volume down key. Then press and hold down your Side button till the Apple logo becomes visible.
Note: As different iPhone models have differnt methods to reboot, here we only take iPhone 8 or newer devices as an example.
7. Restoring your iPhone to factory settings:
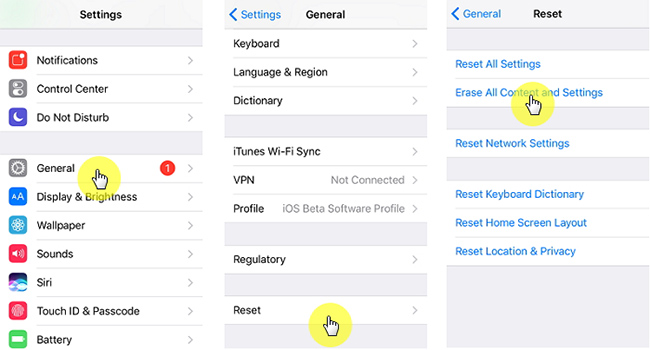
If everything fails, your last option will be to reset your iPhone device to the factory settings and then try to fix your problem. However, this process is going to delete everything on your device, and therefore, make it a point to make a backup of everything prior to restoring your iPhone. Here is how:
Go for Settings > General > Reset > Erase All Contents and Settings. This will help to set up the iPhone gadget as new and also fix your iMessage activation error as well.
Note: If your iPhone data is lost due to restore to factory settings, you can recover them from your iTunes or iCloud backup if you have one. Alternatively, you can also use Joyoshare iPhone Data Recovery to get them back instantly and selectively. Let's move on to the next part.
Part 3. How to Recover iMessages on iPhone with Joyoshare iPhone Data Recovery
Suppose you have successfully activate iMessages function and communicate with your friends or families happily, but one day your iMessages chat history is lost by accident or any other reason, what would you do? One of the best ways to overcome the situation will be to ask any third-party tool, for example, Joyoshare iPhone Data Recovery for assistance. This particular tool happens to be a reliable and powerful utility which has the ability to salvage in excess of 20 types of lost data consisting of iMessages, contacts, SMS, pictures, videos, call history, notes, and so forth on your iPhone device. It will be possible for the users to restore virtually all information successfully and he can likewise preview the iMessages prior to recovery as well.
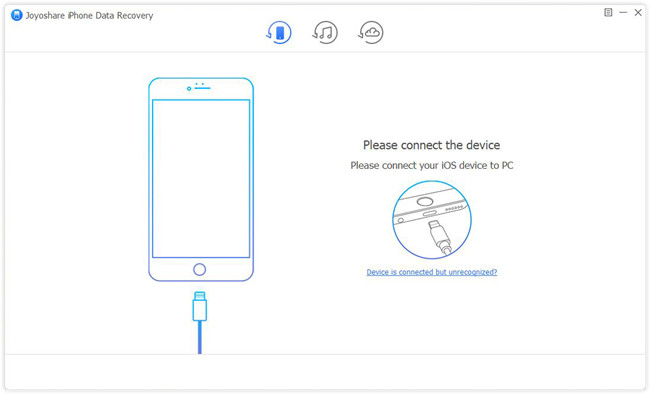
Step 1: Launch Joyoshare after connecting your iPhone device to your computer. In fact, launching the application on your desktop screen will help to detect your device automatically.
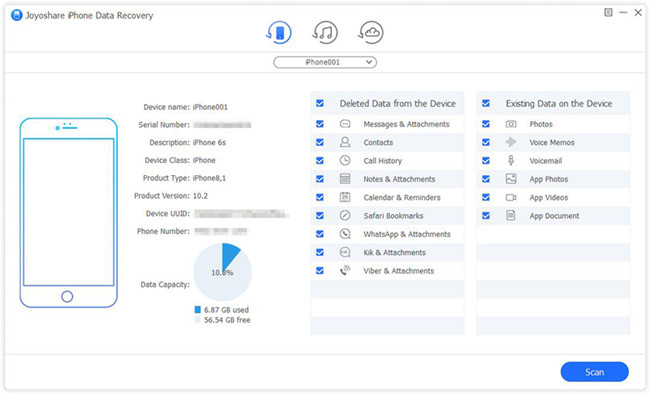
Step 2: Start scanning after selecting the data types. By scanning, Joyoshare will be able to identify any lost or deleted attachment and message.
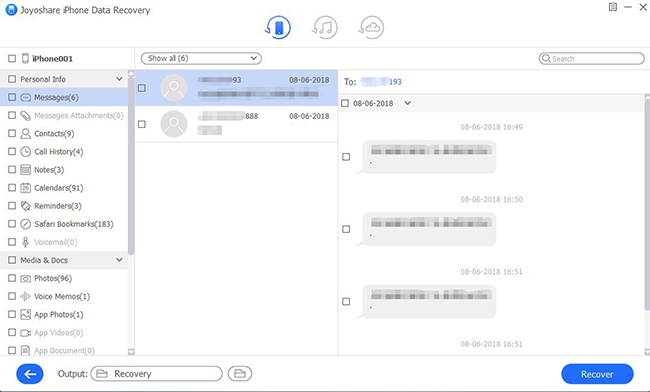
Step 3: Recover the deleted iMessages after previewing them. After the completion of the scanning process, you will be able to view all the recoverable attachments and messages listed in categories. You simply need to preview these items and select the required ones. After clicking the "Recover" button, you need to export the chosen iMessages to your computer's hard drive.
Conclusion
In case all these above-mentioned methods do not prove to be effective when it comes to activating iMessage on your iPhone device, it'll be a sensible idea to contact Apple for assistance. It might be any problem with your device itself and Apple should get it fixed without too many problems at all. However, it'll be interesting to note that it is still possible to use iMessage on different devices while allowing Apple to resolve your problem once and for all.
