Being supported by "Messages" app on iOS 5 and later as well as OS X Mountain Lion and later, iMessage satisfies many an Apple users. You can get away from rigid text messages and enjoy sharing videos, contacts and more with your friends. However, this instant messaging service to a large extent results in a large number of iMessages storage on your iOS device. Once you lose it and have no data backup, you will start to worry. Today, to assist you, we show a tool to recover deleted iMessages without backup and you can also learn some tips at the end.
- Part 1: Tool to Recover iMessages from iPhone without Backup
- Part 2: Guide to Restore Deleted iMessages without Backup
- Part 3: Tips to Avoid Data Loss or Further Data Overwrite
Part 1. Best Software to Recover iPhone iMessages without Backup
No matter under what circumstances did you lose the iMessages, like factory reset, mistaken deletion, virus attack, water damaged, jailbreak, etc., Joyoshare iPhone Data Recovery can come in handy. It provides three solutions to restore from iDevice, iTunes and iCloud.
This iOS utility makes it possible to directly scan, search and find iMessages from your iPhone, iPad or iPod touch. It runs at fast speed and only requires three steps to get data back. Magically, it supports real-time decryption and preview, so you have complete freedom to fully or selectively check your deleted iMessages before recovery.
Key Features of Joyoshare iPhone Data Recovery:
Recover deleted iMessages on iPhone with/without backup
Available for Windows and Mac to download and install
Support 20+ iOS data, like photos, videos, contacts, notes, etc.
Run well for iOS 12.3 and any model of iOS device
Preview the deleted and the existing data as you wish
With ability to retrieve from both common and encrypted backups

Part 2. How to Recover Deleted iMessages without Backup
Here you can complete downloading and installing Joyoshare iPhone Data Recovery on your computer. Next, it's your time to recover deleted iMessages from iDevice with no backup. Let's start the guide now.
Step 1Open program to connect iOS device

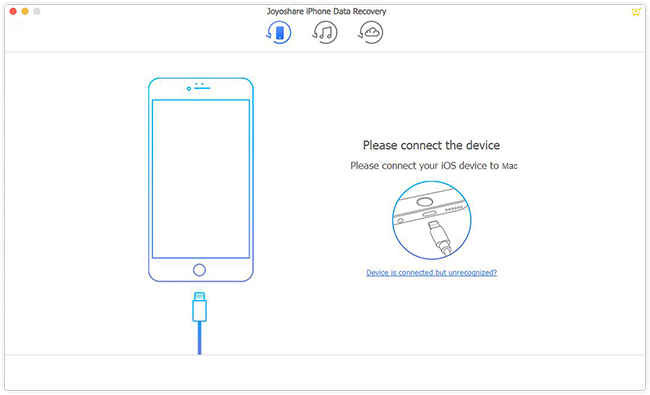
Launch your installed Joyoshare iPhone Data Recovery and choose "Recover from iDevice" on the top navigation bar. You will be asked to connect the device to computer. Do it in your way.
Step 2 Select and scan iMessages

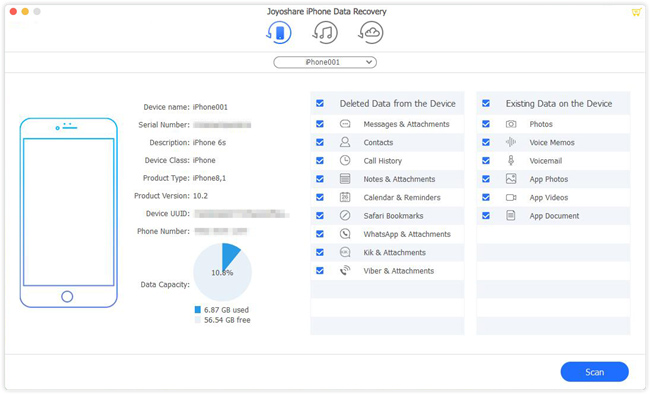
The device info as well as supported data types will be shown after device connection. Mark "Messages & Attachments" and simply click on "Scan" to begin searching data from your iOS device. Of course, you can choose more data as per actual needs to scan.
Step 3 Preview to retrieve deleted iMessages without backup

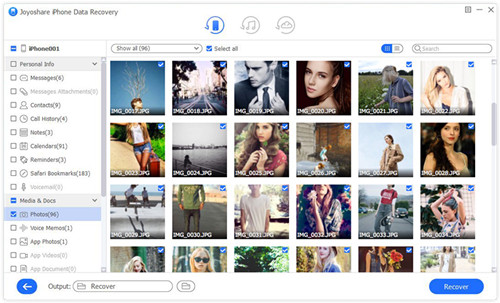
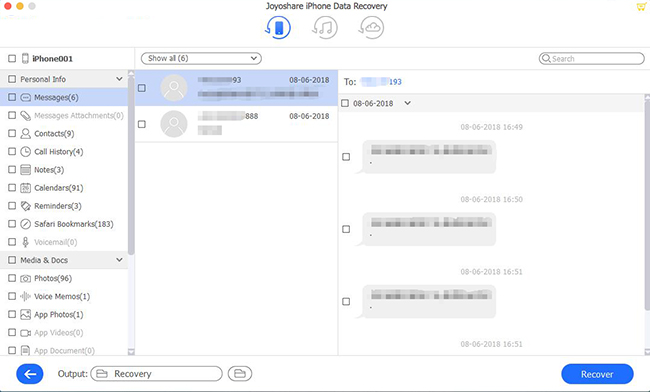
How long it takes to complete the scan depends on the data type and file size you choose; hence, be patient to wait it finished. Later, all recoverable content, including iMessages, will be classified and displayed in the left column's categories. Have a preview to check all of them or part of them. When you ensure what items are needed, you can tick and press the "Recover" button to save on computer.
Part 3. Effective Advice on Data Loss
Considering the frequency, universality and suddenness of data loss, we specially put together a list of useful suggestions for your reference.
1. Get into the habit of backing up important data for your iPhone, iPad or iPod touch;
2. As soon as data loss occurs, stop using your iOS device to prevent further data damage or overwrite;
3. Remember passcode for your encrypted backup, like iTunes. Otherwise, you will have some trouble in extracting data from it when data loss happens;
4. Think carefully before turning two-factor authentication on. If you enable it, the encryption level will be higher and you might difficultly recover data from iCloud backups when there is a data loss;
5. If you think accidental deletion is easy to happen when you sort out thousand of messages, you can learn 4 ways here to quickly find old messages on iPhone.


