When we get our new iPhone, the first thing we do is to set a screen password for the device to protect our privacy and prevent others from using it. Sometimes, we may change this password to improve its security. However, accident always happens, you may forget your password unexpectedly. If you enter the wrong passcode on your device six times in a row, your phone will be disabled.
Under this situation, what would you do to unlock your iPhone? And more importantly, you cannot access to your important data on the phone, and how to avoid losing them? In this article, we're going to help you recover data from a locked or disabled iPhone, and also give you some suggestions to unlock your device and back up your data.
- Part 1: How to Unlock Your Disabled iPhone
- Part 2: How to Recover Data from Disabled iPhone
- Part 3: How to Back up Data on Locked/Disabled iPhone
Part 1: How to Unlock a Locked or Disabled iPhone
According to Apple Support, the only way to unlock your disabled iPhone is to erase your device and remove your passcode, which will delete all of your data and settings. There are two ways to erase your phone, that is, use iTunes or use recovery mode. Here is the step-by-step guide from Apple: If you forgot the passcode for your iPhone, iPad, or iPod touch, or your device is disabled.
Part 2: How to Restore Data from a Disabled or Locked iPhone
After unlocking your disable iPhone, all the original data on the phone will be lost. If you have made a backup before you forget the password, you can restore your device from an iCloud or iTunes backup, and the detailed instructions are described from Apple support: Restore your iPhone, iPad, or iPod touch from a backup.
This method above will help you recover all the data in the backup to your device, but sometimes if you only want to recover some of important ones, or you even have no any backup file, then you may ask a professional iOS data recovery tool for help. Here I highly recommend Joyoshare iPhone Data Recovery for you.
Joyoshare iPhone Data Recovery is a powerful and safe iOS data recovery utility that can recover up to 20 kinds of lost data from iPhone, iPad and iPod touch selectively. With 3 smart recovery modes, Joyoshare iPhone Data Recovery helps you recover any lost or deleted data even if you have no backup files. It provides a real-time preview feature, so you can decide to recover which parts of data according to your needs.
Key Features of Joyoshare iPhone Data Recovery:Fully compatible with all the models of iPhone, iPad and iPod touch as well as the latest iOS 12;
Restore more than 20+ types of data with highest success rate, including contacts, text messages, call history, photos, videos, WhatsApp/Kik/Viber messages and attachements, etc.;
Support to recover from iOS device directly, iTunes backup and iCloud backup with 100% safe guarantee;
Capable of salvaging your iPhone data from various data loss scenarios such as forgotten password, iOS upgrade failure, virus attack, broken device, etc.
Next let's see how to recover data from a disabled iPhone without backup by using Joyoshare iPhone Data Recovery. Just follow the easy steps below:
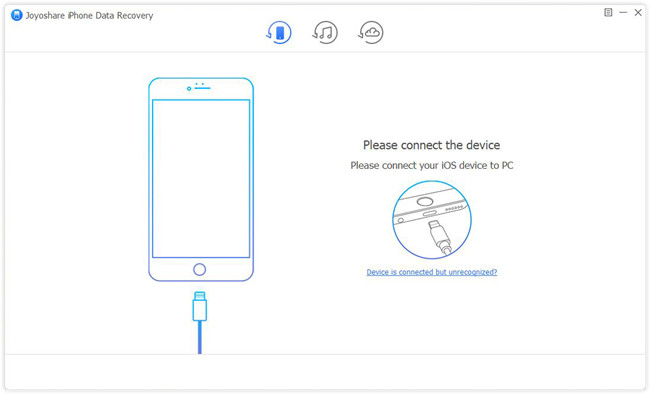
Step 1 Connect iPhone to computer and launch Joyoshare

First of all, please download and install Joyoshare iPhone Data Recovery onto your computer in advance, and then open it. Connect your iPhone device to the PC or Mac with a USB cable. Joyoshare will automatically detect your device.
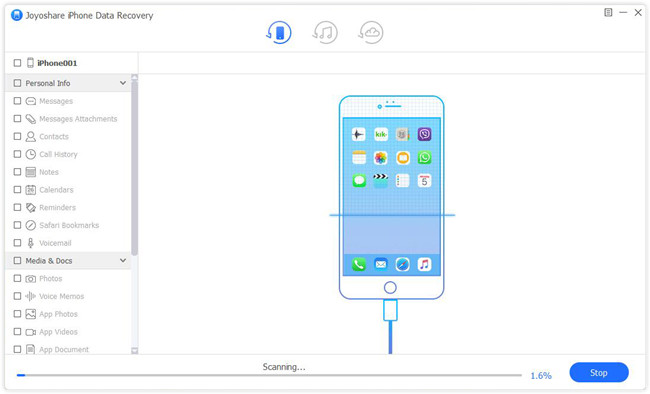
Step 2 Select data types to scan

After Joyoshare recognized your iPhone successfully, it will enter the "Recover from iDevice" mode by default. Next tick the types of data you'd like to recover and uncheck the others, and then click the "Scan" button to let Joyoshare start to scan the data you desire.
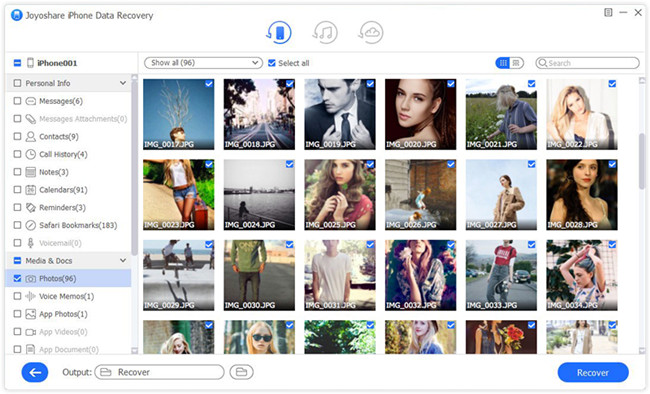
Step 3 Recover data from locked iPhone

Wait a minute until the scanning process is completed. All the recoverable files you selected will be displayed in categories. You can filter out the "Only show the deleted" or "Only show the existing" items or search the required items by entering the keywords in the search box. Then preview the items one by one and pick the ones you want. Afterwards, press the "Recover" button to export and save them to the local folder of your computer.
Part 3: How to Back up a Disabled/Locked iPhone through iTunes
Now you know the importance of backing up data on your phone. To avoid various data loss, I suggest you should sync your data at regular intervals. Usually, we can back up iPhone data through iCloud or iTunes. But when your device is locked or disabled, you cannot store your iPhone data to the iCloud. So we're still able to make a backup with iTunes app on the premise that you've synced iPhone data with the computer before, which means that you have already trusted this computer and your iPhone can be connected to iTunes successfully. Now check the detailed tutorial in this post: How to back up your iPhone, iPad, and iPod touch.


