TeamViewer is a great tool for those who need remote control and monitoring of their devices. Online meetings, seminars, and other events may be held with ease with the app. A file-transfer service is also essential for meeting attendees to exchange papers rapidly. Additionally, TeamViewer can now record sessions. Thanks to this, the complete remote-control operation is captured without any fuss. This has several advantages, such as sharing recorded videos for training and quality control. Here is a simple guide on how to record TeamViewer session. In addition, we will provide you with a superior option.

- Tip 1. How to Record on TeamViewer
- Tip 2. Record TeamViewer with Audio on PC/Mac
- FAQs about TeamViewer
- Comparison Chart
Tip 1. How to Record on TeamViewer?
The video recording function of TeamViewer gives the necessary tools to complete the work at hand. Remote control sessions are automatically recorded in their entirety. Recordings will include the audio from computer and microphone. The app also allows you to record all of your sessions at once. An alert is sent to the other person, indicating that the recording will begin. However, in addition to area recording and editing, TeamViewer recording misses several other critical functions. To record a TeamViewer session, follow the procedures listed below.

- Step 1: Begin setting up a remote connection to the other device. To display the other device's screen, a window will pop up.
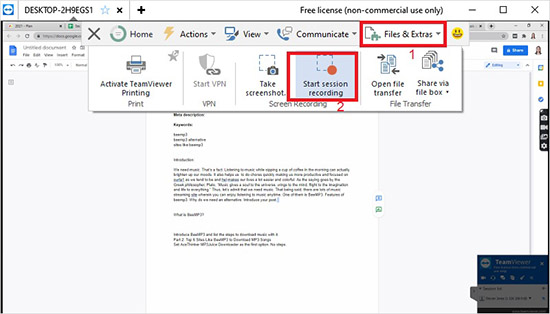
- Step 2: Click "Files & Extras" and "Start session recording". The other person must agree to the recording.
- Step 3: Your recording will then begin automatically. Press the "Record" icon and click on "Stop and Save" when recording. Keep a duplicate of the file in the output folder and monitor it there.
Tip 2. Record TeamViewer with Audio on PC/Mac
Joyoshare VidiKit - Screen Recorder is one of the finest and easiest-to-use apps to record screen and audio simultaneously on Mac and PC. It is the magic recording solution we propose here. Thanks to the most sophisticated screen recording technology, this fantastic utility can capture any video or audio activity on the computer desktop in HD. Because it's so comprehensive, recording conversations, webinars, tutorials, live-streaming videos, games, and other types of content is a breeze. System sound and microphone audio may both be recorded with this software. However, you have the option of selecting which tracks to record. You may save your recorded films and audios in various popular formats and profiles, including MP4, MKV, WMV, MP3, AAC, and WAV.

- Record a high-quality video of your Mac's screen and audio
- Choose your format's default codec, resolution, and more
- Record meeting from Zoom, Skype, Webex, and BlueJeans with audio
- Effects like trimming and watermarking are available
- Full-screen, regular, or bespoke video recording options are all available
Step 1Run TeamViewer meeting recording tool
Download Joyoshare VidiKit from the official website and install it. Double click on its icon to activate this program and choose Record - Screen Recorder. To capture video with audio, click on the camera icon to choose "Record video and audio" mode.

Step 2Confirm recording settings
Click the Options button, a gear icon in the lower right corner, to configure further settings. Press Format button to change output format, codec, quality, resolution, bit rate, sample rate and more. Also, you can set watermark, create recording task, change pointer, etc.

Step 3Choose the recording area
Click the "+" icon below the "Capture Area". You'll notice a pop-up box to choose the screen area you want to record. Alternatively, choose standard area by clicking the inverted triangle icon.

Step 4Screen recording TeamViewer
After selecting everything, tap the blue "REC" button to record the screen and audio. Once you have done the recording, head to the History window to rename, preview and edit recording by using inbuilt media player and editing tools.

FAQs about TeamViewer
Q1. Where are TeamViewer recordings stored?
A: The logged-in user's Documents folder is intended to store all TeamViewer recordings. A new window in "This PC" - "Documents" with the specified extension (*.tvs) appears when you choose "Extras" - "Play or convert recorded sessions" in the TeamViewer window.
Q2. How to start a TeamViewer session?
A: To begin a TeamViewer meeting, choose from the options like a presentation, a video conference, or a call. The first step is to open up TeamViewer and sign in with your existing account by selecting the "Meeting" button. Set a day and time for a new meeting. Using the meeting ID, you may deliver the meeting to attendees through email or phone calls. You may also require participants to provide a password during the registration process.
Q3. Does TeamViewer record audio?
A: Yes, TeamViewer lets you record audio from mic and system during meeting sessions. Choose Files & Extras - Start session recording to record your session. The recording of the session will begin here.
Q4. Is TeamViewer free?
A: TeamViewer is free for personal usage, which includes unpaid activities. Personal use includes connecting equipment at home or remotely assisting friends and relatives.
Comparison Chart
| TeamViewer Recorder | Joyoshare VidiKit | |
| Supported OS | Windows/Mac | Windows/Mac |
| Supported Formats | TVS/AVI | MOV/M4V/MP4/WMV/MKV/AVI/FLV /F4V/SWF/YouTube/Vimeo/Facebook, etc. |
| Price | $23.90 | $15.95 |
| Customizable Quality | √ | √ |
| Schedule Recording | × | √ |
| Customizable Recording Area | × | √ |
Conclusion
TeamViewer is a software application created specifically for managing, controlling, and monitoring PCs, mobile devices, and network devices. Sessions and meetings may be recorded and stored on the platform. This article includes step-by-step instructions on using TeamViewer's session recording capability to record TeamViewer session. Nevertheless, the best TeamViewer meeting recorder - Joyoshare VidiKit, is also advised to better record what is happening on your computer at any given time.


