No matter you are in school or office, a PowerPoint presentation is indispensable. People like to demonstrate their opinions by PowerPoint because it can help others understand their speech content more intuitively. However, it is inconvenient to present again if someone you want to share is far from you. In this case, a question like "how to record a PowerPoint presentation with audio to share and store" has given rise to a hot discussion. You will get the answer soon after reading the below article.
- Part 1. Record PowerPoint Presentation with Audio Using Screen Recorders
- Part 2. Record PowerPoint Presentation with Audio in PowerPoint
- Part 3: FAQs of Recording a PowerPoint Presentation
- Part 4. Conclusion
1. Record PowerPoint Presentation with Audio Using Screen Recorders
1. Joyoshare VidiKit
Joyoshare VidiKit (Screen Recorder) specializes in recording all activities on the desktop with or without audio, such system sound and microphone sound. Thus, it can record PowerPoint presentation with audio in high quality. Besides, you can adjust the size of the recording area and move it anywhere on the desktop. Also, you can save the recordings in various formats and share your presentation to all devices, such as iPhone, tablet, and others. Moreover, you can set shortcut keys to start the recording. Last but not least, you can add a watermark to prevent your presentation from being reposted or used by others without your permission. If your demonstration is so long, the trimming function will be helpful.
- Output recordings in 4K with no delay
- Grab voice form computer system and microphone
- Record screen in customized size or full size
- Easy to skip the unnecessary part and hide the cursor
Step 1 Open Screen Recorder in VidiKit
It is so easy to download and install the program of Joyoshare VidiKit on your PC. After installation, you can launch it by double-click. Then an exquisite and clear interface will be displayed. You are required to choose Record first, then choose Screen Recorder.

Step 2 Select the Area and Turn on Audio
There is no doubt you need to open your file on the PowerPoint first. Next, click the "+" icon to adjust the recording area. You can customize the area by dragging the blue frame or input value next to the "W" and "H". Also, you can select a preset size from the drop-down option. The most important point is that you need to turn on System Audio & Microphone sound to record PowerPoint presentation with audio.

Step 3 Make Further Settings
If you need, you can click the gear icon at the right bottom corner showing Options to do further settings, such as add watermark, set shortcut keys, change the output format and more.

Step 4 Begin to Record Your PowerPoint Presentation
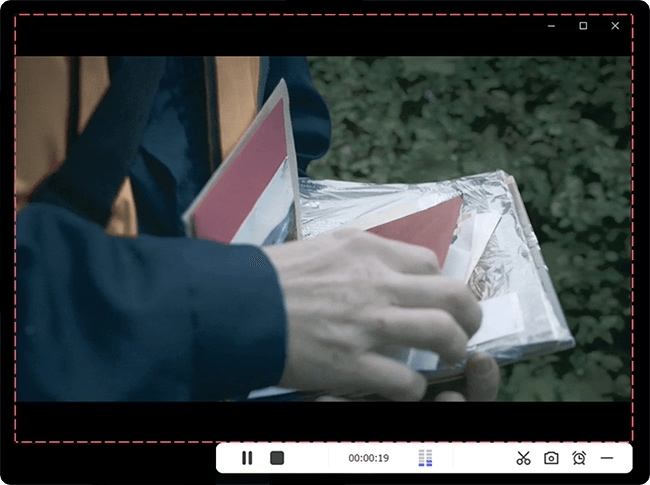
After setting, please click the "REC" button and start recording. When the button is clicked, the small recording toolbar will disappear and start to count down. You can click the "Pause" button when you need to stop your presentation or "Cut" to divide your slideshows into different parts.

Step 5 Manage the Recordings
Clicking the "History" button, a small window will be popped up. You can see that all the recording files are listed. You can preview, rename and edit them if you want.

2. VLC (Windows & Mac & Linux)
VLC is a free and open multimedia player running on all platforms. It could play almost all file formats without downloading additional codecs. The brilliant part of the tool is that VLC could also be applied to take screenshots and record screen videos. Hence, it is also a good choice to record in PowerPoint using VLC. However, the record button is hidden from the main interface by default. You could open VLC and click View → Advanced Controls. Then the record button would show up near the Play button and you could follow the instructions below to complete further operation.
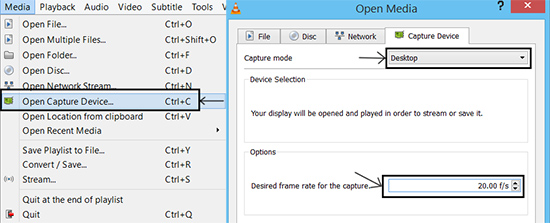
- Step 1: Locate the Media option from the top menu and select Convert/Save then.
- Step 2: Click the Capture Device → Capture mode → Desktop.
- Step 3: Next, you could preset the frame rate in the dropdown menu of Desired frame rate for the capture.
- Step 4: You need to name your file by clicking Convert/Save button. After everything is settled, click Save. Last, click Start to start recording a PowerPoint presentation.
3. QuickTime Player (Mac)
There is also an alternative way that fits Mac users. QuickTime Player is a well-known multimedia player developed by Apple. You could use it to stream live videos, handle images, split clips, and record your screen activities. If you are a Mac user and want to know how to record a presentation on PowerPoint with audio, QuickTime Player turns out to be a good pick.
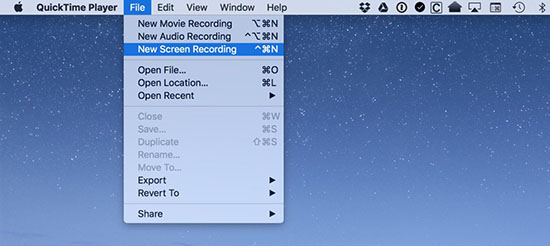
- Step 1: Start the player on your Mac and locate the Files from the taskbar.
- Step 2: Then choose Screen Recording and a new window would appear. You could click the down arrow beside the red button to adjust settings properly. After that, click the red button on the interface.
- Step 3: Another recording window will come out. You could record the full screen by clicking anywhere, and part of the screen by dragging the edge. Then click Start Recording when you are ready.
2. Record PowerPoint Presentation with Audio in PowerPoint
It is understandable if you are unwilling to download another screen recording software on your computer, but prefer to use PowerPoint to record screen. As we all know, PowerPoint is a tool to offer users various ways to display information with words, pictures, videos, and more. To meet more needs, screen recording function has been added. It is quick and easy to operate. However, please keep in mind, comparing with full-featured screen recording software, there are a lot of things that PowerPoint's screen recorder can't do because of some limitations, like lacking of editing, schedule recording, customizing area features.
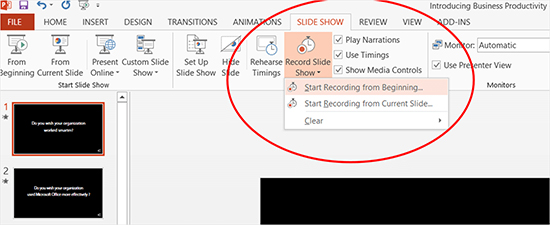
- Step 1: Run the PowerPoint on your desktop, and open the file that you need to present on the program. Then click the Slide Show tab at the top and select Record Slide Show.
- Step 2: Two options are provided here. Record from Beginning option means starting from your first slide, while Record from Current Slide option would start from the slide you want.
- Step 3: Before recording, you could opt to turn off the camera which is enabled by default. The audio is enabled as well, you could keep that to record powerpoint presentation with audio. Next, you could click the RECORD button to record your presentation. Switch slides by clicking the directional arrow button and complete the recording task by clicking Stop.

Part 3. FAQs of Recording a PowerPoint Presentation
Q1. Can I convert a PowerPoint presentation to the video with audio?
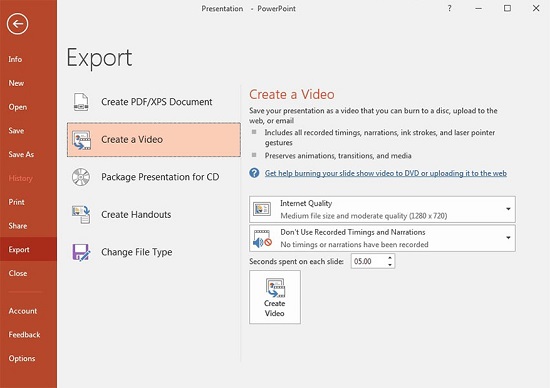
A: Yes, it is easy for you to convert a PowerPoint presentation. After saving the file, go to File and select Export on PowerPoint. And click Create a Video to get your presentation video with audio.
Q2. Can videos be automatically played in PowerPoint presentation?
A: Yes, you could choose the video in presentation in Normal view first. Then click Playback button under Video Tools. Next, click the arrow beside the Start button and choose Automatically.
Q3. What audio files does PowerPoint support?
A: PowerPoint supports various audio file formats, which include AIFF, AU, MIDI, MP3, MPEG-4, etc.
Q4. How long can I record my screen with PowerPoint?
A: There is no time limit when recording screen with PowerPoint so far. You are free to record the presentation with audio in any length.
Q5. How to take a screenshot on PowerPoint?
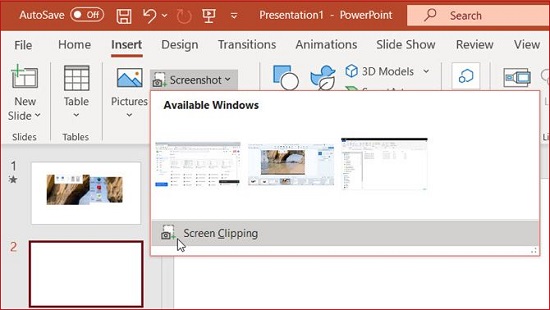
A: Head to Insert tab on PowerPoint, and click Screenshot. If you want to capture a selected window, you could click Screen Clipping and define the area.
Part 4. Conclusion
The post has delivered various methods about how to record a PowerPoint presentation with audio. I believe you would record the presentation with ease via these ways, and share or present the video as you wish. Please let us know in the comment section if you have any doubts.


