Q: "How to record a meeting in Microsoft Teams?" - From Quora
Nowadays, companies increasingly adopt extended work-from-home policies. But they will need help from many video conferencing apps such as Microsoft Teams to engage remote workers and collaborate across departments and locations. People can use Microsoft Teams to join a group chat or a video call instantly, connect, share and coauthor files in real-time securely, etc. If you want to record Microsoft Teams meeting to keep some important meetings for future reference, you can use not only the screen recording option in the app, but also many other third-party video recorders which will give you more available recording and editing features. And today's article is going to show you how to do all of them.
- Part 1. Record Meetings with Microsoft Teams
- Part 2. Record on Windows
- Part 3. Record on Mac
- Part 4. Record on iPhone and Android
- Part 5. You May Also Want to Know
Part 1. How Does Microsoft Teams Record Meeting
Microsoft Teams has its built-in video conference recording tool to let you record meeting sessions or call on the platform for later viewing or sharing with others who cannot participate in the meeting. Moreover, the recording happens in the cloud so you can share it immediately and securely across your organization. However, this function is not included in the free plan of Microsoft Teams. Simple steps on how to use Microsoft Teams to record meetings straightforwardly are as follows.
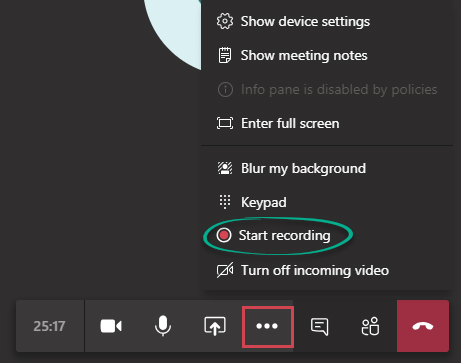
Step 1: Launch Microsoft Teams on your computer or mobile phone and then start or join a meeting;
Step 2: Tap on the "More options..." button in the meeting controls and then choose "Start recording and transcription" in the pop-up dropdown list;
Step 3: Similarly, click on the "More options..." button in the meeting controls and then hit on the "Stop recording and transcription" option to end the meeting.
Note: Mobile users need to update to the newest version of the Teams app for iOS and Android. Everyone involved in the meeting will be notified when the recording and transcription starts. This notification will also be posted in the chat history of the meeting. It's important to note that you can't record multiple recordings at the same time. The recording will be kept at cloud and every participant has access to it.
Part 2. How to Record Microsoft Teams Meeting on Windows
Joyoshare VidiKit is a capable tool that can be fully matched with your Microsoft Teams to complete the recording. It not only captures your meeting screen with high quality, but also grabs the voice from the microphone well during the conference. You can rest assured that this small software will allow you to record any activity without the trouble of duration and watermarks.
- Record a meeting in Microsoft Teams with sound in optimal output quality
- Record Zoom meeting, WebEx meeting, GoToMeeting Webinar, etc. easily
- Save virtual meetings and video chats without a watermark and time limt
- Offer flexible settings to customize recording area and saving format freely
- Cut and schedule recordings, manage ID3 tags, highlight cursor and clicks, etc.
Step 1 Download and Install the Program
Download and install the latest version of Joyoshare VidiKit to your computer. After that, simply start the program and select the "Record" panel to open the inserted screen recorder. When the user interface shows up, make sure that the
 icon has been enabled so that you can record Microsoft Teams meeting sessions with audio.
Step 2 Turn on Microphone and Set Further
There is no denying that it's critically important to record conversations in Microsoft Teams meetings clearly and smoothly. Therefore, don't forget to go to "System Audio" on the main screen of the program to turn on your Microphone device and adjust the corresponding volume bar. The operation is same for system audio.
More settings options can be viewed after clicking on the gear icon near the "REC" button. At that time, you will be able to preset shortcuts, personalize the output format, add a customized watermark to video conference recording, show clicks, etc.

Step 3 Select a Recording Region
You can record Microsoft Teams meetings either in full screen or a partial screen of any size. All you need to do is to press the "+" icon on the left side of the main screen of Joyoshare VidiKit and drag the adjustable blue frame in the way you like. In addition, you are free to choose a standard resolution directly by clicking on the triangle icon near the "+" icon.

Step 4 Start to Record a Meeting on Microsoft Teams
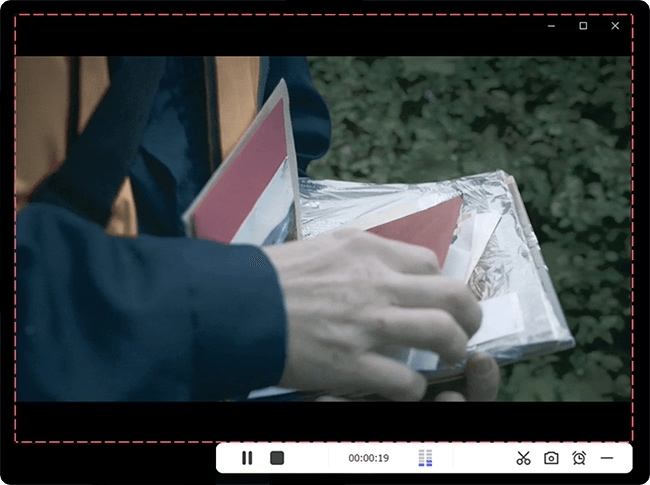
Now open your Microsoft Teams program and join a meeting. When you are ready, click on the blue "REC" button to start recording both the screen and voice. You will notice that there are three buttons on the minimized toolbar. Among of them, the "Cut" button can be used to split the whole meeting into different parts according to the conference arrangement. You are also free to press the "Pause" button to skip any content you don't want to record during the meeting.

Step 5 Save and Edit Recorded Meeting Videos from Teams
When the meeting is over, you can click the "Stop" button on the toolbar. Soon, you'll see your output files in the History window, on which you're able to rename, preview and trim your recordings.
Part 3. How to Record Meetings on Microsoft Teams on Mac
QuickTime Player
QuickTime Player comes with every Mac computer. You can use it to quickly edit a movie, record the entire screen or just a portion of it on your Mac computer, etc. It would be much more convenient if you know how to use QuickTime Player app to make a Microsoft Teams video recording of your Mac screen.
Key Features:
- Record the entire screen or a selected region
- A popular multimedia player to handle numerous videos
- Edit videos by trimming, rotating, rearranging, etc.
- Split a movie into several clips easily
Guide:
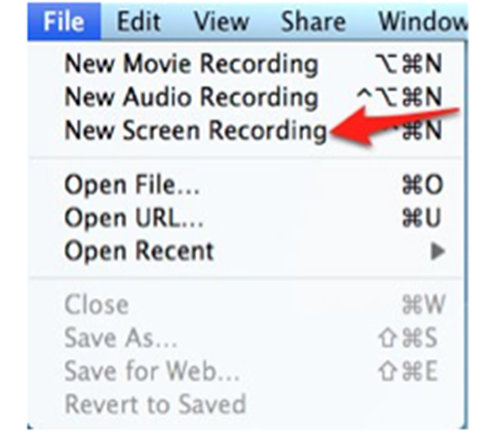
Step 1: Navigate to File > New Screen Recording from the menu bar in the QuickTime Player app on your Mac to open and display the onscreen controls;
Step 2: Click on the down arrow to customize your recording settings such as choose the "Internal Microphone" so as to record your voice, select the "Show Mouse Clicks in Recording" to highlight your clicks, and so forth;
Step 3: You can also adjust the volume slider below the "Record" button;
Step 4: To start recording Microsoft Teams meeting, you need to click the "Record" button and then choose to either click the Mac screen to record the entire screen or drag to choose an area to record;
Step 5: Press the "Stop" button or Command-Contrl-Esc (Escape) to stop recording Teams meeting session, and after that, your recording will be opened automatically.
EaseUS RecExperts
EaseUS RecExperts is an easy-to-use screen recording software, which can help users record almost all online meetings in a fast and easy manner. Additionally, EaseUS RecExperts also offers you a number of features that allow you to capture full screen or a selected area, record computer audio, add text and arrows to Microsoft Teams meeting recordings, and more.

Key Features:
- Highlight the important content you would like to show
- Offer options to schedule recording, capture screen in flexible size, etc.
- Record computer audio and microphone voice
- Export recorded Microsoft Teams meetings to popular platforms
Guide:
Step 1: Run EaseUS RecExperts on your Mac and choose "Record Screen" on the main screen;
Step 2: Click on the "Custom" button and you may choose "Full screen", "Select region", "Fixed region", "Lock window" etc. to select a screen area to record;
Step 3: Press the "Microphone" button and then check "Microphone" or "System sound and microphone" as you like;
Step 4: Tap the red "REC" button on the main screen to begin to record meetings in Microsoft Teams;
Step 5: You can right-click the recorded meetings and you will be able to choose to preview, compress, edit or delete them handily.
Part 4. How to Record Meeting in Microsoft Teams on iPhone/Android
If you often have Microsoft Teams meetings on your smartphone, maybe an iPhone and Android screen recorder would be more suitable for you. And here DU Recorder is highly recommended. This screen recording software has developed both screen recording and live streaming features. Supporting audio recording, it will allow you to do high-quality screen recording with the sound of the meeting partcipants and then save videos to your device. What's more, DU Recorder also enables you to easily perform some video editing operations with the screen recorder.
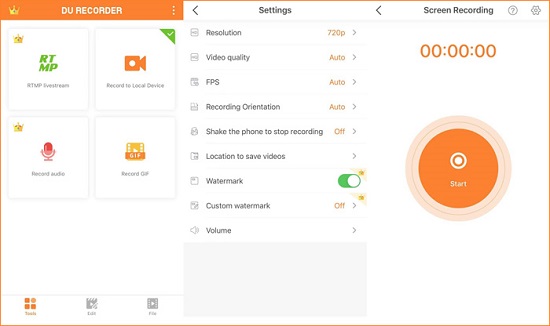
Key Features:
- Small installation package
- No root needed and no recording time limit
- Record meetings on Microsoft Teams in 1080p at 60fps
- Free app to record videos with external sound
For iPhone
Step 1: Download DU Recorder from its official site, and after that, open your Settings app and then go to Control Center > Customize Controls to find and add Screen Recording to your Control Center;
Step 2: Open your Microsoft Teams app to join or start a meeting, and then long press the Record icon on your Control Center and choose the "DU Recorder Live" option as well as enable your microphone;
Step 3: Tap Start Recording to begin to record Microsoft Teams meeting;
Step 4: To stop recording, you just need to click on the red bar at the top of your iPhone screen or alternatively, press the Record button in Control Center again, and you will find your recorded meeting in your Photos app.
For Android
Step 1: Having launched DU Recorder on your Android, you will see an overlay on the side of your phone screen;
Step 2: Open your Microsoft Teams meeting window and then tap the camera icon to choose the Record option to begin to record your Teams meeting session;
Step 3: Pause, restart or stop recording at any time and after recording, you will be able to play and edit the recorded meeting easily and handily.
Part 5. FAQs about Microsoft Teams:
If you are using Microsoft Teams, you may also be unfamiliar with its recording capabilities. Here are some frequently asked questions mentioned by users. You can take a close look.
1 Where are Microsoft Teams recordings stored?
Teams meeting recordings are used to be saved to Microsoft Stream. But now all meeting recordings will be saved to SharePoint and OneDrive for Business even if users have changed their Teams meeting policies to Stream.
2 How to join Microsoft Teams meeting?
There are many different ways to join a Microsoft Teams meeting, including join by a link, join from chat, join from calendar, call in, join in a channel and add a room while join. You can check more details here.
3 Who can start or stop a recording?
To start, you shouldn't be a guest, an anonymous people or an external attendee, have a license of Office 365 Enterprise E1, E3, or E5, and have recording right enabled by an IT admin. To stop, you should be a person from the same organization or a meeting's organizer.


