Q: "How to record live video on Instagram?" - From Quora
Having so many awesome features, Instagram has become one of the greatest social media platforms in the world. On Instagram, you can share live videos to connect with your friends in real-time and contact your followers simultaneously for more interactions. The popularity of Instagram live stream continues to grow. Some people also start to use it to establish their personal brands. As live videos usually disappear automatically when the live stream over, more and more people are wondering how to record YouTube Live, Facebook Live, Bigo Live, etc. to save videos for later viewing. So today let’s walk through exactly how to start a broadcast on Instagram and a few ways on how to easily record Instagram live on PC, Mac, iPhone, and Android.
- How to Go Live on Instagram
- Part 1. Best Way to Record Instagram Live on PC and Mac - Joyoshare VidiKit
- Part 2. Best Way to Record Instagram Live on iPhone and Android
How to Start a Live Broadcast on Instagram
You may need to start a live broadcast on Instagram for many reasons, such as share your tutorials, do an interview, alert followers about sales, etc. After all, Instagram Live allows you to share longer videos that are up to an hour. Going live on Instagram using the official mobile app is simple. The first thing you are going to need is an Instagram account. Now let's jump into the first step.
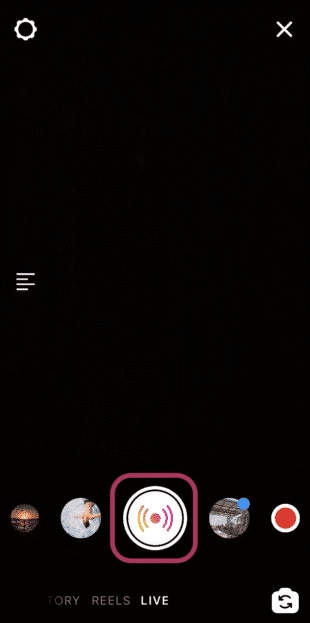
Step 1: From your feed or profile, press the "+" icon at the top, then you will be led to a screen where you can select the type of content you would like to create;
Step 2: Swipe and scroll to Live at the bottom; you can click Title on the left > enter a title > press Add Title to add a title;
Step 3: Press the record button at the bottom and the number of viewers will show up at the top of the screen and comments appear at the bottom; you can press the Comment box to add a comment as well;
Step 4: When you are about to end your live streaming on Instagram, you can press End in the upper-right corner of the screen, and after that, you will be able to save your video to your camera roll or share it to IGTV.
Part 1. How to Record Live on Instagram on PC/Mac - Joyoshare VidiKit
There are many ways to screen record Instagram live videos on PC and Mac, but only a few of them are more efficient than Joyoshare VidiKit (upgraded from Joyoshare Screen Recorder). The Joyoshare's all-in-one application has lots of good, appropriately designed features that can help every user record all desktop activities in extremely high quality. No watermark, no lag at all, and no time limit. It is one of the best screen recorders today.
Joyoshare VidiKit also has a video editor that allows you to brush up your videos. There you can insert a watermark, schedule a live recording task, highlight clicks and cursor, customize the output format, and more. To record streaming videos in a flexible manner, you can also choose between a full screen or a target window of any size. After recording, you are free to play and edit your files with ease.
- Support many output video and audio output formats, devices, etc.
- Record Instagram stories and live videos in 4K or HD quality
- Record the entire computer screen or grab a particular window
- Change codec, bitrate, frame rate, resolution, quality, and more
- Trim and cut screen recording, schedule a recording task, etc.
- Record lag-free live videos with no watermark and no time limit
Step 1 Find and Open Screen Recorder
Open Joyoshare VidiKit on your device and go to Screen Recorder on the "Record" panel. Any attempt to record an Instagram live video with sound requires the use of the "Record video and audio" mode. To do so, please click the
 icon near the "REC" button. But if you only want to record audio, you are free to tick the
  icon.
icon.
Step 2 Adjust Recording Preferences
You can change your recording settings according to your preference. The gear icon near the "REC" button will further open a window for customizing more custom options like the output format, location, record timer, shortcut keys, mouse effects, and more.

Select the area you want to record by clicking the "+" icon on the "Capture Area" section. Then, pinch the edges of the capture frame or manually enter the width and height values to change the size of the frame. You can also choose to turn off the microphone to avoid unexpected noise.

Step 3 Record Instagram Live Stream
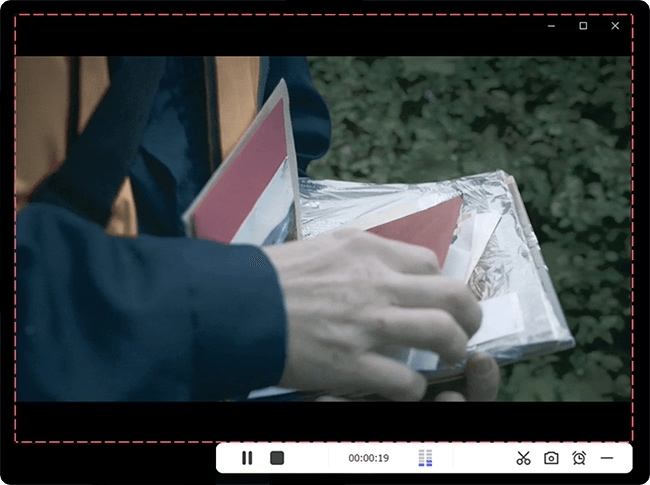
When you are done, tap the "REC" button to start the Instagram live capture. After a countdown of 3 seconds, the recording will begin and the toolbar will be minimized. You can make use of the "Pause" button to skip any unnecessary content, the "Cut" button to create several independent recording clips, and the "Stop" button to exit the recording at any time.

Step 4 Edit Instagram Live Video
You can start to play and edit your Instagram live videos or audio the moment you click the "Stop" button. You are free to rename files or hit the "Edit" icon to cut out unwanted portions of your saved videos or audio. Moreover, you will be able to adjust the ID3 tag information of your audio files.

Part 2. How to Record Live Video on Instagram on iPhone and Android
Without a Third-party App
It is common for you to watch Instagram live videos on your iPhone. There are many times when you want to record and save them but do not know how to do that. As a matter of fact, iPhone features an easy-to-access screen recorder for every user. You can open and use it to record what you are watching on your iPhone without any download and installation.

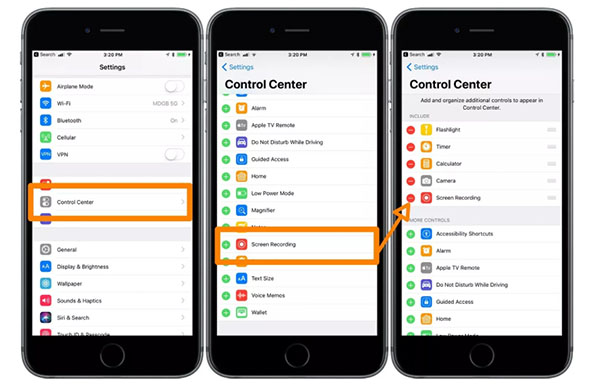
- Step 1: Open the Settings app on your iPhone, then go to Control Center and press the "+" icon next to Screen Recording to add the feature to your Control Center
- Step 2: Open your Control Center, then press the record button, and after that, wait for the three-second countdown and your iPhone will start to record Instagram live later;
- Step 3: Tap the red status bar at the top of your iPhone screen, or alternatively, open your Control Center to press the record button again to stop recording live video on Instagram;
- Step 4: Now you can check your saved Instagram live videos on your Photos app.
Similarly, you can also find a built-in screen recorder on most Android phones. The screen recording utility on Android devices will enable you to record live videos on Instagram, show off your gaming skills, compose a tutorial, etc. Here we will take Huawei as an example and show you how to screen record Instagram live on Android without any hassle. You will be able to start screen recording using a key combination, a shortcut, or two knuckles.

- Step 1: You are able to press and hold the Power and Volume up buttons at the same time to start and stop recording Instagram Live;
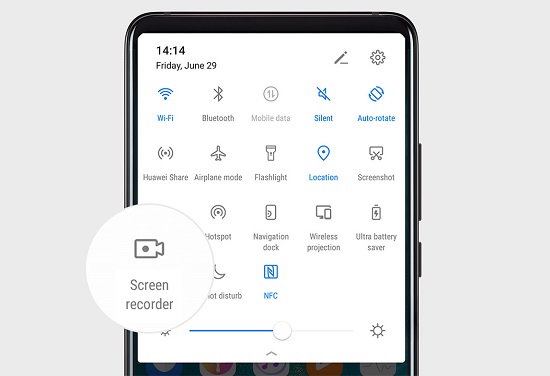
- Step 2: To use a shortcut to record someone else's Instagram live, you can first open the notification panel, then press "Screen Recorder" to begin to record Instagram live videos; you are able to tap the timer to stop recording and find the recordings in the Gallery;
- Step 3: To use two knuckles to record Instagram live, you are required to navigate to Settings > Accessibility features > Shortcuts & gestures > Record screen to make sure that Record screen is activated;
- Step 4: Now you are able to use two knuckles to knock the screen twice quickly to start to record live videos on Instagram; knock your Huawei screen twice again to stop the recording.
With a Third-party App
Here we are going to recommend a third-party screen recorder on both iPhone and Android for you. It is called IGLiveRec, which can be downloaded on Google Play or App Store. What makes this mobile app unique is that it can start recording your mobile phone screen automatically when the Instagram profile you are following starts a live broadcast. It will bring you a lot of conveniences especially when you follow multiple profiles on Instagram at the same time but are unable to view their live streams at once. Using IGLiveRec, you will be able to watch, record, or save Instagram live videos easily and quickly.

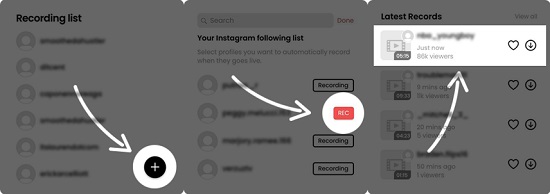
- Step 1: At the beginning, you can press the "+" icon to select the Instagram profile you would like to record when they start a broadcast;
- Step 2: Next, you need to click the "REC" button to select the Instagram profile you would like and add it to the auto-recording list;
- Step 3: IGLiveRec will record Instagram live automatically, and after the live video end, you are free to watch it or save it to your device offline.
Conclusion
Since currently, Instagram does not allow you to go live on computer directly, you can only use Joyoshare VidiKit (originated from Joyoshare Screen Recorder) to record someone else's Instagram live in high quality without a watermark. But using the default screen recorder or IGLiveRec on your smartphone, you will be able to smoothly record other people's or your own Instagram live videos. No matter which way you choose, the streaming video recorder tools mentioned above will help you create lag-free and high-quality videos without any problem.


