Disney movies have been giving us incredible entertainment since our childhood. Kind and beautiful princesses, magnificent castles, brave warriors, etc. are beautiful memories we all hold inside our hearts. Now, Disney Plus, also written as Disney+, is a new and creative streaming platform founded in 2019. From classics to new releases, you can always discover wonderful movies and TV shows on it from Disney, Pixar, Marvel, Star Wars, and National Geographic. Download and record Disney Plus videos so that you can save and keep your favorite Disney videos forever. But don't worry if you don't know where to start. This article will tell you how to screen record Disney Plus as well as download with far less effort.

- Part 1. Is it Illegal to Screen Record Disney Plus?
- Part 2. Download Videos via Disney Plus App
- Part 3. Get Disney Plus Videos with Screen Recorder
- Part 4. Record Disney Plus Videos via PlayOn Cloud (iPhone & iPad & Android)
- Part 5. FAQs about Screen Record Disney Plus
Part 1. Is it Illegal to Screen Record Disney Plus?
The content from Disney Plus has strict copyright protection. Users can download movies legally and officially using the authorized download options, which can be watched only in this streaming app or be played in a proprietary application. Generally, the content cannot be distributed, copied and recreated. That is to say, removing DRM is illegal. What we share below is an official fix or only for unprotected content.
Part 2. Disney Plus Download Offline
Disney Plus app has a download option on your mobile phone. Watching live stream videos could be annoying especially when we get a weak Wi-Fi signal. But this option means we no longer have to rely on the online platform, which is delightful. It is easy to learn how to download shows and movies on the Disney Plus app.
- Step 1: Open Disney Plus website on your computer or install the Disney Plus app on your smartphone;
- Step 2: Select the video title you want to download and click the Download icon at the rear of it;
- Step 3: To download the whole season of your shows, you can tap the Download icon right next to the "Season". You can check your downloads under the "Downloads" option at the bottom of your app screen.
Note: You are supposed to log in to your Disney Plus app at least at a 30-day regular. Otherwise, your downloads will expire. Also, logging out of your Disney Plus account will terribly remove all of what you downloaded from your device. To watch the previously downloaded content again, you'll have to log back in your account and re-download them.
If you prefer to enjoy offline Disney Plus videos on your computer, or would like to save part of the video, or just have no enough storage space on your phone, you need a professional screen recorder to help you. The following parts will introduce various awesome screen recorders, some for computer users, and the others for mobile phone users. You can choose what you like. Disney Plus downloads would never expire on these programs.
Part 3. How to Record Disney Plus Stream for Computer
3.1 Joyoshare VidiKit [Windows & Mac]
Joyoshare VidiKit - Screen Recorder is a robust all-in-one solution on grabbing any on-screen video and recording any audio detected on your computer. You can rely on it if you would like to capture movies from Disney Plus, Hulu, etc. make how-to videos, take screencasts, record online meetings, grab gameplay, etc. Furthermore, you are also able to save your recordings as any format into any device. This program's continuous technological innovations equipped itself with a variety of settings as well. You can grab capturing area freely, adjust video/audio codec, bit rate, etc. add image watermark, trim recordings frame by frame, etc. No time limit, no file size limit, and no product watermark, this software is competent to enhance your recording experience for sure.
- Record movies, streaming videos, and TV shows from Netflix, Hulu, etc.
- Record Disney Plus in full screen or partial region
- Multiple options of resolution, codec, frame rate and more
- Show/highlight cursor and mouse movements
- Schedule recording tasks, trim files, capture audios, etc.
Step 1 Download and Install Joyoshare VidiKit
Before you download, you are supposed to check if Joyoshare VidiKit supports your operating system. After installation, run it on your computer and click Record, followed by Screen Recorder. Be prepared to play your Disney Plus TV shows or engaging movies. You'll record at "Record video and audio" mode by default.

Step 2 Confirm Recording Settings
Press the blue gear icon at the bottom-right corner of the screen to open the settings window. Under "Basic record options", you can press the Format button to set output format and the Watermark button to add your personal logo. If you are going to record a Disney Plus movie that lasts for hours, you are able to set the start/end time of your recording under "Record time options". You can also choose to show/hidden/highlight cursor under "Cursor options".

Step 3 Grab Recording Area
Go to the left side of the screen and hit the "+" icon. Drag and adjust the size of the appeared red frame so that you could record the specific area you want. Or you can click the small triangle icon nearby to choose from a list of standard resolutions. Then you can open your system audio and/or microphone and change volume under System Audio option.

Step 4 Screen Record Disney Plus Shows/Movies
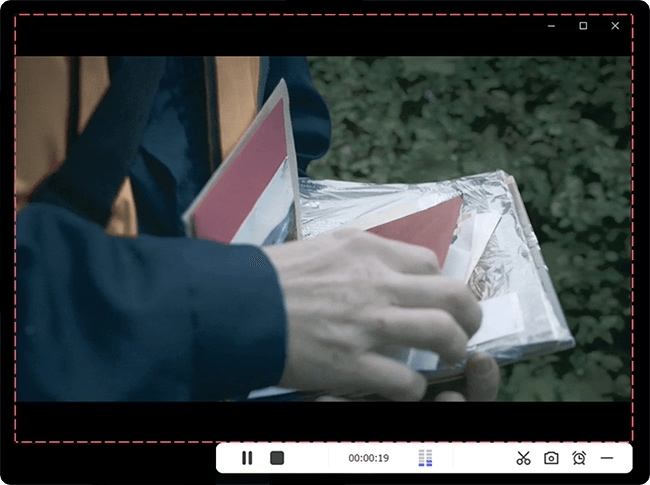
After everything gets ready, you can press the REC button to start to record your favorite Disney Plus shows and movies. After a 3-second countdown, you can find a mini toolbar outside the recording area. You are able to press the "scissor" button to cut recordings and the Pause button to skip your unwanted content.

Step 5 Save Disney Plus Video(s)
Recordings are automatically saved on your computer. Press the History button on the upper-right corner of the screen to manage your recordings, such as rename, snapshot, and trim them.
3.2 OBS (Windows & Mac & Linux)
Another workable recording software to capture great shows on Disney Plus is OBS. It is a powerful and multifunctional tool served for video recording and live streaming. It can be used to grab diverse scenes, such as screen, Windows, gameplay, browser, webcams, etc. Besides, OBS is loaded with customized features and settings, making it possible to create your characteristic recordings. Yet its panel is relatively more complicated than other recording tools, and it may take some time to fully grasp the operation.
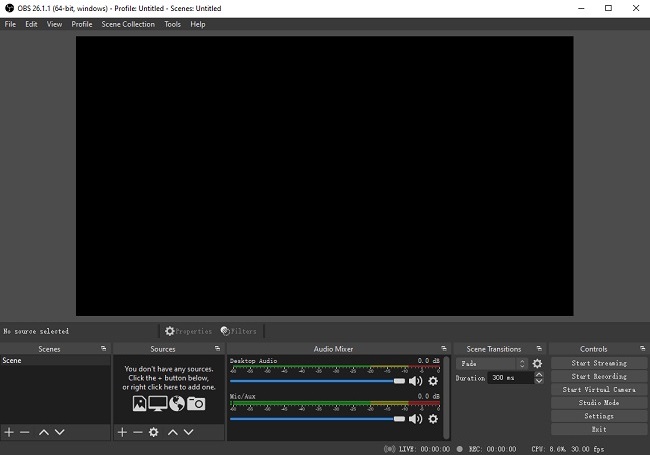
- Step 1: Install and open OBS on your computer. Head to the + icon in the bottom left corner under Scenes to add a scene manually. If the scene is added automatically, you can skip to the next step.
- Step 2: Go to the Sources box and hit the + button. Select Display Capture. When the pop out comes, hit OK.
- Step 3: Play the movie or series you want to record on Disney Plus. Then click Start Recording in OBS's Controls section. If you want to end the recording, hit Stop Recording.
3.3 QuickTime Player (Mac)
QuickTime Player is a pre-installed media player for Mac devices. In addition to the main function of watching multimedia content, it is feasible to record screen easily. If you are a Mac user who wants to save Disney Plus shows locally, this versatile application won't let you down. It also performs well in audio recording. You can pick the audio input you want while recording. More than that, QuickTime Player captures Disney Plus in high resolution, and you'll get recording files with little compromises on quality. Yet it still has deficiencies and gaps when compared to professional screen recorders, such as lacking webcam recording and limited output formats.
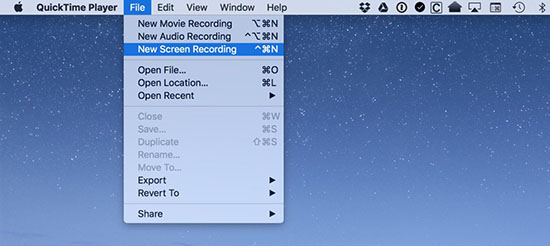
- Step 1: Open this application from Mac's Applications folder. Click File at the top and choose New Screen Recording.
- Step 2: You can choose to record an entire screen or a selected screen. Also, you are able to disable microphone and hide mouse clicks to create a better recording environment by hitting Options.
- Step 3: It's time to play your favorite show on Disney Plus and click the Record button in the menu bar of QuickTime Player. You could click Stop Recording button to end capturing videos on this streaming platform anytime.
3.4 Xbox Game Bar (Windows)
Windows users have a built-in screen recording feature as well. Xbox Game Bar is a gaming overlay with a variety of functions for Windows 10 and 11, giving you instant access to screen recording, taking snapshots, and other functionality while playing games. Hence it could also be applied to record the content from Disney Plus with simple steps. One thing to point out here is that it can record only one window panel each time with no more than 4 hours, which means it might not be an appropriate option to record the series on Disney Plus at one time.
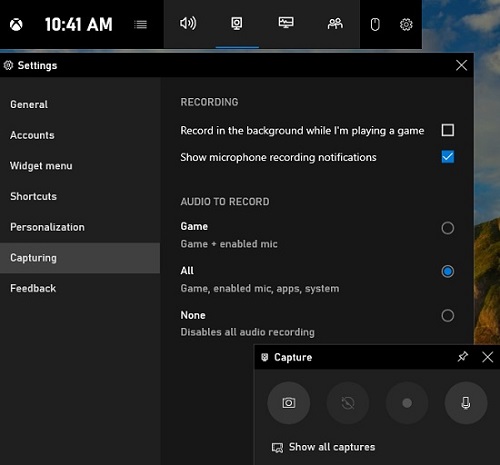
- Step 1: Activate the tool by pressing Windows + G keys. A widget menu will pop out.
- Step 2: From the menu bar, you can click Settings → Capturing to set the audio source.
- Step 3: After that, prepare the show you want to record and click Start recording. Last, click Stop recording to stop capturing Disney Plus.
Part 4. How to Record Shows/Movies from Disney Plus for iOS and Android
PlayOn Cloud is a screen recording tool for Android, iPad, and iPhone so that you could watch Disney Plus videos anytime and anywhere. You can use it to save streaming videos from up to 22 channels, including Hulu, Amazon, Netflix, and more. However, it only offers you free cloud storage for 7 days. And after that, it will cost you $39.99 for 350 recordings, which means you have to take additional pay if you are going to record more Disney Plus videos.
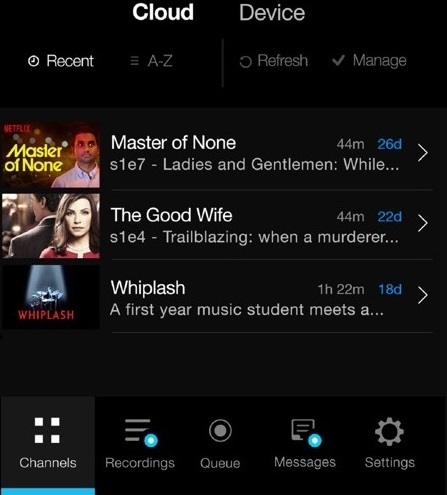
- Step 1: Visit the App Store on your iPhone or iPad (or Google Play Store on your Android) to download PlayOn Cloud app;
- Step 2: Open the PlayOn Cloud app on your device and select Disney+ from its Channels tab;
- Step 3: If you have found what you want to record, click the title to see the details screen;
- Step 4: Click the blue Record button to begin. All your recorded files will be preserved under Recordings.
Part 5. FAQs about Screen Record Disney Plus
Q1. Why can't I screen record Disney Plus?
A: Like other OTT (over-the-top media services) platforms, Disney Plus owns and protects its available content, including shows, movies, sports and more. With DRM, it prevents you from recording screen. This is the reason why you cannot do that.
Q2. Why can't I take screenshots on Disney Plus?
A: In fact, Disney Plus is hardware accelerated, meaning the movies or videos are indeed straightly rendered on your graphics card. However, our Windows computer cannot access this data to visit video content unless it's copied back to the CPU. This is the reason why you cannot take screenshots, only to see a black or blank screen. Another possible reason is that Disney Plus detect the screenshots and place a black overlay over them to protect the copyright content.
Actually, based on users' reports and feedback, it's possible to take screenshots on Disney Plus. We just need to let Disney Plus use computer's CPU to render the video. To do it, go to your browser's advanced settings, and simply disable "Use hardware acceleration when available" option. You can test it on Chrome, and then take a screenshot with PrintScreen or Snipping Tool easily.
Q3. What video quality can Disney Plus support?
A: You can watch and enjoy high-quality streaming on Disney+ and there are popular options, including 4K Ultra HD, HDR10, Dolby Vision and IMAX Enhanced.
Conclusion:
Having learned how to screen record Disney Plus, you can now better keep what you like easily on your devices. The official website provides ways to not only download but also record your favorite movies without problems. If you want, it's also practical to try a third-party screen recorder, such as Joyoshare VidiKit, to create unlimited quality recordings. No matter which way to use it, please bear in mind that Disney Plus strictly doesn't allow you to record content for sharing or reproduction.


