VLC is mostly known as a versatile media player for playing video and music in any format on computer and mobile devices. However, most of you may not know the hidden fact that in addition to the media playing ability, VLC can also be used to accomplish other tasks, such as cutting video files, recording computer screen, and so forth. Considering you may need to capture your screen activity at some point without willing to install any extra software, here in this article, we are going to show you the easy guide on how to record screen with VLC on your Mac or PC in a few clicks only. At the same time, we'll introduce the best alternative to VLC to record screen on computer in case you are looking for a more lossless screen recording tool.
- Part 1. How to Record Your Desktop with VLC
- Part 2. Best Alternative to VLC for Screen Recording
- FAQs about VLC
- Comparison Chart
Part 1. How to Record Screen on VLC
Recording screen with VLC becomes complicated as there are many other advanced functions in VLC. Now the following detailed tutorial will show you the complete process to record your computer screen with VLC in 5 simple steps.
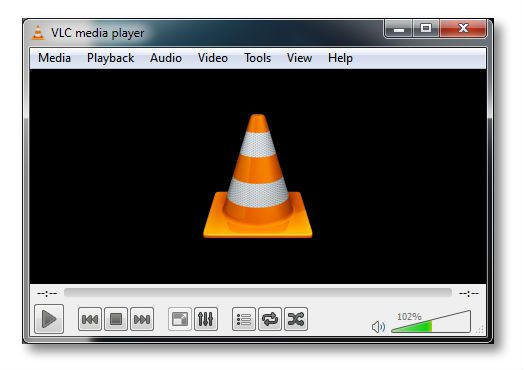
Step 1 Launch VLC Media Player on your computer
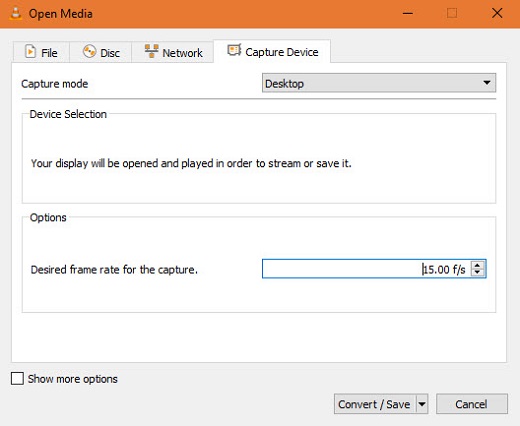
First of all, open VLC on your Mac or PC. Then click the Media tab on the toolbar and select Convert/Save. Switch to the Capture Device tab then.

Step 2 Set up the capture mode
Then change the Capture mode dropdown box to Desktop. In the Desired frame rate for the capture box, set a number of frames per second according to your own recording requirements. Basically, 15FPS should work fine. But if you desire a high-quality recording, 30FPS should be better. One thing you should pay attention to is that usually a higher frame rate means a smoother recording but larger file size.

Step 3Select output directory to save the recordings
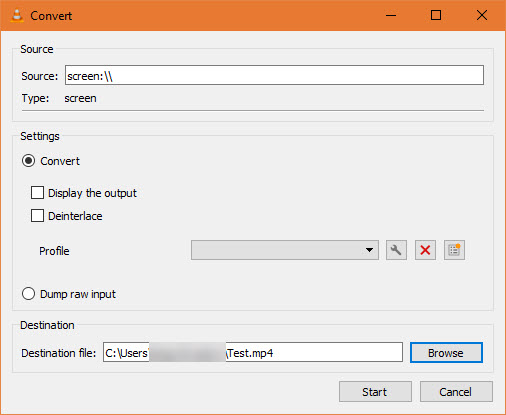
On the bottom right of the dialog box, click Convert/Save button. Then select Browse next to the Destination file box to set the output folder to save the recording in advance.

Step 4Start recording your screen with VLC
Now simply hit the Start button and VLC Media Player will begin to record everything on your screen automatically and silently.
Step 5Quit the recording on VLC
If you want to stop the recording, just click the Stop button on VLC's interface. Then you'll find the recording will be saved in RAW format at the destination folder where you set earlier.
Note: Unlike other exclusive screen recording software, VLC doesn't offer any additional option for you to edit the recorded video clip further. You may have to use some other video editors to polish the recordings in the way you like. If you are seeking for a more dedicated and easy-to-use video capture, you can refer to the following guide where you'll find the best alternative to VLC for screen recording.
Part 2. Joyoshare VidiKit - Lossless Video Capture Tool
Here you meet Joyoshare VidiKit - Screen Recorder, a well-designed screen capturing solution that can record any desktop activity losslessly on computer. It can be used to capture any screen video, including online movies, streaming music, lectures, webinars, webcams, games, Skype calls, and many more. Besides, it's able to record the screen videos with audio simultaneously. Once recorded, the recordings will be saved in common formats like MP4, MOV, WMV, FLV, AVI, MKV, etc. for playing on any device such as iPhone, iPad, Android, smart TV, game console, etc. With this comprehensive screen capture, you can also set scheduled recording and add fantastic effects to the videos as you like.

- Record all desktop activities including videos and audios
- Capture and save recordings in lossless quality
- Save recorded videos/audios to many popular formats
- Support shortcuts, scheduled recordings and other effects
- Best alternative to VLC when you face VLC not recording issue
Step 1Run Joyoshare VidiKit
To record desktop with high quality, you can download Joyoshare VidiKit first. Then activate this screen recorder and choose Record - Screen Recorder. Then, in the pop-up window, you can choose your desired mode like "Record screen and audio". Also, you have the ability to change volume of system/mic audio.

Step 2Confirm recording settings
In the lower right corner, click the gear icon to access more advanced features. Here, you can add watermark, set hotkey, create schedule recording task, show mouse cursor and more. Click Format button if you want to configure output format. Now, you can also change codec, quality, resolution and more.

Step 3Choose the recording area
To choose standard capture region, click the inverted icon in the Capture Area section. If you want to customize recording area, simply click the rectangle icon and drag the blue frame.

Step 4Start recording desktop
Once you have set the recording region, open the video or window that you want to record and click the blue REC button to start the recording process. You have the power to skip and cut unwanted content during the recording. To end the recording, click the square button. In the History window, this tool allows you to edit, preview and rename your recorded video.

Frequently Asked Questions about VLC
Q1. How do I record a live stream with VLC?
A: Activate VLC on your computer and go to View - Advanced Controls - Record - Media - Open Network Stream. Input the direct URL to the live stream. Then, select Play option and start the recording process.
Q2. Can VLC record screen and audio at the same time?
A: No, VLC only allows you to record screen and audio separately.
Q3. Can VLC record in MP4 format?
A: No, VLC can only save your recording in RAW format. You should convert recording to MP4 with its converting function.
Q4. How do I install VLC Media Player on my computer?
A: Open your search engine and navigate to the official website of VLC. Choose and download the right version based on your operating system. Then, install this tool according to the instruction.
Q5. How to display mouse pointer with VLC?
A: Download a mouse pointer image and save it in your VLC program files folder. When you configure the recording settings, open Stream Output and input the following in the Generated stream output string: screen-follow-mouse :screen-mouse-image=mouse.png
Comparison Chart
VLC is a well-known media player to play videos in various formats. However, when it comes to screen recording, VLC does not provide multiple functions for users to choose from. You may be confused about how to choose between VLC and other screen recorders. No worries, here, we provide detailed comparison chart for you to understand different features between VLC and Joyoshare VidiKit in screen recording.
| Joyoshare VidiKit | VLC | |
| Interface | clean | complicated |
| Open source | × | √ |
| Inbuilt pointers | √ | × |
| Schedule recording | √ | × |
| Output format | 150+ | RAW |
| Basic editing features | √ | × |
| Customizable frame rate | √ | √ |
| Customizable quality/resolution/codec/channel | √ | × |
| Capture region | entire desktop | customizable |
| Record screen & audio simultaneously | √ | × |
| Edit ID3 tag (record audio) | √ | × |
Conclusion
Now, you know how to record screen with VLC. It could be an easier recorder if you prefer to record the screen with no extra software installed. But if you want to record the computer screen with lossless quality and more effects, a dedicated video capture like Joyoshare VidiKit should be a better choice to go for. Also, this tool enables you to choose different recording area and create recording task to save your time. After recording, you also have the ability to edit recorded video with its basic recording features.


