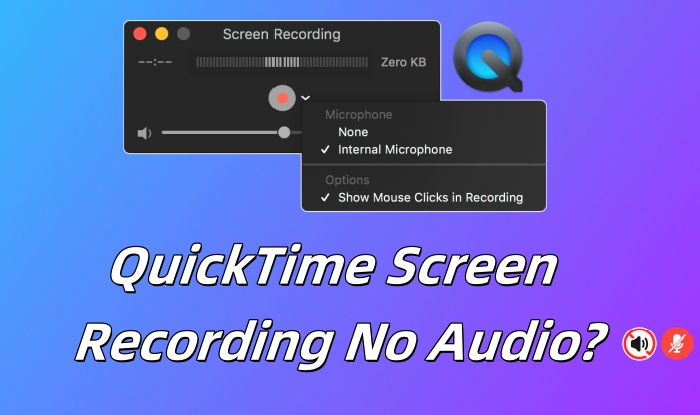
Well developed by Apple and built into macOS, QuickTime is not only a media player but also a screen recorder that's frequently used by a wide range of users. Due to its simplicity, stability and reliability, it has always been the preferred solution taken into consideration for recording on Mac. However, as reported on Reddit, Quora and the Apple community, you may encounter QuickTime screen recording no audio. Apparently, this is a nettlesome issue. The absence of audio leaves the entire video soulless and incomplete, easily missing important points. So, it's high time you learned how to fix no audio on QuickTime screen recording in this post.
- Part 1. Why Is There No Sound on My QuickTime Screen Recording?
- Part 2. How to Fix QuickTime Player Screen Recording No Audio
- Solution 1: Update QuickTime Player
- Solution 2: Grant Access to the Microphone
- Solution 3: Check Sound Input Settings
- Solution 4: Check QuickTime Settings
- Solution 5: Install a 3rd-party Audio Plug-in
- Solution 6: Use a QuickTime Alternative
- Part 3. FAQs about QuickTime Screen Recording No Audio
Part 1. Why QuickTime Screen Recording No Sound?
There are various reasons behind QuickTime Player screen recording no sound issue. Before you start troubleshooting, take some time to find out why.
- The QuickTime player you're using on your Mac is running an older version.
- You didn't give QuickTime Player the necessary permissions to use your microphone.
- The audio input device isn't configured well for screen recording.
- Microphone is not selected as the default audio source in QuickTime settings.
- Lack of a kernel plug-in, QuickTime doesn't natively support grabbing system audio.
Part 2. How to Fix QuickTime Screen Recording No Audio
The issue, QuickTime Player no audio on screen recording, can undoubtedly disturb the recording process and get you into trouble. To smoothly screen record on your Mac with audio, you can see what to do here.
Solution 1: Update QuickTime Player
An outdated version of QuickTime Player may result in unexpected errors, glitches or incompatibility. If QuickTime screen record no audio on your Mac computer, go to check whether this software has been updated to the latest version. This can ensure a seamless screen recording experience for you.
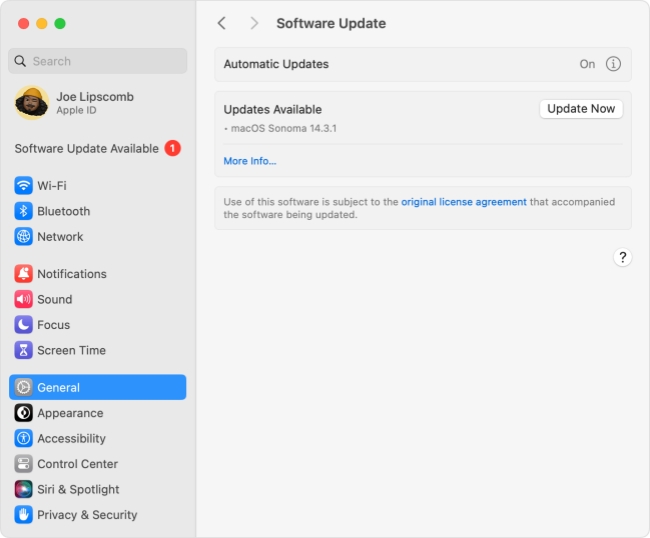
- Step 1: Go to Apple menu and then System Settings/System Preferences.
- Step 2: Click General → Software Update to see if there is any available macOS update.
- Step 3: Updating your macOS system can meanwhile update QuickTime Player.
Solution 2: Grant Access to the Microphone
To record screen and audio simultaneously without hassle, you should make sure that your Mac has given QuickTime Player the necessary permissions to access and use the microphone. If you have set your microphone as the default audio source but have not granted permission, there is a problem.
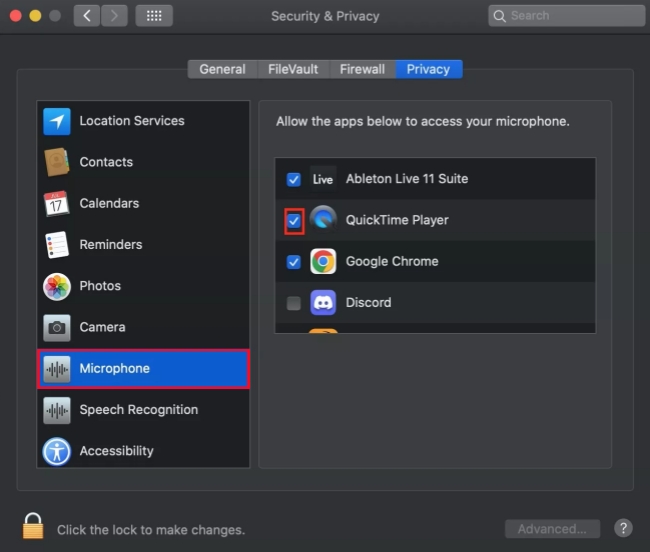
- Step 1: Go to Apple menu → System Settings on macOS Ventura or newer or System Preferences on macOS Monterey or older → Security & Privacy.
- Step 2: Head to Privacy tab and choose Microphone in the left panel.
- Step 3: Click on Lock at bottom left and check QuickTime Player to grant access permission.
- Step 4: Relaunch QuickTime Player to screen record with microphone again.
Solution 3: Check Sound Input Settings
Though QuickTime Player gets necessary permission to access microphone on a Mac, the audio can be missing during the screen recording process. This is because you haven't configured the sound input device properly, especially when you have more than one microphone.
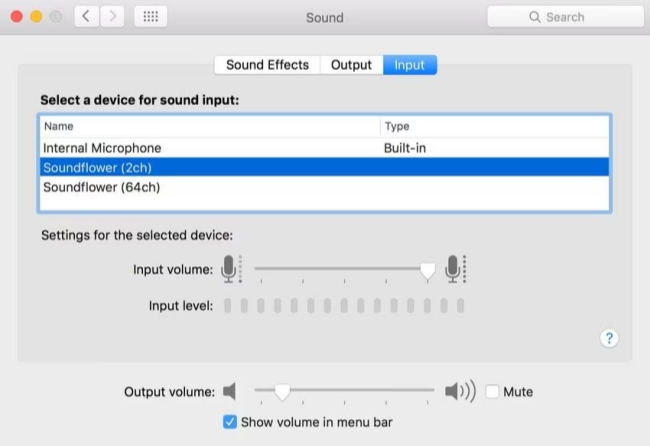
- Step 1: On your Mac, click on Apple menu → System Settings/System Preferences option.
- Step 2: Head to Sound and then Input tab.
- Step 3: Based on your needs, select a device for sound input in the list.
- Step 4: Then drag the slider to adjust the input volume.
Solution 4: Check QuickTime Settings
Chances are that the Microphone option is set to "None" in QuickTime Player or the built-in microphone isn't enabled by default. In this case, you cannot screen record with audio at the same time. Thus, when you are going to initiate a recording process, you'd better check the Microphone settings in QuickTime.
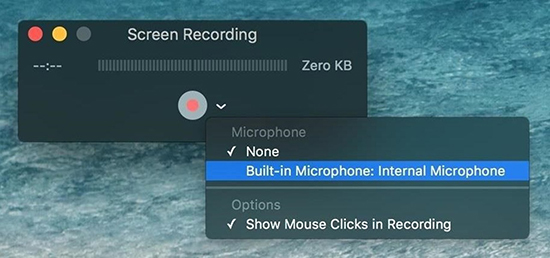
- Step 1: Run QuickTime Player on Mac and go to File → New Screen Recording.
- Step 2: Click the arrow next to the circle-shaped recording button to unfold all recording options.
- Step 3: Under Microphone, pick up an available source, like Built-in Microphone, Soundflower, BlackHole, etc.
- Step 4: Now you can start recording both screen and audio on your computer.
Solution 5: Install a 3rd-party Audio Plug-in
By default, QuickTime Player has no ability to capture internal audio, that is, the computer's system audio. If you find no system audio after screen recording, it's necessary to install a third-party audio plug-in, such as Soundflower or BlackHole. With the help of it, it's practical to create a virtual audio device for routing system audio.
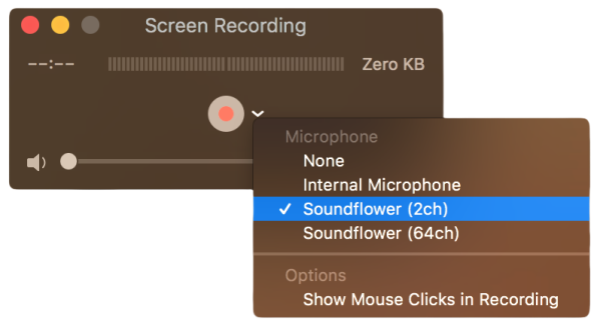
- Step 1: Download Soundflower for Mac.
- Step 2: Go to Apple menu → System Settings/System Preferences → Security & Privacy → General and click Allow to unblock Soundflower and finish installation.
- Step 3: Go back to System Settings/System Preferences → Sound → Output and choose Soundflower (2ch).
- Step 4: Then head to Input tab and choose Soundflower (2ch).
- Step 5: Open QuickTime and click File → New Screen Recording.
- Step 6: Click the arrow button near to recording icon and select Soundflower (2ch) under Microphone.
- Step 7: Now you can click the recording button to begin screen recording with audio together.
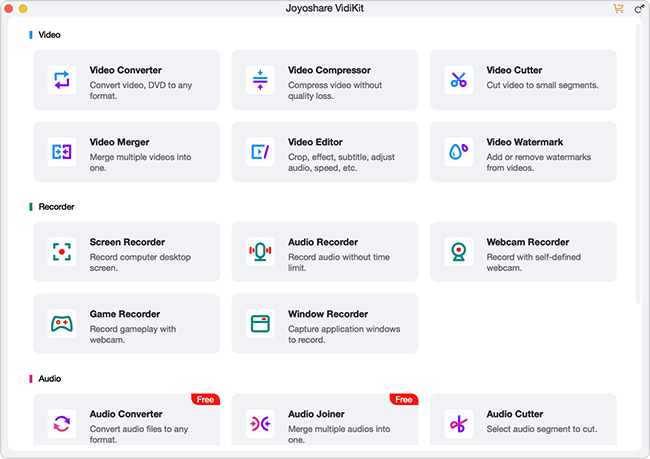
Solution 6: Use a QuickTime Alternative
If all solutions cannot do the trick and the annoying recording issue persists, you can resort to a QuickTime alternative, such as Joyoshare VidiKit. This software is available on both macOS and Windows, combining 21 practical utilities in one toolkit. It does well in recording and provide you with a variety of recording modes, including screen recording, audio recording, webcam recording, game recording and window recording. Whatever your recording needs are, it can ideally satisfy them. While capturing the screen, you can grab audio from computer system and microphone in high quality.

- Capture any audio, like system sound and microphone voice
- Record screen with facecam and sound in high quality
- Support various output formats and allow parameter configuration
- Offer annotation tools to draw whatever you want in real time
- Built-in media player and video editor to manage recordings
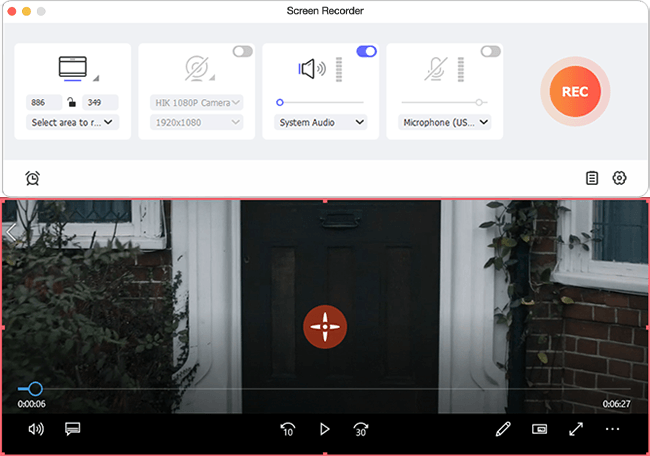
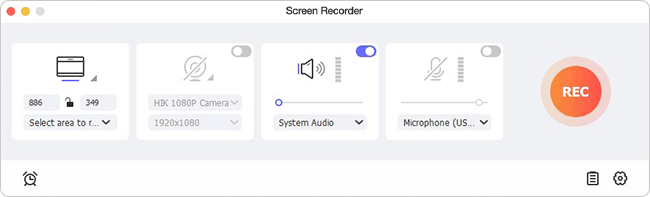
Step 1 Fire Up Screen Recorder in VidiKit
Download, install and launch the newest version of Joyoshare VidiKit on your Mac computer. Take yourself to the Recorder section and then select Screen Recorder.

Step 2 Designate a Recording Area
Prepare what you'd like to record first and then click on Select area to record in Joyoshare program. You can set a capture region for recording based on your needs.
Step 3 Set Audio Source and More Recording Options
Simply enable Camera in the program if you want to record yourself on Mac. Afterwards, you can decide whether to turn on System Audio and Microphone. There is a gear-shaped Preferences icon located in the lower right corner. It's handy to set output format, resolution, quality, frame rate, hotkeys and more in the way you like.
Step 4 Start to Screen Recording with Audio on Mac
When everything gets ready, you can click the REC button in Joyoshare VidiKit to begin recording screen and audio synchronously. A floating recording menu bar will appear, allowing you to pause, cut, annotate, snapshot and schedule the recording.
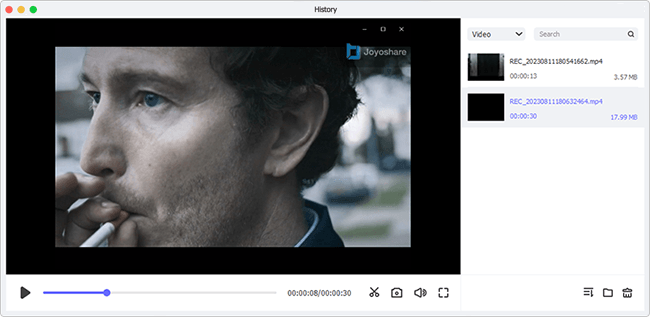
Step 5 Save Recordings for Further Checks
Once done, click on the Stop button to save the recorded videos to History window. Joyoshare VidiKit enables you to play, rename and trim the files.

Part 3. FAQs about QuickTime Screen Recording No Audio
Q1: Can QuickTime record internal audio?
A: No. QuickTime Player cannot record system audio by default. It can only record sound from your microphone. If you want to record internal audio, make sure you have installed a virtual audio routing plug-in, such as Soundflower or BlackHole. Or you can use an alternative, like Joyoshare VidiKit, to capture both internal audio and microphone sound at the same time.
Q2: Why won't my Mac let me screen record QuickTime Player?
A: Your Mac may not let you screen record using QuickTime Player due to missing permissions in privacy settings, outdated software version, recording restrictions related to other specific apps, or potential Mac system errors.
Q3: Where does QuickTime save screen recordings?
A: By default, QuickTime save screen recordings to your Mac desktop in MOV format. If you want to change the location, simply choose File → Save → Export As and select where to save the file.
Conclusion
By following the solutions outlined in this post, you can know how to effectively fix QuickTime screen recording no audio error. No matter what you'd like to record, such as video conferences, gameplay, live streaming or speeches, you don't have to worry about any unexpected recording issues. Both video and audio can be captured perfectly, allowing you to playback later. If the issue of screen recording without sound persists, you can also try an alternative to QuickTime, like Joyoshare VidiKit, mentioned here. It ensures you a hassle-free recording experience.
