If you have excessive CPU consumption, you need a faster computer, or you can also lower CPU load by adding extra RAM. It also contributes to a reduction in the frequency of internal data transfers and memory allocations. Most users do these things to relieve their computer of OBS high CPU usage. You will learn about the frequent above-mentioned error and how to resolve it in this article. But before getting into the details, you have to understand how you can check the CPU usage of your machine. Let's dive in.

- How to Check OBS CPU Usage?
- Tips 1. Lower Frame Rate
- Tips 2. Downscale Your Output Resolution
- Tips 3. Run the Audio Sources at the Same Frequency
- Tips 4. Change x264 Preset
- Tips 5. Check All the Sources
- Tips 6. End Other Processes
- Tips 7. Use Joyoshare VidiKit
How to Check OBS CPU Usage?
Sometimes when you use your computer for extended periods or a heavy application, it slows down your machine. In this scenario, you need to check the CPU usage of your computer. However, if you don't know how to do, don't worry. Follow the steps below to check the CPU usage.
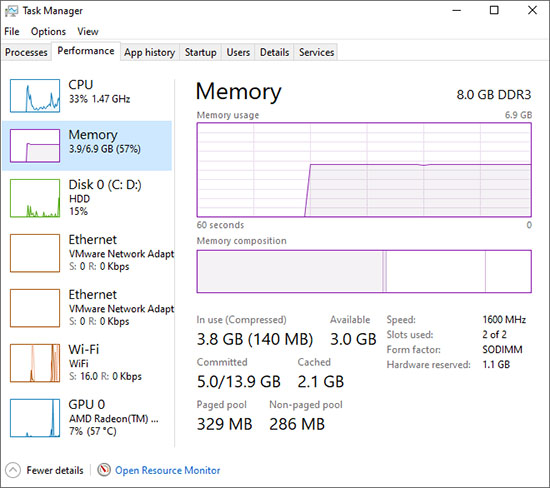
- Step 1: Open the Task Manager by either pressing the shortcut keys (Ctrl+Esc+Shift) or searching it in the search bar.
- Step 2: After that, click on the Performance option from the above menu, you will get to the Performance window. Here you can figure out how you can lower the CPU usage.
Tips 1. Lower Frame Rate
The frame rate is an essential factor in OBS high CPU usage fix. This allows you to customize the number of frames captured each second. Because this is a healthy option, it can render all of the frames. When you capture movies at a high frame rate, you may notice some delays, and your device may be unable to run faster, causing it to freeze for a few seconds. So, by reducing the frame rate to 24FPS, you can accomplish tasks quickly.
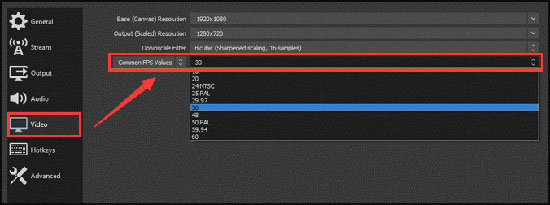
- Step 1: Launch the OBS Studio, and click on the Settings option to open the settings.
- Step 2: Go to the Video tab. Now, either enter the FPS value or select it from the dropdown beside the Common FPS Values option. After that, click on OK.
Tips 2. Downscale Your Output Resolution
You may have seen the message "Encoding overloaded!" on your display, which indicates that your CPU is overloaded and may affect your system's performance. Here's how to lower CPU usage on OBS! At present, you have only one option: downscale the output resolution. You are enabling OBS to compress the video before delivering it to the encoder by doing this. By this, you would give your CPU a break.
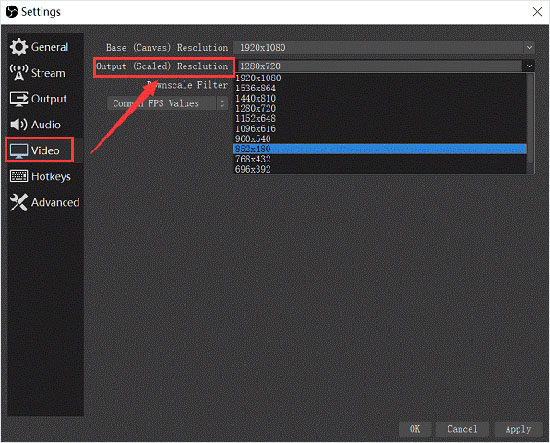
- Step 1: After launching OBS Studio, open its Settings, then go to the Video section.
- Step 2: Now, you can enter the resolution manually or choose it from the dropdown beside the Output Resolution. After selecting the output resolution, click on OK.
Tips 3. Run the Audio Sources at the Same Frequency
The higher the audio rate frequency you play, the more significant CPU burdens your experience will have. As a result, to save CPU use, you must operate your audio devices at the same frequencies in OBS. For instance, if your desktop audio is set to 44100HZ, but your OBS program is set to another frequency, you will suffer increased CPU demand.
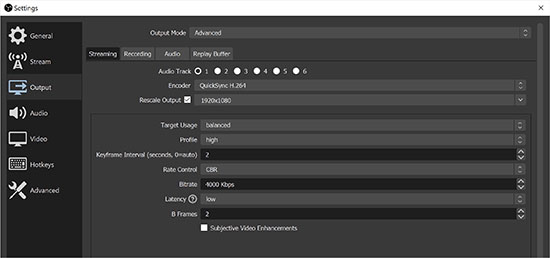
- Step 1: Launch OBS Studio and open its Settings. Now, go to the Output section.
- Step 2: Now, enter the keyframe frequency as per the desktop frequency besides the Keyframe Interval option.
Tips 4. Change x264 Preset
If you still face the OBS studio high CPU usage issue, try changing the x264 preset. When it comes to OBS, it uses an encrypting open video source library known as x264. This program provides several settings that may balance CPU use while increasing video quality. You can also choose to use a very quick default set of presets.

- Step 1: Visit the Settings section and then go to the Output tab to set the x264 preset.
- Step 2: Now, verify whether the selected preset is x264 or not under the Encoder option.
Tips 5. Check All the Sources
A higher CPU is used by a variety of elements and applications on your device. It can also consume a lot of CPU power if you utilize capture cards and a webcam. So, check the webcam to see whether it is set to a higher or lower resolution. Browsing for such sources also uses a significant amount of CPU power. So, attempt to reduce the number of active sources so that your CPU can rest.
Tips 6. End Other Processes
If the problem of OBS taking too much CPU is still not resolved, then try ending some unnecessary processes with the help of the Task Manager. Sometimes the processes running in the background take a significant amount of memory which results in slowing down your computer. To reduce the CPU utilization, we suggest that you end the unnecessary processes.
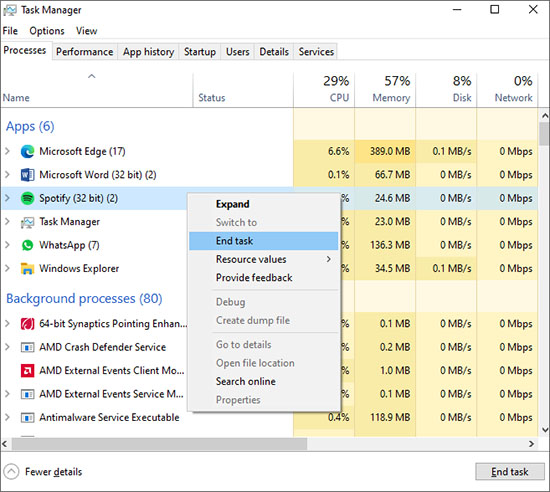
- Step 1: Open the Task Manager by either pressing the shortcut keys (Ctrl + Esc + Shift) or searching it in the search bar.
- Step 2: Right-click on the program that is running unnecessarily and select End task from the dropdown menu.
Tips 7. Use OBS Screen Recording Alternative to Record
If the high encoding CPU usage OBS issue is still not resolved, try using Joyoshare VidiKit - Screen Recorder for recording the screen. It enables you to record both the screen and the audio at the same time with ease. You can set recording task to save your time and highlight cursor to enhance your recordings. Trim and preview the video after recording with the help of this software after finishing your recording process.

- Best alternative to fix OBS black screen, OBS encoding overloaded, etc.
- Customize resolution, recording area, quality and more
- Set hotkeys to leverage in the recording process as you want
- Save your video in formats compatible with YouTube, Facebook, Vimeo, etc.
- Provide multiple pointers to highlight cursor and clicks
Step 1Run Joyoshare VidiKit on PC
Download and launch Joyoshare VidiKit. After that, click on the Record option and open the Screen Recorder. Now, select the Record video and audio option on the left of the REC button to capture both your screen and audio.

Step 2Customize Recording Settings
Either select the recording area with the help of blue lines surrounding the screen or by entering the width and height above the Capture Area section. Customize the recording settings like Format, Watermark, Record time and Cursor options according to your will. You can also reset the changes by pressing the Reset button.

Step 3Start Recording and Save Recordings
To start recording, press the REC button. Then, you will see several setting options. After you are done, stop the video by pressing the Stop button. Then, you can preview your video in the History window with its built-in media player.

Conclusion
After summarizing the preceding OBS high CPU usage issue, we can conclude that the high CPU consumption problem is widespread among broadcasters and gamers. This issue can really affect your gaming, videos, and computer performance in the long term. If you are a live broadcaster or a player who encounters this issue regularly, you may follow the methods outlined in this article or utilize an OBS alternative program, i.e., Joyoshare VidiKit, to generate video recordings as needed.


