Developed as an online tool to offer video conferencing service, Join.Me is widely used by different groups, such as educators, industry people and employees. It helps you to create a meeting easily and meanwhile gives access to record video with audio, so that you can play and review it offline at any time. If you haven't put this function into effect, you can learn from this article. In addition to the built-in recorder, we also introduce other professional tools for you to check.
- Part 1. Built-in Join.Me Recorder
- Part 2. Joyoshare VidiKit (Screen Recorder)
- Part 3. EaseUS RecExperts
- Part 4. Apowersoft Free Online Screen Recorder
- Part 5. FAQs on Join.Me Recording
#1 How to Record a Meeting in Join.Me - Built-in Recorder
Join.Me provides users with a hassle-free solution to record a meeting at the same time as it's being held, rather than resorting to a third-party screen capture software. Now follow the steps below to effortlessly produce your Join.Me recordings.

Step 1: Download join.me and initiate a meeting;
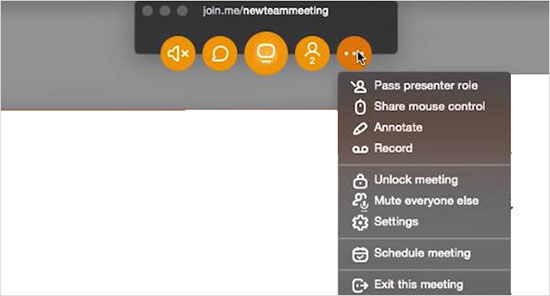
Step 2: Click on the "..." button on the right side of the interface;
Step 3: Choose and press "Record" option to begin recording meeting;
Step 4: Complete the recording with "stop recording" button once your meeting is over. You can now log into join.me > find "my meetings" > "recordings" to check, share, download and delete it.
#2 How to Record and Download Join.Me Recording - Joyoshare VidiKit
If you desire to get high-quality output files after the recording, Joyoshare VidiKit (originally Joyoshare Screen Recorder) can be your first choice. It's feature-rich to help capture types of activities on your computer screen, such as online meetings, gameplays, live chats, streaming music, etc. Moreover, you have freedom to record in full screen, partial area or custom size. It has no time limit to interrupt the recording suddenly and allows you to schedule, trim, watermark or highlight cursor.
- Record Microsoft Teams, Zoom, Join.Me and more meetings
- Output recorded videos in high resolution
- Offer unlimited recording length
- Capture audio from microphone and computer system
- Set capture area flexibly as per personal need
- Options to watermark, effect, trim, schedule and set shortcuts
- Smoothly record Join.Me webinars without lag
Step 1 Download, install and open screen recorder
Officially get Joyoshare VidiKit downloaded and installed on your computer. Then launch it to open "Screen Recorder". You can enable "Record video and audio" mode by clicking the button on the left of blue "REC".
Step 2 Check and confirm recording options
Then customize or select recording region under "Capture Area". According to the actual situation, you're suggested to turn on both system and microphone audios, adjusting the volume in advance. Next, press on the gear "Options" button to choose a file location, output format, add watermark, preset shortcuts and show clicks. If you need it, you can possibly create a recording task.

Step 3 Start to record a Join.Me meeting
Now open Join.Me and start a meeting. Simply click on the "REC" button in Joyoshare VidiKit to initiate your recording assignment. In the toolbar, you're allowed to click the Pause button at any time to skip over the content you don't like, or hit the Cut button to divide Join.Me video into different clips.

Step 4 Save recorded Join.Me meeting video(s)
When you capture what you want or when the meeting is finished, you can easily click the Stop button to save it. Furtherly, the History window will pop up to let you preview, trim, rename and edit ID3 tags.

#3 How to Create Join.Me Recording - EaseUS RecExperts
EaseUS RecExperts is a reliable screen capture for Join.Me users. It records various popular meetings in different platforms, such as GoToMeeting, WebEx, Zoom, etc. Conveniently, it has the ability to grab the voice of speaking from a microphone and capture system sounds. The handy functions it offers even allows you to edit meeting videos with arrows, lines, text and more.

- Pros:
- Record video, audio and webcam
- With editor to add watermark, text, lines and more
- Export and share recorded Join.Me video to YouTube
- Cons:
- Only 2 minutes to record in free trial version
- Guide:
- Step 1: Run EaseUS RecExperts and choose "Record Screen" in the upper left corner;
- Step 2: "Custom" recording area, set audio under "System & Mic" or enable "Webcam";
- Step 3: Hit the cog settings icon to set hotkeys, format, quality and more;
- Step 4: Start a meeting in Join.Me and press the "REC" option in EaseUS RecExperts to record it;
- Step 5: Apply the stop button to finish recording meeting and check it in "Video list".
#4 Record Join.Me Sessions - Apowersoft Free Online Screen Recorder
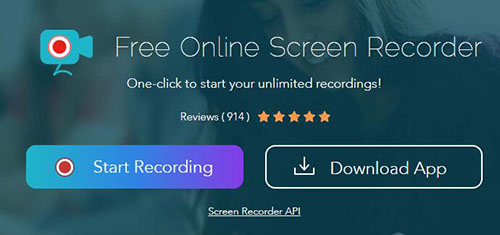
Apowersoft Free Online Screen Recorder is here a web-based online tool to easily and quickly record Join.Me sessions. With it, there is no need to download software on your desktop. Also, it's available to insert webcam, capture video and audio at the same time, make annotation, etc. If you want, you can either save videos on local disk or share to YouTube.

- Pros:
- Free online solution without installation
- Record video with audio from Join.Me
- Allow to annotate videos during the recording
- Cons:
- With limited output formats
- Guide:
- Step 1: Navigate to the online site of Apowersoft Free Online Screen Recorder and hit "Start Recording";
- Step 2: Select the audio including microphone and system sound;
- Step 3: Open Join.Me meeting, press the "Record" button and confirm an area to record from;
- Step 4: Edit your meeting in Join.Me and "Stop" to save it in WMV format.
#5 What People Also Ask about Join.Me:
If you are still a new user of Join.Me, you might as well take a look at the following frequently asked questions.
1 What you can and cannot record in Join.Me?
Join.Me allows you to record all shared content and audios in the meeting. However, it doesn't support to record sound that is playing on your device, the participant bubbles and Join.Me videos.
2 What format the recorded videos save as?
The videos you record in Join.Me will be saved as MP4 by default, which can be converted to other format or furtherly edited using compatible 3rd-party programs.
3 Is there enough storage space to record meetings?
For a Pro subscription, there is 5GB of storage. For a Business subscription, you can get up to 5TB.


