Grand Theft Auto V (GTA V) is an action-adventure game created by Rockstar Noth. You can enjoy a thrilling time in the fictional state of San Andreas. This game can be played on Xbox 360, PlayStation 4, Xbox One, and Windows platforms. However, if you want to display your creativity on YouTube or other media services, you need to play it on a Windows computer as the PC version has an in-game video editor tool. But this tool also has some limitations. Therefore, besides showing you how to record GTA V with a built-in camera, we also offer extra 2 options for you.

- Part 1. Capture GTA V Gameplay with Inbuilt Recorder
- Part 2. Capture GTA V Gameplay on PC
- Part 3. Record and Save GTA V Gameplay Recording Online
- FAQs about GTA and Rockstar Editor
Part 1. How to Record in GTA 5 with Built-in Recorder
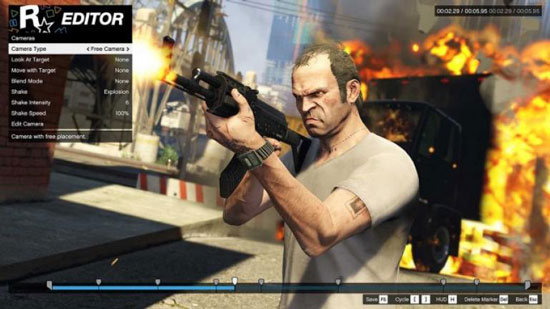
To meet users' need, Rockstar adds a recording feature to GTA V named Rockstar Editor. It can let you record, edit and share the video. It has special camera modes, depth of field, filters and audio customizations. However, it only can be used when you enter the "GTA Online" mode and "Story Mode" in this game.

Step 1: Start GTA V Gameplay
Start playing GTA V on your PC. Please make sure that you are in "GTA Online" mode or "Story Mode". Push down "Alt" to turn on the "Manual Recording mode";
Step 2: Start and Stop the Recording
By default, when you are ready to record, you can press "F1" to capture the clips. Cancel or stop recording by hitting on "F2". If you want to save your GTA recordings, just press left Alt and F1 keys at the same time.
Step 3: Edit Video with Rockstar Editor
To edit your recording in Rockstar Editor, you should make sure that you are in Story Mode in advance. Please note that Rockstar Editor is not available in GTA Online. Pause the game and go to "Rockstar Editor" by scrolling the rightmost tab. Choose "Clip Management". Then edit the video using the tools on the interface;
Step 4: Edit and Save Recordings
Once you finish the editing, you can click "Save Project As" to rename the project and export the video. If you want to set frame rate and bit rate, find and select Export option in the main menu.
Step 5: Upload GTA Recording to YouTube
Some players may want to upload edited recordings to YouTube. Head to your Video Gallery in the main menu of Rockstar Editor. View your complete video to check whether you are satisfied with this video. Then, upload video to YouTube or Rockstar Social Club according to the instruction.
Part 2. How to Record GTA V on PC with Advanced GTA V Screen Recorder
As we mentioned above, the built-in camera is only feasible when you play the game in "GTA Online" mode and "Story Mode". So, if you want to record GTA V gameplay on Windows system computer without limitations, you are suggested to use Joyoshare VidiKit - Screen Recorder. This software is capable of recording all activities on the screen. Thus, as you play GTA V on your PC, this smart recorder can help you record any motions during the game in high quality.
In addition to recording gameplay, it can record live streaming videos, online tutorials, movies, songs, and so on. You can save the recordings in MP4, MOV, AVI, M4V, MKV, FLV, WebM, etc. With this screen recording program, you are able to expound how you play the game using a microphone. Joyoshare VidiKit can grab the audio from the system and the microphone. Also, you can preset schedule recording, trim video, add watermarks, customize video parameters, and more options.

- Capture screen in full screen or selected region
- Record GTA V in high quality with or without audio
- Save recording to MOV, 4K Video, DV, etc.
- Output compatible video to iPhone, iPad, YouTube, Facebook, etc.
- Edit and capture gameplay on PC and Mac as you want
Step 1Run GTA V screen recorder
Launch Grand Theft Auto V on your Windows computer. Open Joyoshare VidiKit gameplay recorder by selecting Record - Screen Recorder. The interface is small and intuitive. Click the camera icon to record the screen with audio. If you don't want to grab the audio from the game and your microphone, remember to make the "System Audio" and "Microphone Audio" turn off.

Step 2Do further settings
To see more hidden options, you need to click the gear icon on the low right corner. Then you can change the place to store your recordings, select recording formats, set shortcut keys and preset a schedule to start and end recording. If you are willing to record the cursor on your video, you can enable "Show Cursor".

Step 3Confirm the recording area
After preference settings, you can select a region to record GAT V. Click the "Capture Area" option to adjust the capture area. You can record the game in full screen by opting "Full Screen" from the drop-down list. Or unlock the ratio and drag the frame to crop an area that you don't want to capture.

Step 4Record and edit GTA V gameplay
In this final step, what you need to do is click the "REC" button to begin the recording process. Once the "REC" button is clicked, Joyoshare VidiKit will minimize, then you will see a 3-second countdown. During the recording, you can click "Pause" to skip the unwanted parts. Click on the scissors icon to trim the clips. Select the "Stop" option to stop capturing. The "History" windows will appear with the recordings listed. You can rename the files, preview videos, take snapshots, and trim videos.

Part 3. How to Record GTA V Online
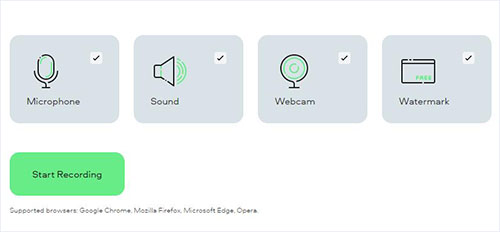
There is an online gameplay recorder provided for you to capture GTA online as you want. This recording tool can grab sound from your system and microphone together or separately. Recording your webcam with Screen Capture, which is compatible with Google Chrome, Mozilla Firefox, Microsoft Edge and Opera, to include your face is also available. Without any software download requirement, it is a completely online recording tool. However, it will place an evident watermark on your recorded GTA recording, which is very annoying and can be deleted by upgrading to its premium version at $9.95 per month.

- Step 1: Open your search engine and navigate to the official website of Screen Capture.
- Step 2: Get your GTA gameplay ready and set the recording settings in Screen Capture like recording audio, capturing region.
- Step 3: After completing the settings, just click the green Start Recording button to begin the recording process.
- Step 4: To finish the GTA recording process, find and click the Stop Recording option in the middle of your screen. After recording, you can't edit your video as there is no editing feature in this tool.
FAQs
Q1. How to stop gameplay recording on PS4?
A: There are multiple users who play Rockstar games on PS4 and want to record gameplays on PS4, including Grand Theft Auto, Max Payne, Red Dead Redemption, L.A., Noire, Bully and many more. Actually, it is very easy to do that. Just press SHARE button twice. Also, you can start the recording by hitting SHARE button twice. Another way to do that is to press the SHARE button and choose Save Video Clip.
Q2. Where are GTA 5 recordings saved on PC?
A: After the GTA recording process, you can access your recorded GTA video by navigating to Documents - Rockstar Games - GTA V - Videos - Clips.
Q3. Can I upload GTA gameplay in YouTube?
A: Yes, you can upload your GTA recordings to YouTube as you want. You just need to select recording from your computer after clicking the CREATE - Upload Videos in YouTube.
Q4. How to use Rockstar Editor?
A: First, enter Rockstar Editor. Then, you can find many functions presented in the left section of your screen. With these functions, you can change filters, adjust saturation, contrast, brightness, vignette and more. Also, this video editor allows you to add music, create slow motion, speed up action, add text and change its size, position, font, color, opacity, duration, etc. as you want.
Conclusion:
To sum up, here we show you how to record GTA V in three meaningful ways. The default way is convenient for the user who intends to record short clips in "GTA Online" mode and "Story Mode". If you prefer to make a long video on Grand Theft Auto V and record the scenes that do not exist in "GTA Online" mode and "Story Mode", you are suggested to use Joyoshare VidiKit.


