Audio podcasts are becoming popular, as it gives the freedom for an individual to share their opinions online. The interesting factor is that you do not have to indulge in the tedious process of recording, editing, and publishing it online. Instead, recording a podcast is a simple procedure using the built-in tools that come with the Mac. If you are here to explore how to record a podcast on a Mac, you will learn seven different ways to implement it.
- What Do You Need to Record a Podcast?
- Part 1. Joyoshare VidiKit
- Part 2. GarageBand
- Part 3. iMovie
- Part 4. QuickTime Player
- Part 5. Zencastr
- Part 6. Audacity
- Part 7. Podcast Capture
What Do You Need to Record a Podcast?
Now, the question of how to record a podcast appears in your mind because you are a beginner. And, like many others, you are wondering about the equipment or the accessories that are essential.
- A good point of view or idea
- Secluded space for clear voice or any location to record
- A Mac to store raw interviews and tracks
- A reliable microphone
- A mixer to add tracks, background music, and even experiment with effects
- Recording software to turn Mac into a full-fledged recording studio
- A pair of noise-canceling headphones
Part 1. How to Record a Podcast - Joyoshare VidiKit
The first podcast software for Mac to record podcast is Joyoshare VidiKit - Screen Recorder. It is a one-stop toolkit that combines video editor, cutter, screen recorder, audio capture, converter, and more. The incredible user interface along with the provided features makes it easy even for a beginner to start editing or recording podcasts in a few simple steps. There is no loss of quality when you process a video or audio. It is also available for you to control recording process by using and customizing your desired shortcuts.

- Best podcast recording software to record podcast in high quality
- Save podcast recordings in various formats like MP3, FLAC, AAC, M4A, M4B, etc.
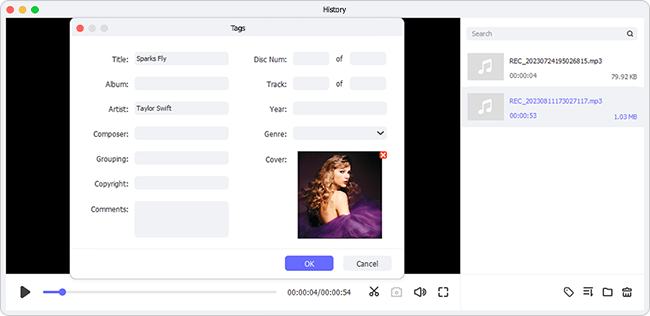
- Edit information of podcast recordings by changing ID3 tag
- Skip and cut unwanted content during the podcast recording process
- Customize channel, codec, quality, sample rate, bit rate and more
Step 1Install and Launch Joyoshare VidiKit for Mac
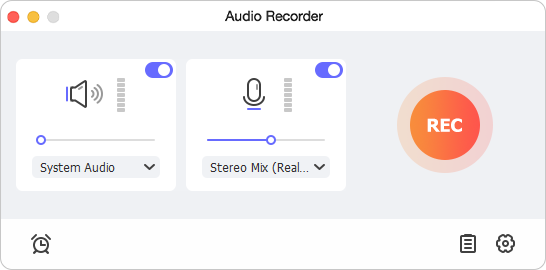
Install the software. Launch the program and go to the Recorder section. Select "Audio Recorder". Select your desired microphone as your input device and customize the system audio.

Step 2Customize Podcast Recording Features
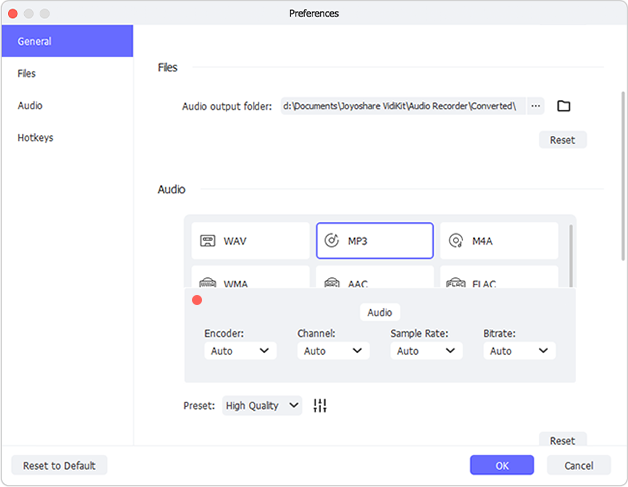
Select Preferences button at the lower-right corner and click the "Audio" symbol at the left section to set the parameters like codec, quality, sample rate, channel, bit rate and more. Also, you can create schedule recording task by setting stop time.

Step 3Record Podcast and Edit Recordings
Click the REC button to start recording. Click the "Stop" button after completion. Open "History" and select the recorded podcast file. Next, click the "Edit" button for trim, and tag features.

Part 2. How to Record a Podcast on GarageBand
GarageBand is the local DAW from Apple that helps in recording podcast on Mac. Unlike the previous versions, the latest version gives a presentation that approximately mirrors some other high-end podcast makers. The software has amazing flexibility, an array of instruments, mixing and mastering features, and intuitive interface.
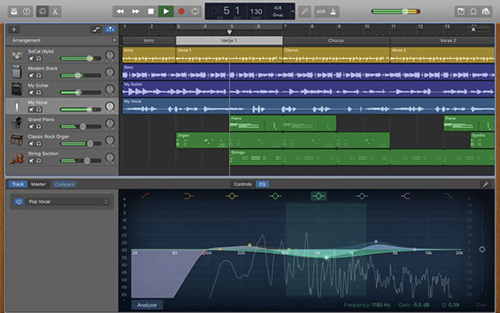
- Step 1: Plug the microphone into Mac. Open GarageBand and click "Voice".
- Step 2: Click on the "Details" tab in the lower-left corner.
- Step 3: Select the microphone from the dropdown box against the "Input Devices" option. You can further select time signature and tempo.
- Step 4: Click "Choose" and start recording the podcast.
Part 3. How to Record Audio for Podcast - iMovie
How to capture audio files using the iMovie application on Mac? The answer is quite simple because of the feature the application provides. Although it is improving, it does provide fascinating features, such as color grading, media organization, speed, green-screen effects, soundtrack, and narration. You can easily get started with the software to begin recording your first podcast.
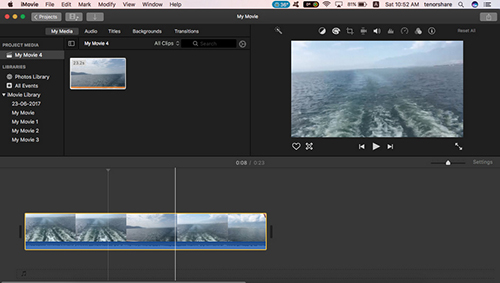
- Step 1: Open this application and add a video. Then, drag the video to the timeline.
- Step 2: Select the camera icon above the preview window and click the microphone icon.
- Step 3: Click the settings option next to the red button to change the parameters.
- Step 4: Click the red circle button to start recording the audio. Click the stop button to finish the podcast recording.
Part 4. How to Record Podcast - QuickTime Player
QuickTime, as Apple describes, is a tool to synchronize sound, audio, text, music, and video, play audio and video files and more. Apart from watching video, you can record a podcast, video, and process the same using the editing features for incredible results.
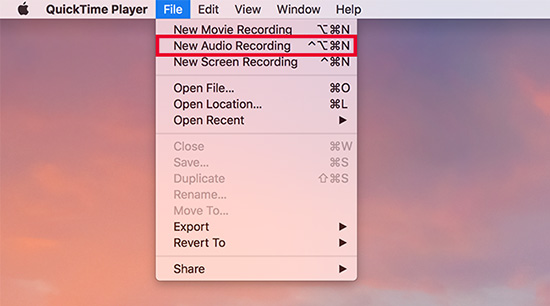
- Step 1: Open the app on the Mac and select "File > New Audio Recording".
- Step 2: Click the options menu and choose microphone and quality. Adjust the volume.
- Step 3: Use the record button to record and the stop button to stop the recording.
- Step 4: Click "File > Save" to save the recorded podcast file and select a location.
Part 5. How to Record Podcast - Zencastr
Zencastr sits in a different league because of its unique remote recording ability for a podcast. Unlike other applications, it creates a high-quality audio track. You can create separate tracks for each individual and capture the audio in 16-bit 44.1L WAV for high-fidelity quality. Additionally, as it uses VoIP service, you can forget screen capture from other platforms.
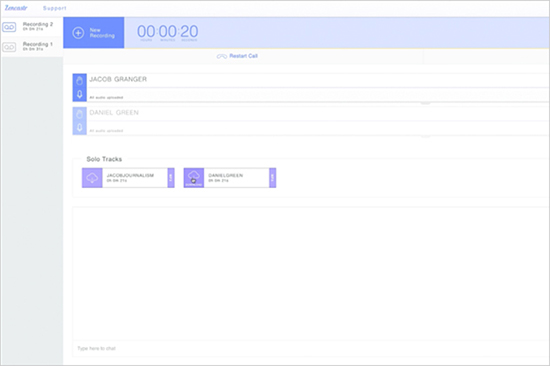
- Step 1: Open this app, click "Create Episode", and select the language.
- Step 2: Click "Invite" from the "Recording Page" to add guests. Click "Settings" to make changes to audio and video settings.
- Step 3: Click the "Start Recording" button to record the session.
- Step 4: End the session by clicking the "Stop Recording" button.
- Step 5: Click the individual track to download both podcast file.
Part 6. Podcast Recording App - Audacity
Audacity, a podcast software for Mac, is a free tool to record and edit audio. It is user-friendly and helps beginners start a recording session without any prior training. The software works smoothly till 32-bit/384kHz audio and comes with built-in dithering. You can easily import multiple tracks, combine, edit, and render output as a single file. It is an easy to handle and quick solution for podcasts.

- Step 1: Select the Recording Device tab.
- Step 2: From the drop-down menu, select "Microphone".
- Step 3: Click the "Tracks" button and select the "Add New" feature.
- Step 4: Click the red circle button at the top to start podcast recording.
- Step 5: Click the black square button to stop the recording.
Part 7. How to Record a Podcast - Podcast Capture
Podcast Capture is a podcast recording program available for Mac OS X. You can import files, combine, mix, and render them into a single file. Likewise, you can add a watermark and distribute the content to a website that accepts RSS feeds. The availability of the tools helps you focus more on content creation than editing.
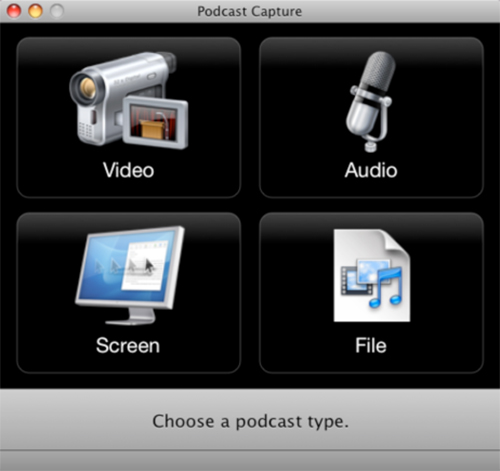
- Step 1: Open Podcast Capture.
- Step 2: Select "Audio".
- Step 3: Click "Start" to begin the podcast recording process and "Stop" to end the session.
- Step 4: Choose a title, add a description, and select a workflow.
Conclusion:
You have gathered different solutions on how to record a podcast on a Mac in this session. As you can see, there are seven various tools to help you start your podcast journey. However, each of them is unique and serves different purposes. With Joyoshare VidiKit, which is a single answer for all video and audio editing requirements, you can not only create a podcast but add music, effects, and much more without leaving the platform. Use the trial version to learn about this program and start your podcast journey today!
