VidiKit
Convert, record and edit
For most people, a great video recording software would be of great importance to help them record computer screen, including games, streaming movies, Skype video chats, webinars, presentations, etc. Joyoshare VidiKit (Screen Recorder) is such a best screen recording solution to rescue. As a full-featured video recorder, it's able to record any desktop activity including video and audio without any quality loss on your computer. Please download and install it as below:
After installing Joyoshare Screen Recorder on your computer, double click the software icon on the Desktop to launch it. Then you'll get the following window.
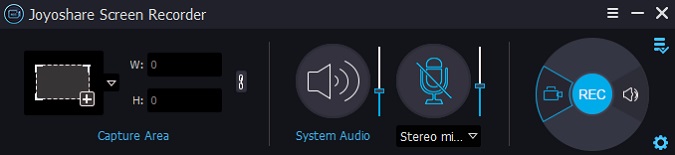
In the Capture Area section, click the "+" button and you'll get the recording window popped up. You can then choose full screen or custom recording area by scaling and moving the recording window according to your own needs. You can also click the drop-down menu to select the fixed recording window size, such as 320x240, 640x480, 1280x720, etc.

By default, Joyoshare Screen Recorder will record video with audio (both system audio and microphone audio) simultaneously. But if you don't want to record the audio tracks while recording the screen, you can click the ![]() icons to disable the audio. Otherwise, you should leave it alone. You are also allowed to select different microphone speakers when recording voices like video conference, Skype chat, etc. If you however are about to record streaming videos, such as YouTube movies, music videos, etc. , you are highly suggested to turn off the microphone audio but only keep the system audio on in order to avoid unexpected noise during the recording process.
icons to disable the audio. Otherwise, you should leave it alone. You are also allowed to select different microphone speakers when recording voices like video conference, Skype chat, etc. If you however are about to record streaming videos, such as YouTube movies, music videos, etc. , you are highly suggested to turn off the microphone audio but only keep the system audio on in order to avoid unexpected noise during the recording process.
Note: Joyoshare Screen Recorder also serves as audio capture that lets you record computer sound only. To record audio instead of video, you should click the ![]() icon next to Rec button.
icon next to Rec button.
Now click the "settings" icon at bottom right corner, you'll be allowed to make recording settings before capturing the screen. Here you can set output file folder, output video or audio format, customize recording shortcuts, create scheduled recording tasks, personalize cursor effects, and other preferences all depend on your requirements.

Currently Joyoshare Screen Recorder supports almost all popular video formats as output, including MP4, M4V, AVI, MOV, FLV, WMV, SWF, etc. as well as a wide range of mobile devices like iPhone, Android, Windows Phone, game consoles, smart TVs, and so on.

Now open the program which you want to record video from. Then simply click Rec button to start recording the screen in high quality. You can also take screenshots during the recording process by clicking ![]() icon at anytime you like.
icon at anytime you like.

To finish recording, simply click the "stop" icon next to Pause button. Then you can preview the recorded files in History window and edit the name and ID3 tags of the recordings in your way.

You can also follow the video tutorial as below to learn how to record any desktop activity on PC without any quality loss.
Record screen video and audio, high quality, no time limit, no watermark!