Indeed, Shotcut, as a remarkable video editing freeware, gains favor of many users. If you are a loyal fan of Shotcut, you undoubtedly operate it to do a lot for you with ease. But for a newcomer, this is not an uncomplicated handle. According to a recent report, it is found that quite a few beginners are ignorant of how to take Shotcut to mix clips together. In response to this phenomenon in the report, this piece describes a quick guide on how Shotcut merges clips as well as presenting an optimal alternative to Shotcut.
- Part 1. How to Merge Clips in Shotcut
- Part 2. FAQ about Shotcut
- Part 3. Alternative to Shotcut Join Clips
- Part 4. Comparison
Part 1. Step-by-step Guide on How Shotcut Merges Clips
As a multi-platform and totally free video joiner & editor, Shotcut is well compatible with hundreds of file formats. It contains many basic features, which not simply allows you to merge clips with no difficulty but also record video, convert video, edit video clips with a series of special effects and filters, cut video footage to a specified length, etc. Additionally, it is designed with a sleek and intuitive interface. Even without any professional skill, you can operate it smoothly. Now for a quick look at how to merge clips in Shotcut video editor.
Step 1 Run Shotcut and add one clip

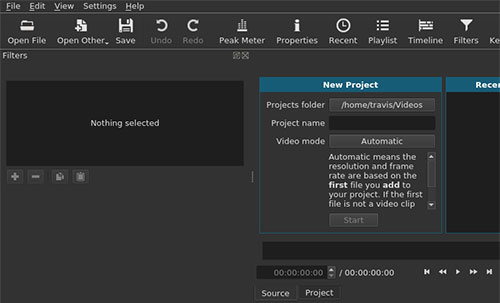
In the first place, download and install Shotcut on your computer. After that, launch it and tap on "File" - "Open File" to add your first video clip. Then you need to drag this clip to the timeline on the bottom.
Step 2 Merge clips in Shotcut

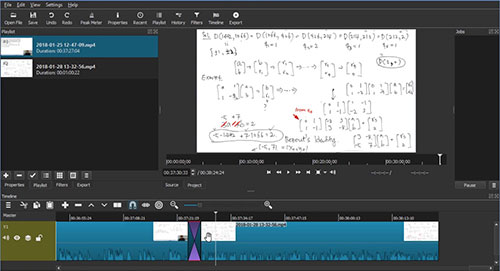
Now, add the second video clip in the same way and still drag it to same track where the first video locates on the timeline window. Please make sure that the end edge of the first file and the start edge of the second one are lined up. To import more video clips to merge, do this operation again.
Step 3 Save final video clip

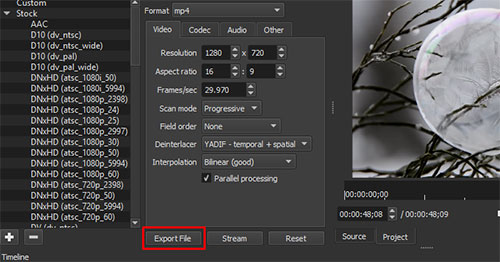
Finally, go to "File" again and then to "Export Video". In this interface, you could choose an output format as well as adjusting video parameters like resolution, scan mode, aspect ratio, etc. After setting up, click on "Export File" to merge video clips together.
Part 2. Frequently Asked Questions about Shotcut Video Editor:
#1 What type of files does Shotcut support?
Due to FFmpeg, Shotcut gives full supports to tons of audio & video codecs and formats, such as popular and latest videos, network stream, 4K resolutions, etc., and even various image formats inclduing GIF, JPG, PNG, BMP, TIFF, WebP, SVG, TGA.
#2 Does Shotcut cost money for commercial use?
No. Shotcut video editor is completely cost-free. It is developed and provided under GPLv3 license, supporting for Free Software Definition. Thus, for any legitimate purpose of your will, it won't charge a cent.
#3 Is Shotcut perfect for beginners?
As you know, Shotcut is a timeline-based video editor, whose design makes it unlikely that it will have a very intuitive interface. Although it is officially self-proclaimed that Shotcut comes with a sleek and intuitive operation panel, it is actually preferred by professionals to beginners.
#4 How can I avoid quality loss during the merging process?
To prevent quality loss happening in merging process, you need to do: 1) All of your video clips to be merged are encoded with the same format and codec; 2) Do not do lossy editing like crop, effects, etc. before merging; 3) Don't change output format, just keep it same as the original video. And then, Shotcut won't re-encode your video to cause loss of quality.
#5 How long should Shotcut take to export video?
How long it takes to export a video depends on the video file size, video effects applying, and video output quality. By the test, Shotcut roughly takes 2 minutes to output a one-minute standard video without effects. If you need to export video to high quality like 1080p, you might spend about 20-30 minutes using Shotcut. To export a video with color grading and heavy effects, Shotcut is going to take longer.
Part 3. Joyoshare Video Joiner - Alternative to Shotcut Merge Clips
Among all modern desktop video joiners, Joyoshare Video Joiner may not be the most popular, but it is definitely high-performance and cost-effective. How so? It is not just a user-friendly video joiner with the capability to merge numberless files at 60X faster speed but also takes editing function to polish videos by applying amazing visual effects.
Beyond that, it as well provides users with two merging modes, including high-speed mode and encoding mode. Under the high-speed mode, your video clips could be quickly joined together without any quality loss. The encoding mode gives you a chance to edit videos and customize video format, such as adjusting resolution, frame rate, bit rate, and codec.

- Easily rename and rearrange files
- Allow you to cut files while previewing
- Quickly extract audio from any video clip
- Fast and losslessly join video clips together
- Support various format like MP4, MKV, HD, MOV, DVD, FLV, etc
Specific steps on how to merge video clips using Joyoshare Video Joiner:
-
Step 1 Launch Joyoshare Video Joiner and add videos
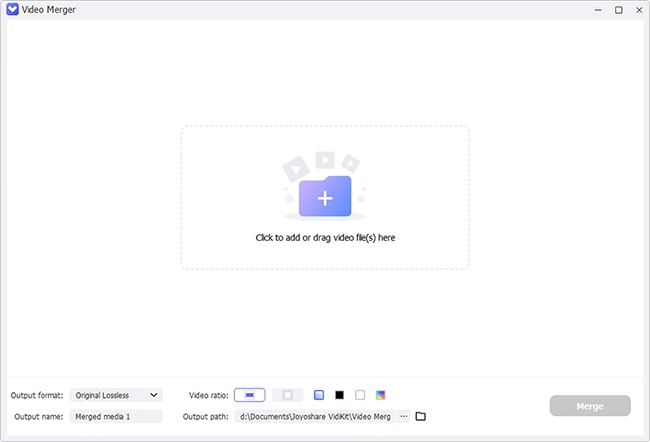
Let's get started by downloading and installing Joyoshare Video Joiner on the computer. Next is to hit on "Open File" to add video clips that you need to merge into the program. You can also do it by quickly dragging these clips to the designated position.
-
Step 2 Select a mode to merge clips
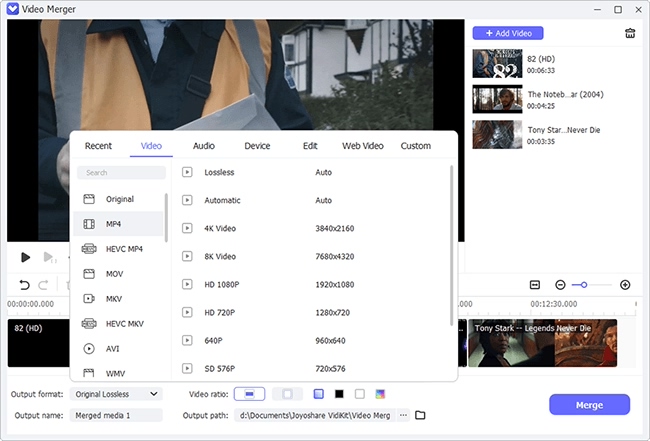
Based on your own personal needs, press on "Format" to select a mode to merge your clips and then to choose an output format. In the event of all the imported videos are in the same format and you wish to merge them without any quality loss, please press the high-speed mode. By contraries, suppose the format of these uploaded files is different and you desire to customize videos, please touch the encoding mode.
-
Step 3 Delete unwanted sections
After that, you are allowed to preview these videos and delete any section that you don't need by sliding the yellow timeline. What else can be done in this step is renaming and realigning these files.

-
Step 4 Edit video clips
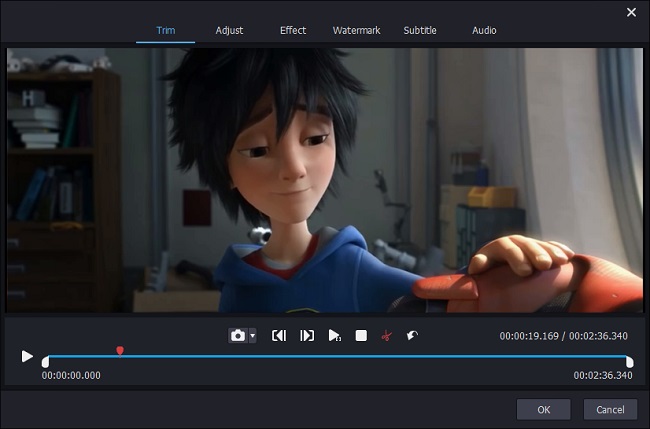
This step is for users who choose encoding mode to join video clips. They have the right to edit videos by clicking the "Edit" icon next to every file. For example, trim videos, change aspect ratio, add awesome effects, design unique watermark and insert subtitles.
-
Step 5 Begin to merge video clips
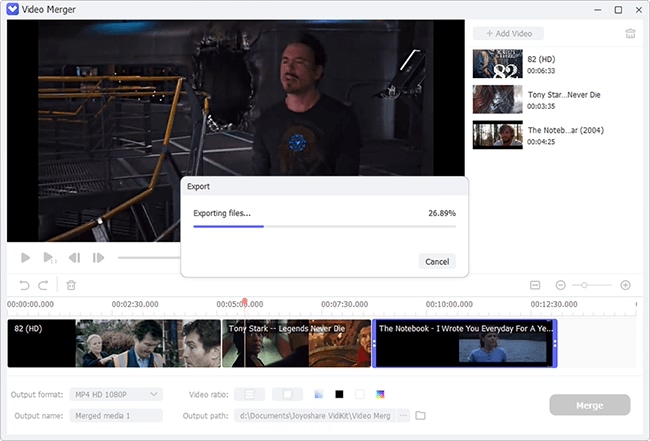
End with tapping the "Convert" button in the lower right corner. Then Joyoshare Video Joiner begins to merge these files. Please know that the merged video will be saved in a file named converted in the local folder.
Comparison:
Anyway, both Shotcut and Joyoshare Video Joiner provide an effective solution to merge multiple video clips together. Which one looks nicer to you? It depends on your application. If you are in two minds about choosing, the following comparison table could come in handy.
| Program | Shotcut | Joyoshare Video Joiner |
| Supported OS | Windows, Mac, Linux | Windows, Mac |
| Intuitive Interface | No | Yes |
| Quality Loss | No | No |
| Merging Speed | 30X speed | 60X faster speed |
| Merging Mode | Single option | Lossless and customizable modes |
| One-time Batch Consolidation | No | Yes |
| Watermark-free | Yes | Yes |
| Custom Output | Yes | Yes |
| Price | Free | $29.95/Lifetime |
