Would you want to replace the source audio file in your AVI video with a new audio track? Would you be interested in adding background music or your own voiceover file to your AVI file for making it more magnetic? Whether in theory or in practice, there is no difficulty in achieving to add audio to AVI file. Just from this how-to guide, you could know 3 prevalent and specialized video editing software to make things done without effort.
Part 1. Use Joyoshare Video Joiner to Add Audio to AVI File
Available for both Windows and Mac, Joyoshare Video Joiner is technically a full-fledged video editor. It is developed with a lossless mode and an encoding mode. The former is intended to combine unlimited media files with the same codec together without quality and frame reduction.
The other not only merges various files into one but also supports editing files as you want, such like add audio to any video, embed watermarks and subtitles, losslessly cut and convert, flexibly crop, rotate, flip, extract sound from video, etc.
Another attraction of Joyoshare Video Joiner lies in its user-friendliness. That makes it much well-received by whatever beginners or experts. Besides AVI, it does of course support hundreds of other formats including MP4, WMV, MPEG, MOV, MKV, WebM, OGG, MP3, M4V, M4A, AC3, FLV, TS, and more.
Why Recommends Joyoshare Video Joiner:
Add any audio files to AVI video without hassle
Quickly merge audio and video into a single video file
Losslessly cut and merge AVI files at 60X surprising speed
Support numerous formats and offer diversified editing tools

Step 1Import AVI file to Joyoshare Video Joiner
With Joyoshare Video Joiner officially downloaded and installed on your computer, double-click its icon to open it. The next thing is to import your AVI file. You have at least two ways to do this. One of them is going to the "Open File" button at the bottom left. Another is by way of dragging.

Step 2Make formatting settings
Secondly, you have to get into the format window by "Format" to set up mode and output format. For adding audio to AVI video or other editing demands, mark the "Encoding mode" option. Then, freely select an output format and further custom the output quality founded on your real need, like codec, resolution, bit rate, frame rate, etc by touching the gear icon. Please note that the high-speed mode is aimed at merging multiple identical media files into one without quality reduction.

Step 3Add audio file to AVI
Now, return to the first interface and head to the "Edit" icon on the right of your AVI file. In this way, you will be directed to the editing interface. To add new audio track to AVI, follow "Audio" - "File" - "Open File"
 icon to access local folder and upload the audio file that you plan to add to the AVI video. After that, you can play it to preview. If needed, adjust audio volume and weight and use sound effects as you fancy. Even, you can loop the audio file by checking "Repeat" when the added audio length doesn't match your AVI video.
Last of all, you only need to press on the "Convert" button in the bottom right corner of the first interface to export the video.

Part 2. Use Avidemux to Add Audio to AVI File
After Joyoshare Video Joiner, Avidemux is another workable software to add audio to AVI in a trouble-free fashion. It's a lightweight and free video editor for Windows, Mac, and Linux. With it, whether basic editing like join, crop, rotate videos or advanced editing like add a new audio track to AVI, remove audio stream from AVI can be completed with ease. As for how to add audio to an AVI file, follow these steps.

Step 1: Once Avidemux successfully installed, launch it and tap on "File" > "Open" or directly drag to add your AVI to it;
Step 2: Next, proceed to the "Audio" tab in the top menu bar and followed by "Select Track";
Step 3: In the "Audio Tracks Configuration" window, the "Track 1" represents the original audio in your AVI video. To add a new audio track, please check the "Track 2";
Step 4: Now, click on the drop-down menu and touch "... Add audio track" to browse local file and choose the required audio track. The "copy" option is to set up codec for the audio. Touching "Configure" and "Filters" can customize bitrate, quality, gain value, etc. If you wish to adjust the lag between the audio video, enable "Shift audio" and set a proper value;
Step 5: After finishing, tap on "OK" to save these settings. And then go to "File" > "Save" to export the AVI video with a new audio track added.
Part 3. Use VirtualDub to Add Audio to AVI File
VirtualDub is the same "add audio to AVI file" freeware as Avidemux. Though, it can only be applied on 32-bit or 64-bit Windows operating system. Designed as a decent video editor, it supports fast speed to make editing on videos. Except adding audio to video, the software has also the capatibility to real-time downsize files, reduce noise, crop and trim videos, decompress audio and video, etc. Do the following to add audio file to your AVI video by it.

Step 1: The first thing is to download, install and run VirtualDub. What follows is your AVI file addition by "File" - "Open video file...";
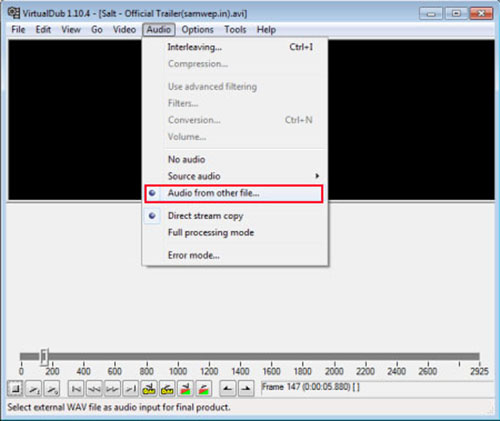
Step 2: When your AVI file has been loaded up, navigate to the "Audio" option located at the top of its main interface;
Step 3: From the "Audio" drop-down menu, click on "Audio from other file..." to open local file and opt for the targeted audio file;
Step 4: Finally, you just go to "File" and select "Save as AVI..." to export the AVI video with the addition of a new audio file.


