Q: "When trying to set up a new Apple ID on an old iPad it says 'Could not create Account, your account cannot be created at this time'. What can I do to set up an Apple ID?" – From Quora
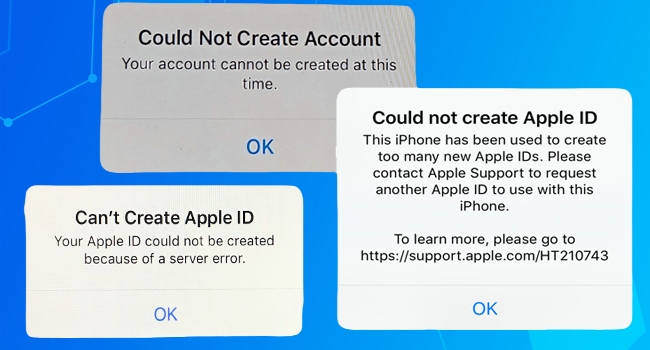
Supposing that you buy a new iPhone or iPad, the first priority is to set up a new Apple account. If you set up your device without Apple ID, there are so many services you can't access. In reality, many iOS users who have an account have possibly been alerted by the error message. It might say "This iPhone has been used to create too many new Apple IDs", "You Apple ID could not be created because of a server error" or "Your account cannot be created at this time" If you are encountering this issue and your device shows "Could Not Create Account" or "Can't Create Apple ID", you might as well view this full-guide tutorial to find effective methods, all of which are collected and tested by those technical forums.
- Part 1. Why Apple ID Cannot Be Created at This Time?
- Part 2. How to Create a New Apple ID in Different Ways
- Method 1. Create an Apple ID on appleid.apple.com
- Method 2. Create an Apple ID on icloud.com
- Method 3. Create an Apple ID on Mac
- Method 4. Create an Apple ID in iTunes on Windows
- Method 5. Create an Apple ID through Apple Music on Android
- Method 6. Create an Apple ID on App Store
- Method 7. Create an Apple ID with a Different Email
- Method 8. Create an Apple ID on Your Family's Apple Device
- Part 3. Troubleshooting of Apple ID Creation Issue
- Part 4. Finisher to Cannot Create Apple ID at This Time [No Data Loss]
- Part 5. FAQs about Apple ID Creation
Part 1. Why Can't My Apple ID Be Created at This Time?
Some iOS users have reported that they hardly create an Apple account at all, especially a newbie who never set up Apple ID has no idea why this error appears. As iPhone is a kind of complex and sophisticated tool, an issue can occur due to various reasons. But don't worry, we have listed possible causes for you to insight into.
- 1. Exceeded the number of new Apple IDs allowed to be created
- Generally speaking, Apple sets the number of new Apple IDs that you can set up with iCloud on a single device in one year. According to the claims on Apple Support, if you create Apple ID too frequently or too many times, it will be regarded as an abnormal action.
- 2. Apple server is down
- If Apple server is experiencing an outage, it's impossible for you to access certain Apple services, Apple ID included. This prevents you from connecting and requesting Apple server.
- 3. Poor Internet connection
- A new Apple ID creation cannot be finished if your iPhone connects to a weak or unstable network.
- 4. Something incorrect with IP address
- You can encounter a failure to create a new Apple ID if your router is using a static IP address.
- 5. VPN or HTTP Proxy Interference
- A VPN or HTTP proxy that has been enabled while creating an Apple ID can sometimes disturb the network connection.
- 6. Old iOS Software Version
- An outdated iOS software is less stable, causing your Apple device to perform worse than usual, which restrains you from creating an Apple ID.
- 7. Software Bugs or Errors
- The glitches or bugs hidden on your software can preclude your Apple device from creating an Apple ID.
Part 2. How to Create a New Apple ID in Different Ways
An Apple ID helps you to access all Apple services and features such as iCloud, FaceTime, iMessage, App Store, and more. If you are unable to create a new Apple ID on your current device in Settings app, try to do this on another available device, like iPad, Windows, Mac, or even an Android mobile phone. Here are some workable solutions that're used and recommended by real users in Apple communities and iOS discussions.
Method 1. Create an Apple ID on appleid.apple.com
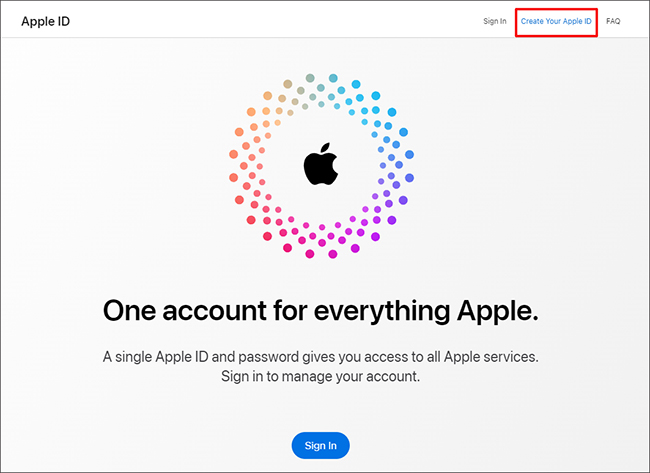
- Step 1: Visit appleid.apple.com on any browser you have.
- Step 2: You can find "Create Your Apple ID" option on the right-hand corner of the menu bar.
- Step 3: Enter first name, last name, country/region, email address, and password. The email address that you type in is your new Apple ID.
- Step 4: Enter a phone number that's available to use and verify your identify by entering the received verification code.
- Step 5: Click on Continue and follow the onscreen prompts to finish creating an Apple ID.
Method 2. Create an Apple ID on icloud.com
- Step 1: Navigate to icloud.com on web.
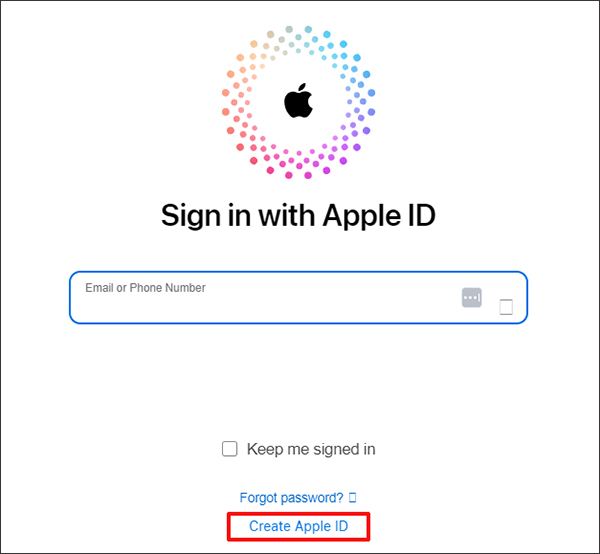
- Step 2: Click on "Sign In" and then "Create Apple ID" in the new window.
- Step 3: As required, type your first name, last name, country/region, birthday, and more personal information. Then click on the "Continue" button at the bottom.
- Step 4: Follow the onscreen instructions to complete Apple ID creation.
Method 3. Create an Apple ID on Mac

- Step 1: On your Mac computer, click on Apple menu → System Settings (or System Preferences on the older macOS versions).
- Step 2: From the sidebar, simply click on "Sign in with your Apple ID" (or "Sign In" in the older macOS versions).
- Step 3: Click on "Create Apple ID" and then enter necessary information like email address, password, device region, etc.
- Step 4: Now you have to type in your payment method and billing information. Then hit "Continue".
- Step 5: Finish verification in your email and then you can use your new Apple ID.
Method 4. Create an Apple ID in iTunes on Windows

- Step 1: Launch iTunes app on your Windows PC.
- Step 2: In the top menu, find and click "Account" → "Sign In". In the pop-up window, hit "Create New Apple ID".
- Step 3: Enter your email, password, and country/region.
- Step 4: Provide payment method and billing information. Simply click on the "Continue" button.
- Step 5: Verify your email address by checking verification email.
Method 5. Create an Apple ID through Apple Music on Android

- Step 1: Open Apple Music app on your Android mobile phone.
- Step 2: In the "Welcome to Apple Music" screen, tap the trial offer and select a subscription.
- Step 3: Tap "Create New Apple ID" and follow the onscreen steps.
- Step 4: Confirm your billing information and provide a payment method.
- Step 5: Tap Join Apple Music on the Android device and then go back to your iPhone to sign in this new Apple ID.
Method 6. Create an Apple ID on Apple Store

- Step 1: Open App Store and tap My Account at the upper right corner.
- Step 2: Choose Create New Apple ID.
- Step 3: As prompted on the screen, provide an email address and other necessary information.
- Step 4: Set payment method and billing information. Go on with Next button.
- Step 5: Confirm your phone number and check your email to verify the email address used for your new Apple ID.
Method 7. Create an Apple ID with a Different Email
In fact, you can create a new Apple ID not only with your Gmail email address, but also with Outlook, Yahoo Mail and other email services. Also, as the users confirmed, it is much smoother to create an account using a work or school email, which may be more authoritative and trustworthy than a personal email. So, if you happen to have a work or school email address, try to use them.
Method 8. Create an Apple ID on Your Family's Apple Device
This solution comes in handy when your single device has reached the maximum number of accounts allowed to be created in a year. If you Apple ID account cannot be created at this time and luckily your family has an Apple device available, such as a Mac, iPhone, or iPad, you can ask them to create a new Apple ID for you. Give them your phone number as well as email address explicitly. After generating an Apple ID on their device, you can then sign into it for further use on your own device.
Part 3. How to Fix "Apple ID Cannot Be Created at This Time"
The afore-mentioned solutions can assist you to create a new Apple ID. If your Apple ID cannot be created at this time, you can further try the following fixes to resolve the issue with your device.
Fix 1. Check Apple System Status
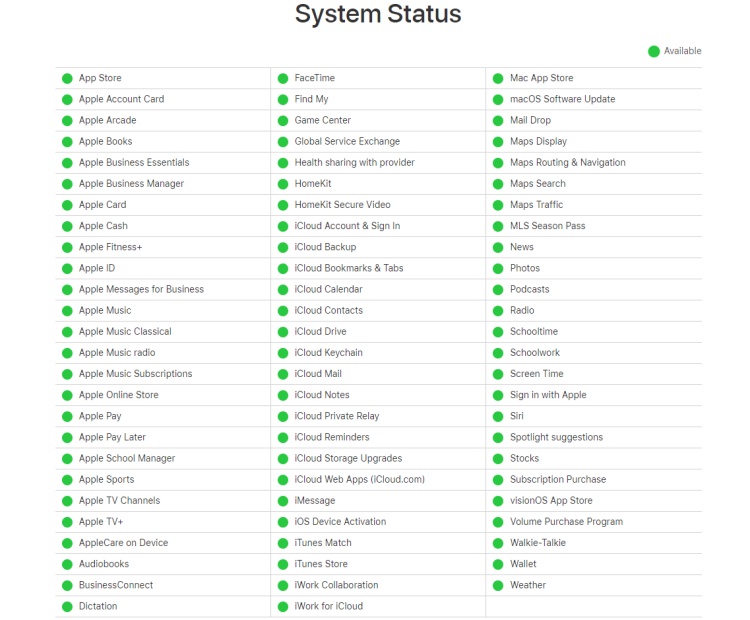
The Apple server might go down so that you cannot create an Apple ID at this time. In order to exclude this possibility, it would be better to check Apple System Status. On this page, you can view the real-time information about the status of all Apple services. If green dot is shown in the front of "Apple ID", there is nothing wrong with the Apple server.
Fix 2. Restart or Force Restart iDevice
Restarting device has been widely mentioned when your mobile devices encounter various stuck issues, app crashing, and other system problems. As a matter of fact, it is definitely as effective as what we always hear about. It not only helps clear RAM but also inspects minor system errors in the reboot process. To do this, simply call out the power-off slider and then drag it to shut down. Wait a while and reboot your device.
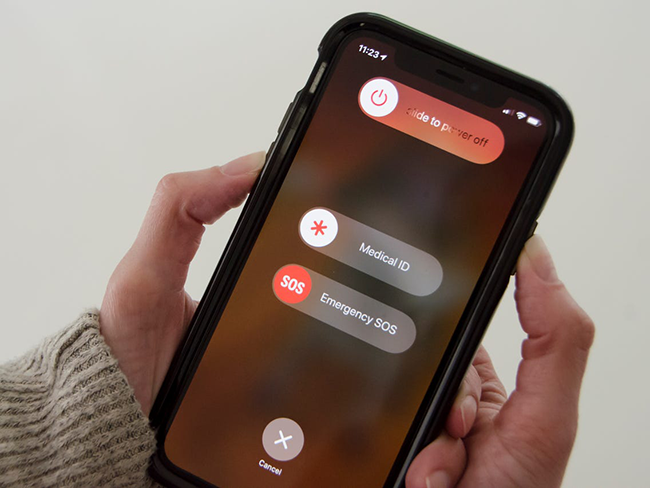
Further, you can force restart your device in case simply restarting doesn't work. Below are detailed steps.
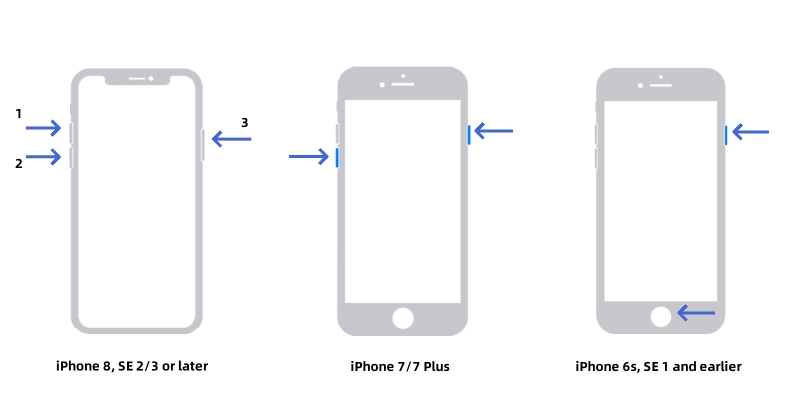
- iPhone 8 and the later/iPad with Face ID: swiftly press and release Volume Up, do the same to Volume Down, hold the Side button and release it until the Apple logo appears.
- iPhone 7 and 7 Plus: hold the Volume Down and the Sleep/Wake buttons and release them when you see the Apple logo on the screen.
- iPhone 6 and earlier/iPad with Home button: hold the Home button and the Sleep/Wake button and undo them until the Apple logo shows up.
Fix 3. Update iOS Version
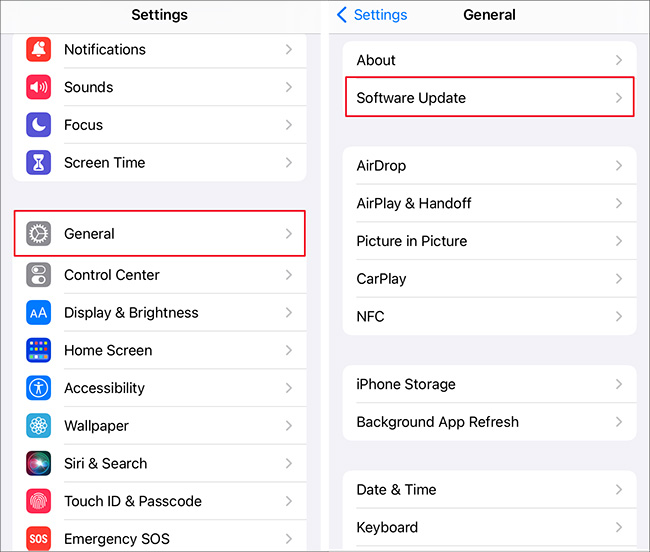
It proves helpful as well when you find the message "Your Apple ID could not be created" pops up. An outdated iOS operating system may lead to this problem as it may carry hidden bugs and crashes at times. If you are not sure whether you have the newest iOS version, you can go to Settings, enter General screen and find Software Update option. You can tap it to further check if there is an update available. If any, tap Download and Install. After the installing process is done, try to add a new Apple ID once more.
Fix 4. Check Internet Connection and Reset Network
If Apple ID cannot be created at this time due to a server error, you should be aware that the Internet connection on your device is too weak to connect to Apple servers. To fix it, it is necessary to reconnect to a stronger network or reset the network settings.
You can turn off the Wi-Fi network and use cellular data instead. Or, you could restart the router and disconnect to the Wi-Fi network by tapping the info icon and the Forget This Network option. Then, join in a stable Wi-Fi network.
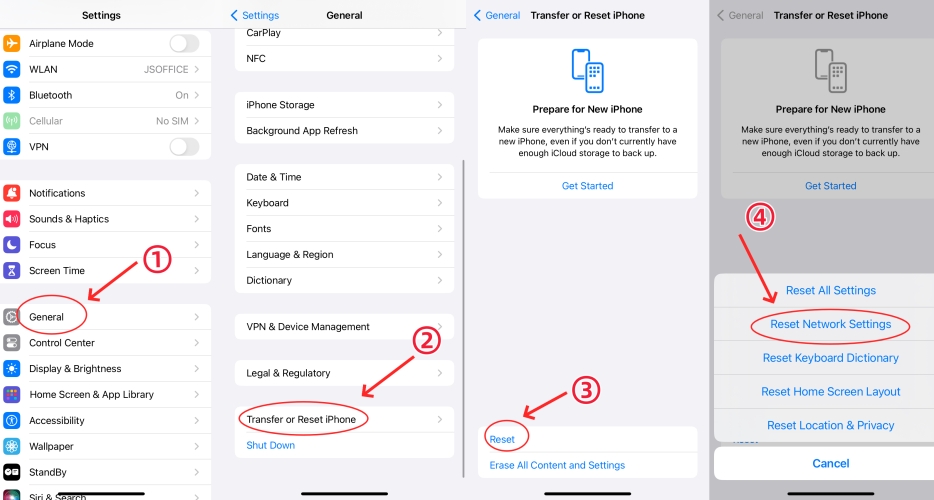
Alternatively, refreshing the network settings on your device will be helpful. Just head to Settings → General → Transfer or Reset iPhone → Reset → Reset Network Settings. When your device restarts, try to create a new Apple ID again.
Fix 5. Erase All Contents and Settings
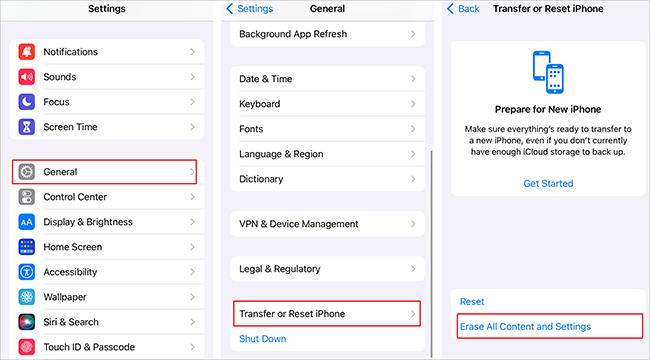
In the most extreme situation, these solutions can't take any effect, and the final fix is to factory reset your iPhone as a new one. Consequently, it will eradicate essentially hidden system faults that might lead to Apple ID creation issue. However, it is not recommended because it will erase all data and contents stored on your data. If you are going to reset your device, you should back up your device in advance.
- Step 1: Head over to Settings – [your name] – iCloud. Then select iCloud Backup, tap Back Up Now, and it will back up your data with iCloud.
- Step 2: In Settings, enter General and choose Transfer or Reset iPhone.
- Step 3: Locate Erase All Contents and Settings option and enter your passcode if asked.
Fix 6. Try Another Browser
Some Apple users have successfully created an Apple ID by switching to another browser. Different browsers can take you to the official Apple ID website and go through with the account creation process. You can try Google Chrome, Safari, Microsoft Edge, Firefox, or whatever else you have.
Fix 7. Disable VPN or HTTP Proxy
Check whether the VPN or HTTP proxy is enabled during the process of Apple ID creation. This can sometimes influence the network connectivity and cause a failure to create a new Apple ID. Thus, disabling them and try again.
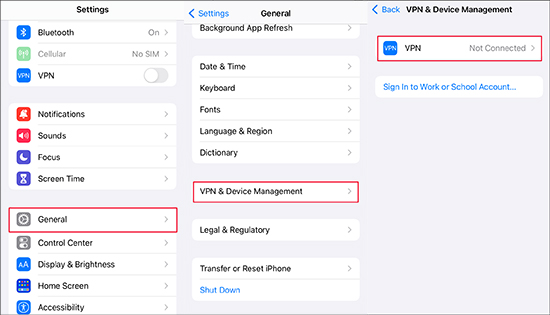
- Step 1: Open Settings on your device.
- Step 2: Go to General → VPN & Device Management to disable VPN.
- Step 3: Return to Settings screen, find WLAN, and tap "i" next to your connected network. You can now scroll down to the bottom, locate HTTP Proxy and choose Off.
Fix 8. Contact Apple Support
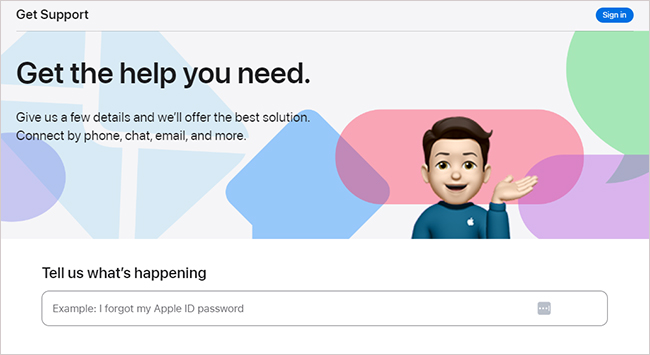
If you have tried all solutions but in vain, it’s time to reach to Apple Support. It’s feasible to visit support.apple.com to start a live chat or schedule a call. If you prefer to dial the service hotline on your country, you can check Apple Support phone number list here. You should let the support team clearly know what your problem is and tell them the email address you want. They’ll add your email address to the list of allowed emails for Apple ID creation. After that, you can refresh the page where you created an Apple ID and get everything done smoothly.
Part 4. Finisher to Cannot Create Apple ID at This Time
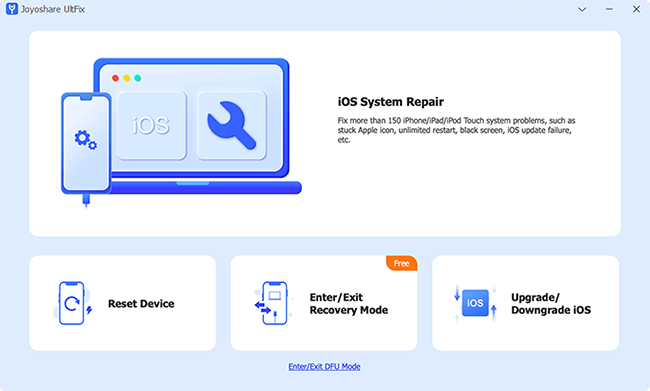
Joyoshare UltFix, acting as a great helper in fixing various iOS system issues, is designed with standard mode and advanced mode to repair 150+ problems by yourself, including potential system glitches that results in Apple ID creation failure. It is highly compatible with all models of iPhone, iPad and iPod touch, covering all iOS versions. What makes it stand out is that it is able to fix all errors with no risk of data loss, whatever the problems you come across. It also assists you to factory reset your devices in case you can't remember the password. If you want to upgrade or downgrade your iOS system, this program is a good helper. In addition, it is capable of entering and exiting recovery mode for free, which is accessible as long as your iPhone connects to your computer successfully.
Valid until Jan 31, 2025 (Monthly Plan)
Copy the coupon and paste it at checkout.
- Fix various Apple ID issues easily and quickly when you can't sign in Apple ID
- User-friendly instructions and intuitive interface make it easy to operate for all iOS users
- Deep repair mode can fix serious issues in locked or disabled iDevice
- Free enter and exit recovery mode with one click
- Downgrade and upgrade iOS to your desired version
Step 1 Open iOS System Repair
First of all, launch Joyoshare UltFix on your computer and connect your iPhone/iPad. You can choose "iOS System Repair" option in the main interface and then go straight to the next step by clicking "Start" button.
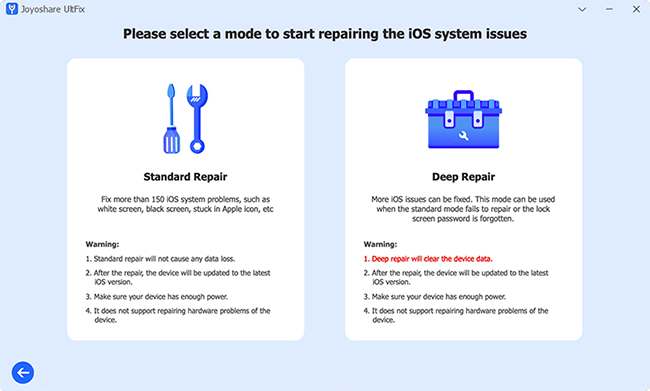
Step 2 Select Standard Repair Mode
It's better to select "Standard Repair" mode so as to protect your data intact. If device is not detected, usher it into recovery mode or DFU mode according to the operation instructions.
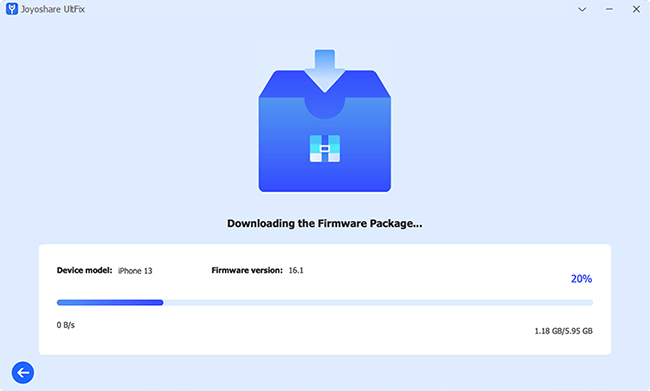
Step 3 Download Required Firmware Package
The software will show some relevant device information. Confirm them and click "Download" button to download the required firmware package and repair your device. Wait a while to download and verify it.
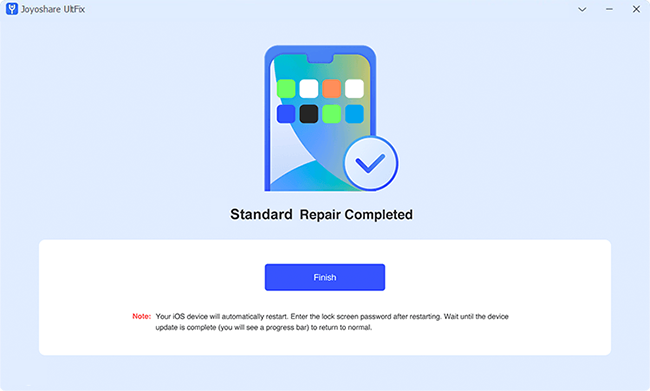
Step 4 Repair Unable to Create Apple ID at This Time
As soon as the downloading process is completed, choose "Start Standard Repair", and then it will unzip the firmware package and fix your problem automatically. In this process, you have nothing to do except waiting. After successfully repairing, it will show "Finish" button.
Part 5. FAQs about Apple ID Creation
Q1: How to create an Apple ID for a child?
A: Children under the age of 13 are not allowed to create their own Apple IDs. However, if you are a parent, a legal guardian or family organizer, you have the right to create an Apple ID for your child. Here is how to do this on your iPhone or iPad.

- Step 1: Open Settings app on your device and go to Family.
- Step 2: Tap the Add Member button at the upper right corner.
- Step 3: Choose Create Child Account and then Continue to move forward.
- Step 4: Enter your child'a name and a correct birth date.
- Step 5: Complete Apple account setup by following the onscreen instructions.
Q2: How can I create Apple ID without credit card?
A: You can select None for Add Payment Method in the payment details screen to create a new Apple ID without credit card.
Q3: What happens if I create a new Apple ID?
A: A new Apple ID gives you access to Apple's services and products, such as iCloud, iTunes, App Store, Family Sharing, etc. However, if you switch to a new account on your device, you will inevitably lose some data and purchases associated with your previous Apple ID.
Q4: How to create a new Apple ID without losing everything?
A: When you change another new Apple ID, some data loss may occur. However, you can take steps to avoid this or minimize data loss on your iPhone. Here's what to do.

- Step 1: On your iPhone, head to Settings → [Your Name] → iCloud.
- Step 2: You can see a list of apps displayed under Apps Using iCloud section. Turn off the app you'd like to save on your new Apple ID and select Keep on My iPhone option.
- Step 3: Sign out old Apple ID from your iPhone and sign in with the new Apple ID.
- Step 4: Turn on related options under Apps Using iCloud section and choose Merge.
Q5: Can I set up a new Apple ID if I already have one?
A: Yes. Even if you already have an Apple ID, you can create more. Note that each Apple ID should be associated with a unique email address.
Q6: How many Apple ID can I create on one iPhone?
A: You can only create 3 Apple IDs per device within one year. If you have reached the maximum threshold, you will be prompted with a message saying "The maximum number of free accounts have been activated". In this case, you can set up a new Apple ID on another device.
Conclusion
In this article, we talk about how to create an Apple ID as well as how to get you out of the situation where you cannot create Apple ID at this time. With all information we provide, we wish that you have gained more insights on the Apple ID creation issue. The patience you spend reading this tutorial will certainly save lots of time and effort finding solutions on your own. Finally, we feel sincerely happy that you can get rid of the trouble and thus have a better experience with iPhone or iPad.
