While creating a larger project using PPT, you may want to include videos. But one issue is that the file size of the PowerPoint can increase significantly if you include the videos with its original size. And accordingly, the larger the file size of the PowerPoint is, the more difficult it will become to share. This is when you may think of trying some tools to compress videos in PowerPoint. To help you deal with this challenge efficiently, we have prepared this guide to help you with the right solution.
- Part 1. Compress Video Using PowerPoint
- Part 2. Compress Video with PowerPoint Alternative
- Part 3. FAQs about PowerPoint Compression
- Part 4. Comparison
Part 1. How to Compress Video in PowerPoint
Compressing a video in PowerPoint is not that difficult. PowerPoint comes with an in-built compressor which you can use to compress the videos in your PPT. But there's one thing that you should be aware of. If you use it, the alternate audio tracks and embedded subtitles will be removed during the compression process. So, keep this in mind while trying to compress your videos. Now, the following are the steps that you need to check:
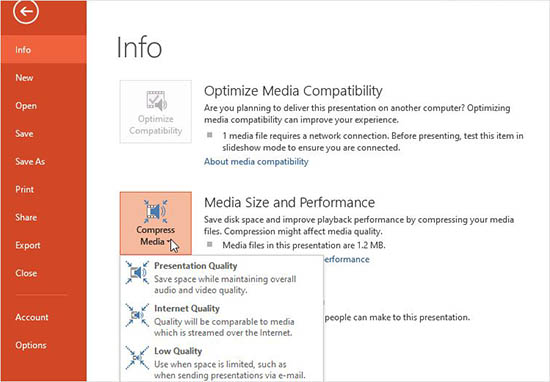
Step 1: Add the video file to the PowerPoint and then create a copy of it. Ensure you embed the video and not add the link. If you add a link to the video, that video won't get compressed.
Step 2: Now, open the PowerPoint presentation with the embedded video and click on the File tab.
Step 3: You need to click on the "Info" tab once done. When you see the Media Size and Performance section, you need to click on the tab that says "Compress Media."
Step 4: You will see the drop-down menu. From the menu, you need to choose the video quality to which you want the video to be compressed. There are multiple video quality options, for example, Full HD (1080p), HD (720p), or Standard (480p). Choose the one that suits your requirements.
Step 5: After selecting the correct compression quality, PowerPoint will start the compression process. Once done, click on the Close tab.
Part 2. Compress Videos in PowerPoint Alternatives
Since PowerPoint conversion removed subtitles and audio tracks when you try to compress it using PowerPoint, the better alternative is a video compressor that will let you compress the video and won't affect the quality, subtitles and audio tracks. The one that we recommend is Joyoshare VidiKit. It is a professional and all-in-one video toolkit that allows you to compress PowerPoint videos without losing their original quality. It lets you do batch conversions, and compression happens at 40X speed. The video you add to process can be saved in different formats.

- Compress your videos by file size or percentage
- Compress video at 40X speed
- Do batch conversion of videos
- Preview your videos before saving them
- Edit your videos and convert them to other formats
- Compress video for email, word, YouTube, and more
Step 1 Download Joyoshare VidiKit and Launch Video Compressor
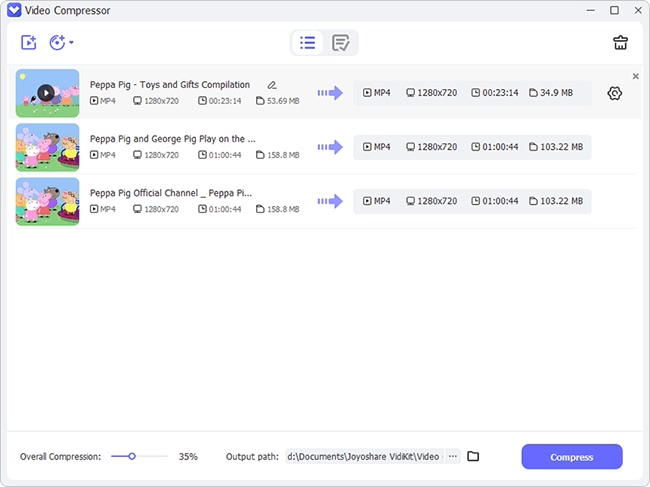
First, visit the official website of Joyoshare VidiKit and download the correct version depending on the OS of your computer. Then, launch the tool and click on the "Convert" tab to enable Video Compressor. Once done, click on the "Add Files" tab to add the video/videos.

Step 2 Prepare Video/Videos for Compression
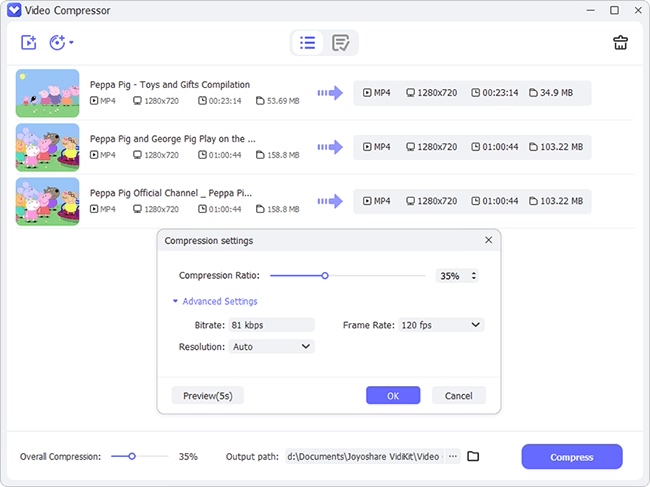
When the video gets uploaded, you will see its thumbnail, resolution, duration, and size. If you don't want to do anything manually, just click on the "Compress" option, simply adjusting the compression degree. Or you can click on the "Edit" option and edit the file size.

Step 3 Begin Compression Process
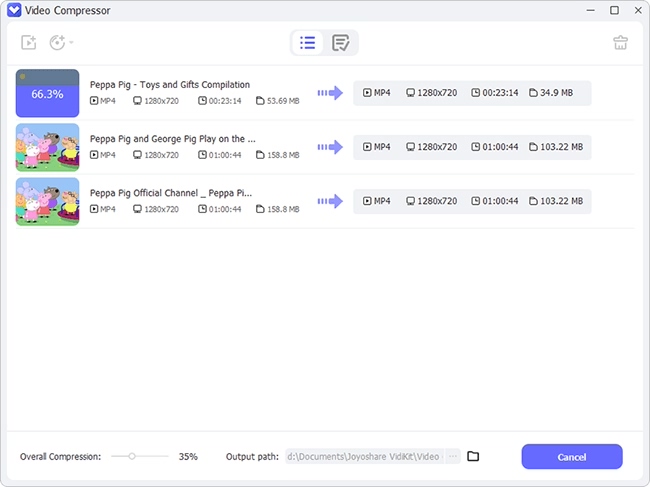
Go to the "Output" tab to choose the location for the compressed video to get saved. Click on the preview option to check the quality of the video. Once done, hit the "Compress" tab. Then click on the "History" tab to find the compressed video.

Part 3. FAQs about PowerPoint Compression
1 Does PowerPoint have a file size limit?
Yes. If you embed a media file to PowerPoint, there is a size limit. It can be from 50MB to 100MB. For WAV files, the file limit is 100KB. Keep the restriction in mind and don't insert large media files in PPT.
2 How to compress PowerPoint file for email?
If you want to share a PPT file to an email ID, just compress the video using PPT and once the video size reduces and you see the overall video size reducing, just share it with the person you want to.
Part 4. Comparison:
You can now better learn the differences of compressing videos in PowerPoint or using Joyoshare VidiKit Video Compressor:
| Program | Joyoshare VidiKit | PowerPoint Compressor |
| Operating System | Windows, macOS | Windows, macOS |
| Supported Formats | MP4, AVI, M4V, MPG, MPEG, MKV, 3GP, 3G2, MOV, FLV, VOB, OGM, OGV, ASF, TS, WMV, RM, M2TS, RMVB, WEBM, and more. | MP4, M4V, MOV, MPG, MPEG, WMV |
| Parallel Task | Yes | No |
| Quality | Retains original quality along with background sound and subtitles | Removes background sound and subtitles |
| Price | Starting at $15.95 per month | Free |
Conclusion
Now, you know how to compress videos in PowerPoint using its built-in compressing feature and third-party dedicated video compressor - Joyoshare VidiKit. As explained using an alternative is a better option because it gives you more option to compress the video the way you want. This brings you great convenience especially when you'd like to reduce file size of multiple videos at the same time.
